The joy of spoon carving
Words: Greg Miller
Photos: Greg Miller and Mike Ford
Spoon carving is a rapidly growing pastime in Australia, following a few years behind its massive popularity across North America, the UK and many other parts of Western Europe. A quick look on the internet will show a wondrous array of spoons and inspiration, reflecting the level of interest in this craft.
Wooden implements have been used for cooking and eating throughout human existence. Spoons can be functional, decorative and symbolic. Some are heirlooms handed down for generations. Most kitchens have at least one wooden spoon and often more. In the Scandinavian cultures, households traditionally had a spoon rack, holding each person’s eating spoon for everyday use.
Handmade spoons seem to have a life of their own. Making them is a delightfully creative activity. It’s easy to get hooked.
Why green?
What is the difference between spoon carving in seasoned wood versus green wood? When carving seasoned wood, we generally look for straight grain in the piece of timber. Seasoned wood is harder, so some of the techniques will be different. Wood is softer when it is green, so it’s easier to carve, and we can also use wood with interesting curves in order to create spoons with non-linear shapes.
Split not sawn
In the green woodworking tradition, wood is split rather than sawn. Splitting the wood along the grain, along the line of the fibres, is also known as riving or cleaving. This gives superior strength by reducing the incidence of short grain and grain runout. In green woodworking, we commonly carve across the grain, rather than along the grain. Green woodworking necessarily pre-dates dry wood woodworking. The combination of ancient skills and knowledge, simple tools, and wood fresh from a tree all come together in green woodworking. Below are the basic steps to get you from raw material to finished spoon.
1. Start with a piece of tree

A hard, dense timber is ideal for durability and will give a clean finish off the knife. Straight pieces can be used, and strategic bends and curves can utilised in those which aren’t.
2. Cleave the piece in two, through the pith

The pith must be excluded as this will usually be the source of splitting or shakes. A bend in a spoon will be obtained from a bend in the branch section. At any fork in the branch, the pith also forks. This too must be excluded, so the placement of the froe needs to reflect a careful selection of the desired path of the split. Start from the top end of the branch section, to better control the split.

Hopefully, it will split down the line of the pith to its junction and again down that line to the base. Of course, sometimes the material has another idea!
3. Use the axe to remove much of the waste

Use a nice sharp carving axe on a block to face off the pith side. This would be a good time to draw the planned outline of the spoon’s shape.

The axe will quickly remove much of the waste from the handle area and around the bowl. The more axe work, the less knife work needs to follow.
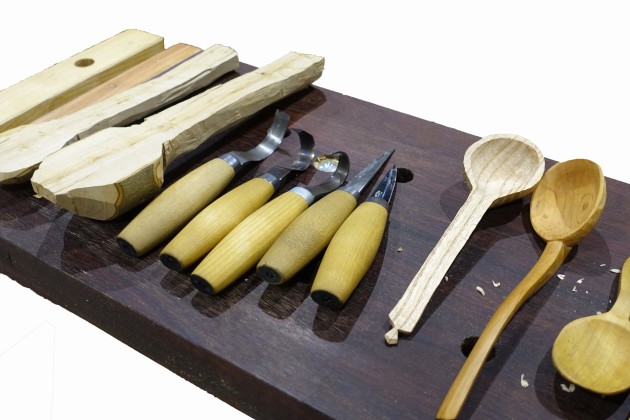
4. Use the sloyd knife to further refine the overall external shape

The sloyd knife is a Scandinavian carving knife with a straight blade. With a longer blade and a skewed cut, slices of material are quickly removed from the handle area (photo 6), while a closer hold and short controlled cutting action will commence the outer shaping of the bowl and the transition between the bowl and the handle. While not completing the external shape of the spoon, we have now created a shape which fits firmly and comfortably in the hand while we carve out the bowl. Some people may like to use a drawknife and a shaving horse to do some of this initial shaping.
5. Use hook knives to hollow out the bowl of the spoon

Hook knives come in assorted radii and styles – left handed, right handed and double-sided. The curved blade is designed to remove the waste from the bowl and do the final clean cut. Most of the time the hook knife is used across rather than along the grain. In this way it’s less likely to bite into the changing grain direction at the base of the bowl. Finish the inside of the bowl with nice clean paring. Ensure blades are razor sharp for the cleanest cut.
6. Use a shorter detail knife to complete the outer shape

This is the final stage where the finish texture, profile, curves and transitions are completed, including any finials and other details.

You might choose to complete the spoon with an ‘off the knife’ finish. However if you choose to sand the spoon, you will need to dry the spoon first. Sanding green wood will just clog the abrasive paper, as it won’t create loose dust.
7. Dry the spoon
The thinner the spoon, the quicker it will dry. Wood is always seeking to be at the same moisture content as the air around it. Moisture escapes from the endgrain faster than through the side grain, so we seek an even rate of drying throughout to reduce shakes and other degrade. For this reason it’s best to let spoons dry slowly, away from radiant heat and out of the wind or draughts.
If the wood feels cold on your cheek, water is still evaporating from it. An alternative is to use the microwave to speed up the drying. Using short bursts, and allowing the spoon to cool down between bursts, you can reduce the drying process from days to under an hour. You can also destroy your spoon and even set fire to it, so care needs to be taken. The length of the bursts required will vary depending on the species of wood and other variables.

8. Finish the spoon
With the spoon dry, you can now sand it if you wish and apply a finish. Most food safe oils are generally plant-based natural oils. Do not use lacquers, polyurethanes or waxes. Finishing the spoon with penetrating oils not only makes the spoon look like a million dollars, it also helps to preserve and protect the wood.
9. Managing your material
Green woodworking revolves around the availability of the resource. When a nice piece of green wood comes your way, make sure you seal the ends to slow down the rate of drying and degrade. A waterproof PVA glue, like Titebond III, is a fantastic end sealer and it dries clear, which is important for choosing your line when you are going to cleave it through the pith. The wood will wait a few weeks for you if you leave it in a cool shady place out of the wind. You can seal it in a plastic bag also, though surface mould will eventually form. Alternatively, do the initial shaping for your spoon blank, put it in a plastic bag and then into the freezer. It will keep for years until you are ready to defrost it and start carving.
Spoon carving with green wood is a wonderfully creative process, each piece of wood a lovely gift from the tree just longing to be given a new life. It is an activity which re-connects us with the tree, with ancient traditions, and our inner need to be creative in a very tactile way.
Sitting in a chair doing the knife work lends itself perfectly to being a social activity, with spoon carving groups springing up in many places. What a pleasant way to build community and honour the trees!
This article is republished from Australian Wood Review issue 88.
Greg Miller is a cabinetmaker / joiner who lives in Perth and teaches woodworking skills to people of all ages. Learn more at www.thejoyofwood.com.au