The biscuit (joiner) is back

There are many reasons why you can rely on the functionality of the biscuit joiner, explains Raf Nathan.
In 1956 a Swiss carpenter, Hermann Steiner converted an angle grinder to make simple joints for panels made from a then-new material known as chipboard. Later on, Lamello was the name he chose for the 1968 release of the first portable version of a quick jointing tool.
When Festool released their domino tool in 2007 it was a game changer. The actual technology had been around for years in heavy joinery machines but packaging it in a handheld power tool was an innovation. I sold my biscuit joiner and converted to dominos and have never left them. But recently, I’ve come back to the biscuit.
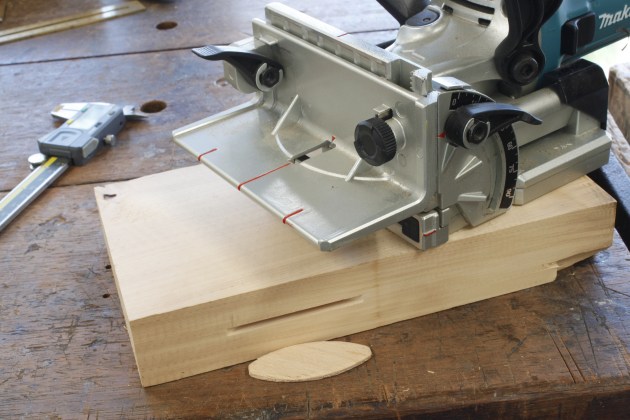
1. With the extra fence fitted slots can be cut in various thicknesses of wood.
The joiner
The motor in this tool is housed in a barrel driving a 100mm diameter TCT tipped, 4mm thick sawblade – actually on my calipers it was 4.16mm thick. Plunging the tool leaves an arced slot that accepts manufactured wood joiners called biscuits – hence the name biscuit joiner, although plate joiner is also used. The fence and depth adjustment system set the height of the cut and depth.
The biscuits
The biscuits are compressed slightly and usually made from beech. Biscuits are 4mm thick and available in three main sizes – #0 at 47 x 15mm, #10 which are 53 x 19mm, and #20 at 56 x 23mm. This offers a range of widths for different workpieces.

2. Marking out for a shelf.
The grain direction of the biscuit is angled slightly to avoid short grain weakness at the sides. When the glue and its moisture make contact with the compressed wood biscuit it expands making for a tight joint. Normal times for letting the wood glue cure still apply. This system is perfect for manufactured boards like MDF and ply, but also suits real wood joining very well.
Brand selection
A good biscuit joiner will have around 700 watts of power, several depth settings for the different sized biscuits, a facility for being used on mitres, a good right angle fence with height adjustment and a dust outlet. Cordless tools are available now which is great, but if you are plugging in a dust extractor hose (a good idea) then you may as well have a cabled tool.

3. With the shelf clamped down along the pencil lines, the lower edge is the reference face.
I have a Makita joiner at the moment and it is very good. Previously I have trialled other tools and found the DeWalt also very good but the best is the Lamello, being the real deal. They have several versions all very well made at different price points. Don’t get a really cheap tool as I have found they are problematic, for example the blade and base and fence may not be parallel, making good flush fitting joints impossible.
In use
You can use a joiner for edge joining, shelves, mitres and small cabinet doors. Basically you butt the two mating pieces of wood together and strike a pencil mark where the biscuit slot will be. Use the mark to centre on the pointer of the tool and make the cut. It all comes down to referencing from matching faces to achieve flush joins.

4. Cut the slot in the end of the shelf.
For better results the biscuit joiner works with the base of the tool on a flat surface. The weight is down and the joiner is plunged into the wood. This will position the slot centred for a 20mm thick board or panel. Placing shims under the base will raise the slot for thicker pieces. But this is only for shorter lengths of material. Swing the fence flap down and rest this on top of the wood, and use that face for referencing the position of the slot.
The extra adjustable right angle fence slides onto the main fence and allows height adjustment for materials thicker than 20mm. On the Makita and Lamello the extra fence slides on to the main fence and allows good height adjustment for wood that’s thicker than 20mm. On the DeWalt the fence is more sophisticated and offers all the functions as a one-piece unit (photo 1). All machines also come with an extra plastic clip-on base that allows you to cut wood 12mm (or 12.5mm on some machines).

5. Showing the finished joint.
Pros and cons
Within a minute or so you have a good clean joint strong enough for shelves and panel cabinets. Standard cabinetmaking rules apply still in relation to the length of a shelf in relation to the expected load and strain on the joint.

6. Cut slots for mitres with the point angled down.
The thing is biscuit joinery has strength limits – perfect for manmade boards in say kitchen cabinetmaking, it will not be sufficient for a table leg to rail joint. And the same goes for chairs or any heavy work. Using biscuits for drawer making is a borderline option – most of the drawers I made this way stayed together.

7. Biscuit joinery is ideal for mitre joints.
However, there are various metal and plastic fittings available for knock-down and fixed joints giving enormous strength. Usually these comprise of two parts that mate and act as clamps as well. Composite biscuits are also used for manufactured stone joining. However we are only looking here at standard wood biscuit joining.
Shelf or T-joint
Mark the position of the shelf and mark a line on the lower face of the side (photo 2). Put the shelf on the pencil mark and clamp, the lower edge is always the reference face (photo 3). Cut the slot in the side. With the lower face
of the shelf face down, cut the slot in the end (photo 4). Photo 5 shows the finished joint.

8. Biscuited corner joint.
Mitres
This works best on panels with the mitre point down (photo 6). The quality of the mitre will depend how accurately you can cut the slots. Small deviations that obstruct the mitre on a dry test fit can be helped by taking a shaving off the biscuit to give it a bit of play. The biscuits suit frames made from stock at least 45mm wide (photo 7). For small cabinet doors I have found biscuits will yield lasting results, however in my doors I glued a plywood panel in the door frame so the whole assembly is rigid.
Corner butt joint
For basic cabinet work with solid or manmade panels biscuits are good for corner joints (photos 8, 9). Examples are melamine panels or veneered MDF cabinetwork.

9. Showing the slots cut for a corner joint.
Edge joining boards
Biscuit joinery is a great use for tabletop making as the biscuits align the top edges almost perfectly (photo 10).
I am not a big fan of gluing the biscuits fully in this application. An air-dried oak tabletop I made using glued biscuits had, after quite a few years, opened up a tiny bit on the joint line only where the biscuits were located. The rest of the glueline was perfect. In this case I guess the air- dried wood shrank in widtht, which is fine, but the biscuits with their angled grain direction couldn’t move along with the rest of the wood. So now I would only glue half of the length of the biscuit, to cover myself.

10. Biscuits can be used to align boards for tabletop or panel glue-ups.
Table clips
Fixing tabletops is made easy by biscuit cutting the slots for the clips (photo 11). Adjusting the depth between two cuts you can make say an 8mm slot that suits a shop made table clip. Metal clips from trade suppliers fit pefectly in the joiner’s 4mm slot.

11. Multiple biscuit joiner slots can be used for fitting tabletop buttons.
Mitre keys
With the tool sitting on top of a mitre it can be plunged into the wood and cuts a fairly neat slot for a key (photo 12, 13). It is not a super accurate way to cut these and the blade is exposed at one point so I only use this method occasionally.

12. Using the biscuit joiner to cut slots for mitre keys.
As you can see, there are many good reasons to include the biscuit joiner in your tool kit. They are simple and fast to use and the biscuits themselves are quite inexpensive.
Raf Nathan is a furniture designer and maker who lives in Brisbane. Learn more at www.interwoodshop.com.au

13. Now it’s a matter of gluing in filets of wood and trimming them off later.