Synergy

Words and photos: Robert Howard
Evolution is central to my way of designing. Each of my designs tends to be an extension or variation of a previous one. Every now and then I do manage a new idea, usually stimulated by some chance outside influence, and this opens up a new evolutionary path in my work.
I have always seen design as a two part process. First, I have an idea. Second, I must make that idea work. The first part is the mysterious one and, to a large extent, our ability in this regard may well depend on how well we chose our parents.

I think our aesthetic sense is well and truly established by the time we pick up our first woodworking tool, and there isn’t much we can do about that, except perhaps develop and refine it. The criteria for good design are as old as design itself, and involve the classic ideas of proportion, harmony, line, form, integrity, balance, and so on. Fortunately, these do not depend on the accident of birth, but can be learned.
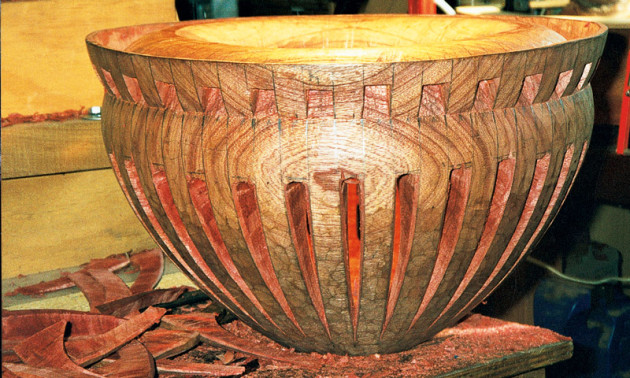
‘Synergy’, the piece shown above, is the end result of one of the evolutionary paths in my work—what I refer to as my geometric series of bowls. All of these consist of a fairly classic form with the wall carved into a series of geometrically arranged flutes on both the inside and outside surfaces.
The main challenge with these bowls has not been the design, but rather the technical problem of carving them (which is also a psychological problem—being able to endure the tedium). I don’t think anyone would be mad enough to try to carve a bowl like this without building up to it through a series.
It is a big bowl—about 500mm across by over 300mm deep—and required a big piece of Australian cedar. To get the wood I bought an entire tree, about one metre across at the butt and 3.4 metres long. This was chainsawed into 12 blocks. The wood was sopping wet and the most extraordinary red colour I have ever seen in cedar. I carve all my wood wet. This reduces the stresses in the block (the equivalent of woodturners rough turning blocks and setting them aside to dry) and, because the bowls take so long to make and are thin walled when done, by the time I have finished carving they are dry.

I tried to turn the bowl form to save time, but the results were a bit comical to say the least. I didn’t have the lathe bolted down, and the lowest speed on it was too fast for such a big, out of balance block (photo 1). I was almost reduced to chasing the lathe around the shed, so bad were the vibrations. Even when it was running fairly true, it still vibrated badly. Either way, it defeated me. I’m a carver after all, not a bloody woodturner, I said to myself!

Carving a bowl like this is a very logical process. First I had to carve the underlying form before cutting the openings and then the individual flutes or straps. I began by marking the internal opening and carving a deep hole into the block. A generous allowance was left for the doughnut top on the inside wall where it would be undercut. The top of the doughnut was then formed and, in the process, the inside of the outer lip of the bowl. Using the top as a guide, I continued rounding the doughnut by carving the inside lower corner as well (photo 2).
With the inside taken as far as I comfortably could, I turned my attention to the outside. First, I carved out all of the lumps and bumps caused by my turning, truing up the form and establishing the intersection line where the straps penetrate through the wall. Then I refined the outer lip.

This was as far as I could take the basic form. The doughnut was not completely undercut on the inside, and the wall was still very thick—up to 75mm immediately under the doughnut. There simply wasn’t enough room inside the bowl to do any more. I resigned myself to the fact that the rest would have to be carved from the outside, through the gaps between the straps.
Marking out the straps was a fiddly process. I decided on a strap width of about 25mm with an equal gap between them at the rear. By trial and error I found this gave me 31 straps and 31 spaces. The straps tapered slight-ly to meet just above the bottom, and tapered slightly towards the inside of the top loops. These loops were separated by a 5mm gap on the inside of the doughnut, and spiralled slightly so that each strap emerged through the gap between it and the strap adjacent to it (photo 3).
I now began cutting holes to separate the straps. Taking care not to blow out the short grain when the drill exited the wood, I drilled holes in all of the gaps, offsetting the holes above the line of intersection by one gap from those below the line.
Using a chisel, I carefully squared up the holes on the outer lip, leaving the lip intact for strength (photo 3). I left a comfortable amount of excess wood on each strap, in anticipation of the bruising that would inevitably occur when I worked through the gaps carving the inside of the loops and the bowl wall.
This excess would be carved off at the end to clean up the strap edges and ensure an undamaged surface. The bottom gaps were roughsawn with my trusty Festool jigsaw. The size of the cutout pieces lying beside the bowl in photo 4 indicates the wall thickness at this stage.
With the holes cut in the outer rim at the top, I could now see exactly how well (or badly) I had estimated the form of the strap as it continued through the hole, and make any necessary adjustments. Using a hand saw to make careful angled cuts at the top of each of the lower holes, I continued the line of the straps up to the intersection line and chiselled away more waste, taking care not to cut into the lower part of the doughnut inside the bowl. Then, working through the holes, I roughed out the bottom of the doughnut, and cut some of the thickness away from the lower straps, reducing them to a triangular cross-section, but still a long way from their finished size.
The loops in the doughnut were separated in three stages. First, with careful use of the hand saw and carving chisel, I cut out a triangular hole between the top halves of each loop. Before I could cut out the underside I had to finish marking it out. This was possible now that I had finished roughing out the underneath of the doughnut. I wrapped a flexible piece of plastic around the bottom of the doughnut to join the two ends of each line and traced the line with a pencil. Because of the way the straps spiralled, these gaps could not simply be cut through from top to bottom with a saw.

The second stage of separation once again involved careful use of saw and carving chisel to cut a section of the gap on the inside of the doughnut (photo 5).

The final stage was a rather messy affair, chiselling through the gaps as shown in photo 6.
I now had to confront the most difficult part of the carving: hollowing out the loops. This was complicated by the fact that the grain direction changed as I worked my way around the bowl. At two points there was pure short grain, at two there was pure long grain, and at four others half and half with two sloping to the right and two sloping to the left.
There was no elegant way to remove the wood in the centre of the loops. It was simply a matter of cutting, picking and scratching at it with whatever tools seemed best able to do the job. Some measure of the difficulty can be gauged from the fact that I averaged (and this is just to rough out the holes) four loops a day. The entire bowl was now roughed out. All I had to do now was refine the form—or, in other words, do it all again, more carefully, and to a higher degree of finish.

In order to finish the inside of the bowl at the bottom, I made up a long handled small gouge to give me the necessary reach while working through the gaps in the bowl wall. I used this with one hand inside the bowl, one outside. The gouge and the finished triangular strap cross section can be seen in photo 7. I left the tool marks on the inside of the bowl.
Next, I carefully cleaned up the inside of each loop, then cut away the bruised edges of each strap and reduced them to their final width. Because of their triangular cross section, this trimming changed their thickness in variable ways, so I then had to retrim their thickness as needed.
With the loops cleaned up, I moved on to the lower straps, trimming them to their final width. I also cleaned up the lower points of each of the gaps. As with the loops, reducing the width of the straps, because of their triangular cross section, also changed their thickness, and this had to be readjusted.

So far I had worked the loops on the one hand, and the lower straps on the other, and in doing so had managed to avoid dealing with a particularly difficult lump of wood lodged in the gap where one joined the other (photo 8). With all of the other wood out of the way, I was now able to pick this away.
As an aside, this bowl taught me a lot about my carving tools. I was thankful I was a bit of a collector and had such a variety to choose from (about 200 I think), because it was the odd ones that saved me on this job. In particular, I learned the value of skew chisels. When you have to cut in a particular direction (because you are working in through a hole, for example) regardless of grain direction, a skew chisel can dramatically reduce, if not eliminate, the adverse effects of bad grain.
The skewed edge means that the chisel effectively cuts at an angle to the direction in which you push it, thus improving your choices from one to three directions: straight ahead with a conventional flat chisel, to a left or right skew angle depending on which skew chisel you use (left-hand or right hand). I also had left and right spoon skews. I also learned that skew chisels with one bevel were more useful than those with two, offering two different angles of attack instead of one. The downside is having to buy two separate tools to get the left and right hand skews.
Before I cut away the small section joining the straps at the outer rim, I sanded all of the surfaces I intended to finish sand down to 400 grit. When the sections were finally cut out to separate the straps, the bowl became, in effect, a giant spring. The straps were securely joined at the base but, after that, were only joined by the small 8mm square section where the straps touched each other as they intersected. Polishing it—in particular, rubbing it back between coats—became a bit of an anxious procedure.
The bowl took the best part of three months to complete and, to this day, remains unchallenged amongst all the bowls I have made for sheer energy-sapping tedium. Doing every little thing either 31 times or 62 times (left and right, or inside and outside, each 31 times) was certainly mentally challenging.
Robert Howard is a contributing editor to Australian Wood Review who also teaches woodwork classes, see roberthoward.com.au