Searching for form
Using models can allow you to develop forms. Photo: Eric Ahlstrom
Words: Robert Howard
If you have been a woodworker for a reasonably long time you will have learned some things about yourself. We are all unique combinations of physical and psychological attributes, some of which work for us, and some of which work against us. I, for example, love puzzles, and can become quite obsessed with solving them. I am also in some respects a perfectionist. Under the right circumstances, these two personality quirks combine to make me endlessly patient.
I have been delighted to discover that making and using models to develop and refine the designs for my carvings is one of those right circumstances.
It might seem a stretch to call the design of a carving a puzzle, but the process of turning a rough idea, or
a drawing, into the very best three dimensional version of itself, is indeed an absorbing and fascinating puzzle that has to be solved. The challenge, at least for me, is to develop the form so that it is as beautiful as I can possibly make it from every viewpoint.
For most of my career I have dived directly into the wood, making the form up as I went, to a design that was usually little more than a rough drawing, and often enough not even that. The price I paid for that is that I have let work go into the world that was not as good as I would have liked it to be.

The original ‘ribbon’ bowl form carved in 2002. Photo: Greg Piper
Twenty years ago, in 2002, I had the idea to make a ‘bowl’ form out of a ribbon. Without using models, I made one which turned out reasonably well (shown up top), and then, because I wasn’t entirely happy with it, I immediately refined it in a second attempt. I returned to the idea in 2010, with a very different form, and again without using models.

The first version of the ribbon bowl was immediately refined. Photo: Greg Piper
It is always difficult to visualise what a proposed three dimensional, curved form is going to look like in every aspect. In this case, as I worked around and around the form shown below while carving it, I could see it turning out exactly as anticipated in all respects except one. It was with a growing sense of alarm and dread that I realised there was one important angle of view that I did not like at all. And worse, by this stage I knew there was nothing I could do to correct it.

Another later refinement of the ribbon bowl. ‘This is the view I was unhappy with and wanted to change.’ Photo: Richard Waugh
Being the perfectionist that I am, these ‘almost but not quite’ carvings nag at me after I have let them go, and this one has nagged enough to cause me to have another go at it. This time, however, I was determined to make as many models as necessary to get it right before I began the final carving.
Model materials
My previous attempts at making models were frustrated by the lack of an ideal material to use to make them. Wax and clay were the traditional choice of sculptors, and I did try wax but found that it was not strong enough to hold my forms.
It needed the added strength of a wire armature inside the wax, but thin walled, complex forms made their construction too difficult for me to contemplate, particularly when I knew I would almost certainly need to alter them as the work progressed. I don’t remember how or when I discovered jelutong, a native wood of South-East Asia, then mostly used in the pattern making trade, but it quickly became my favourite modelling material. It is available in good sizes (e.g. 300 x 80mm boards), carves like butter, and is a pale, creamy colour with no distracting figure. It is soft, not strong, and doesn’t take fine detail, but it works beautifully for my forms.

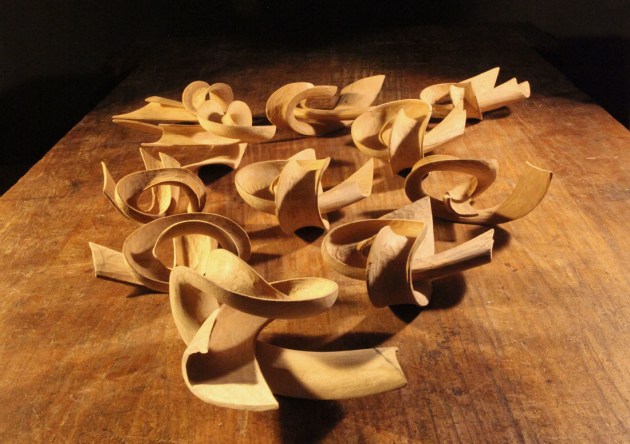
‘I decided to add a twist to the ribbon as a way of introducing more movement and also put more curve into the width of the ribbon to make it stronger and less flexible. I maintained this strategy throughout the 11 models.’ Photo: Robert Howard
So far I have made 11 models to develop this new form. When you look at them you can see that I learned a lot about making the models, as well as about the form I was modelling. They started out very rough, just developing the structure and lines of the form. When you look at them, and you see the dramatic difference between the first and the last, you need to remember that when you look at, say, No. 3, that No’s 4 to 11 did not exist when it was made. And this is the point: I had to look, and look, and look again, and think very hard, and slowly, slowly make the changes that allowed me to creep towards No. 11.
Because each model was carved from scratch and I am not a robot, some things I meant to change, but even where I didn’t intend to make changes small differences necessarily occurred. Also, I did not have this article in mind when I made the models, so the process was not entirely linear. Sometimes I backed up and did some further refining to a previous model, before moving on again.
As I became more familiar with the modelling process, and began to refine the models more, I learned how the form worked. As I worked through the models, the changes I wanted to make became more subtle, and I needed to know what I could do to create a particular change, and how it would appear from all the other viewpoints. You can’t do this purposefully if you don’t know the form.

Means to an end
Finally, a word about tools. I have used rasps all my life. When I was a child on a farm, my father’s rasp was a tool I used a lot to make toys for myself. By the time I was making rocking chairs I had graduated to my #49 and #50 Nicholson pattern maker’s rasps, which were a revelation. For these models I have gone a step further, with my Auriou 15G 150mm modelling rasp for the final refinement of the surfaces. Jelutong and this rasp are a match made in heaven.
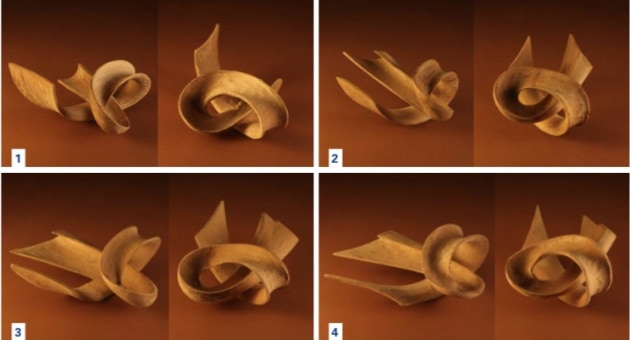
After a number of false starts, I decided the best way to show the development of this carving was to photograph each one from the same angle so you could see the progression. You will notice a few break lines in some of the carvings. Most are the result of dropping them on the floor. A couple might have happened by pushing too hard when I was carving. In a couple of other places I have cut bits off and glued on larger bits rather than making a new model to effect the change.
When you compare the first and last models in this sequence, it should be obvious that this is a process you can use to develop the design of anything you might want to make.

It will work for furniture as well as carving, although the model making process will be different in that you will assemble, rather than carve, your miniature piece of furniture. Because it is much easier to work with shapes and forms that you can actually see rather than imagine, I think you will be surprised by how much you can improve your initial ideas by making a couple of models. Be prepared to push through any initial blockages though. It can be too easy to give up too quickly. I do believe that if you are patient and persevere, you will be well rewarded.
Robert Howard is a woodworker and sculptor who lives in Brisbane. He teaches regular woodcarving classes from his studio. Learn more at www.roberthoward.com.au
Robert Howard