No glue, no screws: self locking joinery
Words and photos: David Luckensmeyer
Diagram: Graham Sands
A client wants to cellar thousands of bottles of wine in a small space. Wine racks must store bottles efficiently, horizontally and preferably individually. The joinery process has to be quick because there are so many joints. Rack designs must be robust as the weights involved are surprisingly large. What’s the best design solution?
This was a real scenario for me. I needed a joinery technique that could be reproduced thousands of times and which was inordinately strong. I estimated that the cellar space could hold at least 1500 bottles of wine. At individual weights of 1.2–1.6kg, such a volume of wine weighs 1800–2400kg.
Besides the aesthetic and engineering concerns, there were two further constraints. First, as with all furniture destined for confined spaces, the racks had to be assembled in situ, otherwise they would not fit through the doorway. That meant no glue. Second, cellars designed for long-term storage are temperature and humidity controlled, ideally at 12–14°C, and 70% humidity (for good cork health). That meant either expensive fasteners (e.g. stainless steel screws) or joints which did not require any.
1. Essentially just a series of interlocking half-lap joints where accurate machining and gravity keep the joint together.
This scenario is resolved by using three-way joints that assemble easily and hold without glue or fasteners. I made the joinery using machinery and tooling commonly available to most makers. Obviously, building wine racks is not a commission that comes along every day. But the design constraints and the solutions shared in this story serve other scenarios, from bookcases and étagères, to shoe racks and lattice work (photo 1).
Design considerations

2. A prototype confirmed a horizontal bar spacing of around 200mm was perfect. Here the horizontals are 12mm here but larger at 20mm for the final design.
Wine bottle dimensions are fairly standard. Most 750ml bottle shapes are between 300–330mm in height, and have diameters of 75–80mm for riesling, around 80mm for Bordeaux bottles (e.g. cabernet sauvignon, sauvignon blanc), 85–90mm for Burgundy bottles (e.g. pinot noir, chardonnay), and 90–95mm for Champagne (and sparkling). Rack sizes need to cater for these dimensions (photo 2).
Large shelf spaces maximise storage as wine bottles can be stacked together. But this makes extracting wines difficult depending on their locations. And have a care about loading shelves too heavily! By contrast, individual pockets are user-friendly but deliver a waste of space along with the convenience. Drawers on runners are the least effective. The best designs cater for a mix of storage spaces.
I chose to build wine racks with 310mm deep pockets sized at 100 x 250mm. Row heights of 100mm cater for all 750ml bottle diameters. Column widths of 250mm allow for side-by-side bottle storage of three by 80mm diameters in a bottom-first orientation, or three by 95mm diameters in a mix of two bottom-first and one neck-first orientations.

If cellar space permits, consider a double-deep arrangement whereby wine bottles are stored in tandem. My double-deep rack is 630mm deep which is able to store all bottle sizes including the taller rieslings. I used 20 x 20mm hardwood throughout. For a seven column double-deep wine rack (1970mm wide), each 250mm pocket holds six bottles of wine (three in front and three behind) for a total of 42 bottles per row. With 21+ rows on offer, that’s over 900 bottles of wine storage for that rack alone.
By reducing the number of uprights, and adopting a design that accepts three bottles per column width instead of one, I’ve significantly maximised storage efficiency. But now the strength of the rack becomes more important than ever (fig.1).
A machine-work mindset
The scale of the project becomes evident quickly. Just the double-deep rack described above, with 21 full rows, two partial rows (due to the vaulted ceiling) and seven columns has 32 uprights, 180 front-to-back cross pieces, and 92 horizontal bars. That’s 720 intersecting three-way joints and 3,600 dado cuts. The total commission has in excess of 7000 dado cuts in total. Marking out and making that many joints by hand is just not feasible on larger projects like this.
A ‘machine-work mindset’ means taking commercial quantities of timber and accepting the finish achieved straight off the machines. It does not mean cutting corners or doing shoddy work. Where possible, use sharp blades and slower feed rates. If your thicknesser produces snipe, leave your product extra-long so you can cut it off. There is no possibility of hand-smoothing surfaces by plane or sandpaper later. Mark faces, keep sawn ends together and stack consistently so you can track machined and non-machined surfaces.
Most of us are in the habit of optimising workflows to minimise machine setups. Machine-work makes this optimisation essential. All pieces must be identical and therefore treated identically. Cutting 80 sticks to length only to find you needed 90 introduces greater possibilities for error. Dealing with the subtle differences during assembly is an exercise in frustration. Learn from my mistakes and make more than a few extras.
The material used in the wine racks is uniformly 20 x 20mm. Variables are reduced by standardising the stick size and dado depth. I machined timber to 22mm, ripped boards into 22mm thick sticks, and went back to the thicknesser and machined all four surfaces (1mm at a time) to achieve my final 20 x 20mm stock using the same setting on the machine for the final thickness. Likewise, dial in the dado width and depth and cut all joints with these settings. Digital calipers are a must for good machine-work outcomes because success or failure is often measured in tenths of a millimetre.
Joinery details

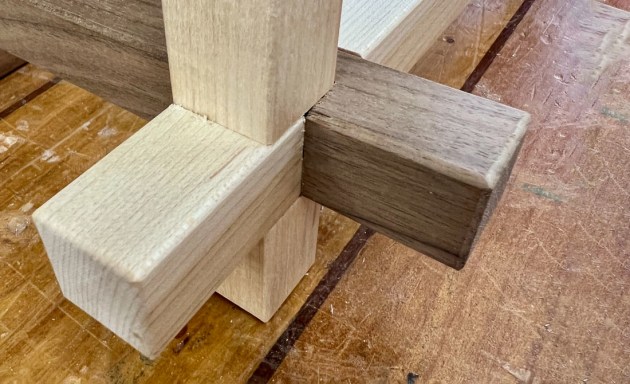
3. The uprights take the most weight so they have only one dado cut per intersection to keep as much material as possible.
The joinery for the three-way joint is rather straightforward and related to a castle joint. The uprights have a 20mm wide x 10mm deep dado cut (half-lap) at consistent intervals to set the row heights at 100mm (photo 3).

4. In this smaller rack, the offset dado is already machined and ready to accept the locking horizontal bars.
The front-to-back cross pieces are machined at four points along their lengths, with an identical 20mm wide x 10mm deep dado cut. These are the other halves of the intersecting joints with the uprights (hence the name ‘half-lap joint’, photo 4).

5. The additional offset dado is what makes the three-way joint work – the remaining material is 10 x 10mm, only a quarter of the cross-section.
These cross pieces all have four additional dado cuts, machined on an adjacent face, and offset by 10mm. The offset design is critical because without it the two dado cuts would sever the horizontal bars altogether (photo 5).

6. Assembly is straightforward with careful attention to keep joints aligned.
After the uprights and front-to-back cross pieces are assembled (American hard maple), the horizontals (American walnut) are put into place first by sliding onto the uprights, and then sliding down so they engage the offset dados on the front-to-back cross pieces. Gravity ensures each joint cannot separate unintentionally (photo 6).
Beyond a passing comment here or there, I have not detailed the workflow used to achieve the three-way joint. There’s a good reason for this: if you have a large sliding tablesaw, equipped with digital readouts and incremental programming for the rip fence, my workflow would be of relevance. Otherwise, you will need to devise and adopt your own methods for achieving precision and consistency, whether with a slider, crosscut sled, or hand tools.
In general terms, the width of the dado must match the material’s dimensions. You can dial in the dado height (exactly half the material’s thickness) with test cuts. For the intervals, adopt a machine-work mindset and process the entire project at once. Cut everything to length, mark faces and ends for consistency, adjust your stop for each dado and cut every piece at that interval before proceeding to the next.

7. Use shims to adjust for width – 0.1mm thick shims are the most useful.
The accuracy of the offset is critical for a correct fit. If you do not have digital aids on your saw, use a purchased or shop-made setup block to machine the offset consistently. If the offset is too large the joinery will be loose, but too small and the joinery will not assemble (photo 7).
Reflections
This self-locking joinery must include half-lap joints. Cross-lap joints will not self-lock which is achieved using adjacent, offset half-laps. Consequently, there is no possibility of eliminating the portion of the joint that extends beyond the intersection.
The open ends or ‘ears’ (as I call them) are 30mm long. I might have been able to reduce this to 20mm, but definitely not 10–15mm as the short cross-grain on my test pieces often failed during test assembly.

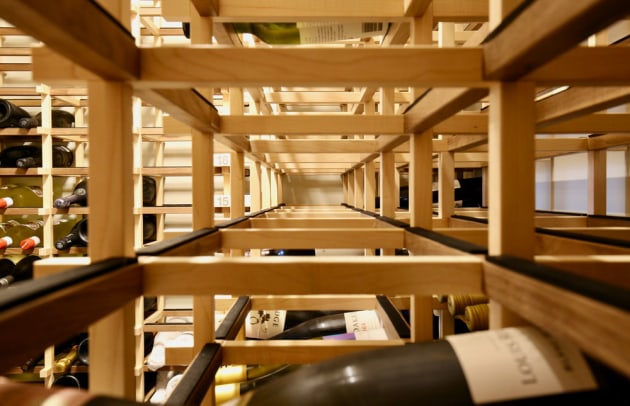
8. Looking into a double-deep unit – EVPM black foam strips reduce bottle movement during loading.
I am confident that my design can handle the bottle weights when fully loaded. The heaviest possible scenario of 900 x 1.6kg wine bottles (1,440kg) is distributed across 32 uprights. That’s 45kg per upright.
Similarly, each pocket has six bottles of wine (or 9.6kg) distributed across four horizontals. That’s a mere 2.4kg per horizontal. Note that the compressive strength of American hard maple is some ten times higher than what is required in this scenario. That said, please obtain independent advice if you plan on making your own wine rack.
David Luckensmeyer is a Brisbane based woodworker and furniture maker, see www.luckensmeyer.com.au and Instagram @luckensmeyer