Mr Darcy's Saw Sled

Words and photos: Kerryn Carter
I have struggled without a crosscut sled for three years. Yes it's a total hassle. I remember on the first day I got the tablesaw, I thought... having no saw sled is a total hassle. But then I thought... I’ll give it three years and see if I can just live without it. And? I can now say it is a universal truth that a tablesaw needs a tablesaw sled.
But let’s rewind to an even bigger saw headache. This problem began years before the “no saw sled” years and it has a medical name...its name is the Felder “Expectationititis”. It’s is a little known fact I learnt woodwork at a place that had a very expensive Felder sliding table panel saw (something I really never tell anyone). I guess it’s like admitting that you learnt to drive in your Mum’s Aston Martin. It’s slightly obscene. Not reality at all... and so you must suffer a great deal when you buy your Honda Jazz or in my case your Jet Proshop Table Saw (the “Jet”).
I think of it like that time Mr Darcy first laid his eyes on Elizabeth Bennet. It is all disappointment. But the Jet, like Austen’s heroine, considerably improves upon acquaintance. It is, after all, small and compact and unlike a big shop tablesaw does not require me to sell a kidney to afford the electrician’s three-phase bill.
So I have a Jet tablesaw but I’m tainted with desires for that Felder big shop functionality and at the top of that list is the ability to repetitively crosscut long lengths. I really am Elizabeth Bennet... I want it all. I am happy with Longbourn but I yearn for Pemberley. And that right there folks was the insidious start of the germ of an idea that I could make a crosscut sled but include some kind of extension piece for docking long lengths.
In the three years I have procrastinated I have been occasionally watching Youtube videos on other people’s sleds (the videos are awesome if you get a chance have a look). A few have extension pieces that allow for a stop to extend but none had the holy grail ability to support the piece (yes I realise that you probably have a great uncle Joe in Timbuktu that invented it 25 years ago with one arm in 10 minutes, but I haven’t heard about it). So in the name of Elizabeth Bennet I decided to go for it.
So without further ado here it is.... the Mr Darcy Saw Sled....
Main Sled

Step 1: Prepare some mitre slides for your table to run on. There are a lot of options out there including good old fashioned hardwood, some nice aluminium runners from INCRA but I went for the Microjig Zero Play. Noting that I had to buy two sets and hence had to go without cappuccinos at the corner shop for basically a month to pay for it.

Step 2: Raise the runners with coins so they are just proud of the table... see the “money” shot.

Step 3: Apply double-sided tape to the runners.

Step 4: Lay the table on the runners. My sled base is 18mm AA plywood.

Step 5: Apply pressure.

Step 6: Install runners as per manufacturer instructions.

Step 7: Prepare two fences (one for the front and one for the back). The front fence is 18mm plywood and only needs to be basically straight. The back fence is 32mm plywood which I made by gluing 2 x 18mm pieces together and fully dressed. It is important that the length of the fence leaves room for the extension fence to “register”. I left approximately 75mm of the table free for the extension to sit on.

Step 8: Remove a rebate from back fence to accept a track system of your choice (should you choose one). I chose the Kreg.
Swing Stop

Step 9: Install the track system as per manufacturer instructions.

Step 10: Assemble swing stop as per manufacturer instructions.


Step 11: Replace the table sled bottom on the table and raise the blade so that it cuts a slot from almost the front to almost the back.

Step 12: Attach the back fence with one screw only from the bottom – make sure to countersink. Also move the fence away from the back edge of the sled by approximately the width of the steel angle that you will use for your extension piece later.

Step 13: Insert a 3mm offcut into the slot and use your largest square to square up the back fence.

Step 14: Clamp the fence and secure it with one screw.

Step 15: Use the 5 cut method to square up your fence (please google this method if you don't know it there are plenty of Youtube clips on it).
Step 16: Install the front fence, it is not necessary to square it.
Extension Piece

Step 17: First make an identical fence to the existing back fence complete with track if you chose one.

Step 18: Attach a steel angle along its length. Being careful not to make the steel angle too long so that it won’t interfere with the sawblade when it is finally installed. Any excess steel can be cut off.

Step 19: Install a dowel peg to ensure exact alignment of the back fence and the back fence extension. Once it is aligned it is time to drill a hole to take the bolt. Use a straightedge to make sure the extension is sitting square to the main fence. It should be roughly square given the fence must register on the table and has been dowel jointed. Clamp the extension down.

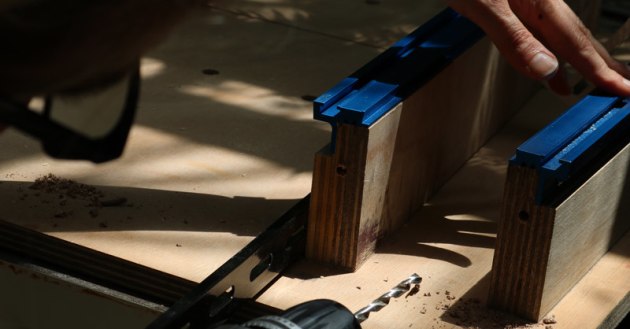
Step 20: Embed a counterbored coach bolt in the bottom of the sled nearish to the blade but being careful not to interfere with the blade. When the extension is on the bolt needs to sit in the middle of a slot or slightly to the left of middle. This is to allow the steel angle room to slide on when you are trying to get the extension on. So with the extension on (dowel engaged) and clamped down drill a hole in the middle of a slot.


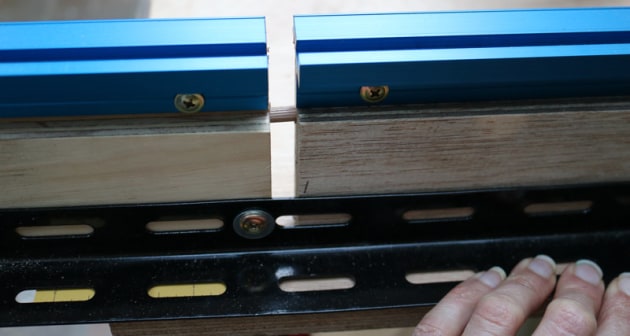
Step 21: See the pictures above showing the bolt and steel angle. The first picture shows the bolt when you first try to get the extension on (the bolt is all the way to the right). As the two fences are aligned via the dowel the steel angle slides to the right, the bolt ends up in the middle and is secured with a tri wheel nut.


Step 22: The safety perspex is added by first of all finding out what is the greatest height cut the saw can do with the sled on and installing the plastic 5mm above that line. In my case I supported one side of the perspex on a rail on the front fence and the back fence I mortised a hole to accept the perspex. Tip: to mortise the back fence I had to take it off the sled. I clamped some dressed wood to hold the mark.


Step 23: A further wooden block is attached on the back fence to protect the sled user from being exposed to the blade at the height of the cut.

Step 24: Steel mending plates are added to provide support to the extended fence providing the holy grail that is support for long pieces.
Who knew that Jane Austen can be the source of woodworking wisdom but here we have it. I can safely say that my Felder Expectationitis is being cured with every perfect 90 that comes off my new sled. The only question that remains is what to build?
Kerryn Carter is a furniture maker, woodcarver, inventor and DIY whizz who also teaches woodwork classes for women and for kids. She writes regularly for Australian Wood Review, see her latest article on making a coffee tamper station in the new issue (#97) of the magazine.
Learn more at www.toolschool.com.au