Making the Split Stool

Words and photos: Josh Stevens
As a woodturner my experience with furniture making usually revolves around making components for other designers. Often the parts I make are basic shapes with the clean lines we commonly see in modern furniture. These jobs are fun and still present a challenge, but I had been craving something more interesting and involved.
Design development
A few years ago I decided to design a comfortable modern stool that made use of the split turning technique normally seen used for furniture ornamentation and crafty wooden baubles. My own spin on this technique was to use 120° segments for a three-way split, rather than the two or four-way splits I’ve seen in the past. This led to the development of my Split Stool with the latest version being the 760mm bar stool height version seen here.
I’ve used American ash for this build as it’s an easy timber to work with and I had plenty of off-cuts from previous jobs. It turns very cleanly and has nice straight grain which was important for this piece.
Turning the legs

Photo 1 shows the 120° segment we will be cutting out as well as its grain orientation. I put a ripping blade in my track-saw and set it to 30° to cut these pieces. You can also do this on a tablesaw or bandsaw.
Check the angles are correct before gluing up – if you’ve made a mistake you can correct the angles on the planer. Take care with this: any gaps at this point will result in a weak glue-up that has the potential to fly apart on the lathe.
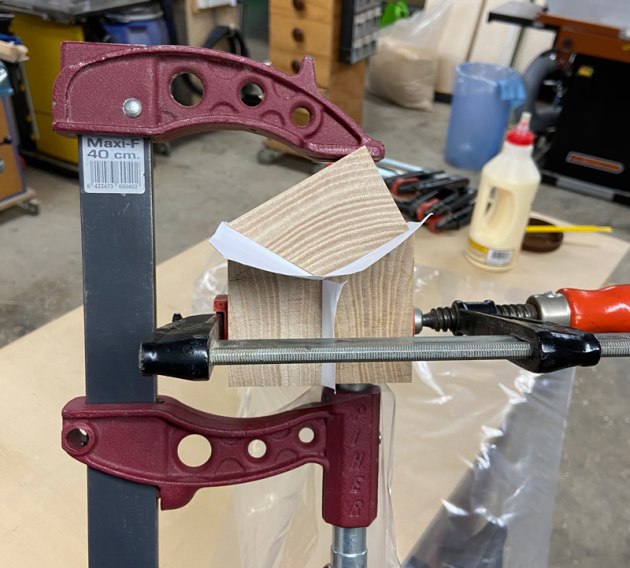
The segments are glued with paper separating the joints. One strip of paper runs between the two pieces at the bottom and a wider strip spans the top two segments (photo 2).

It’s an awkward shape to glue up but gluing the two ‘bottom’ pieces first makes it easier to position the ‘top’ piece (photo 3).

Here's the end view showing the three-way join with the desired result – no gaps. If the paper slips too much it can be difficult to get the joint apart cleanly after it has been turned. After the glue has dried, the ends are cut off on the mitre saw. Hopefully you’ll see a clean glue joint with no big gaps (photo 4).

Out of the clamps, mount the piece between centres, locating your live and drive centres at the intersection of the joint (photo 5). I use a cup live centre for this as it won’t drive in and split the glue joint apart. To start things off, I keep the speed low (around 800rpm) and turn a 10mm wide tenon around 50mm diameter at each end.

The hose clamp shown in photo 6 is a safety measure which stops the glue joint splitting from the ends due to the live and drive centres. A little bit of blue tape keeps the end of the clamp all wrapped up and serves as a nice reminder there’s a hose clamp there.

As my design called for a straight taper I used a parting tool to establish the required diameters at either end, then turned down the leg to finished proportions. I sanded to 240 grit while the lathe was running and continued sanding with the grain while the lathe was stopped.
A parting tool was used to remove as much of the tenon as I could manage (photo 7), and then a handsaw was used to cut the ends off. Taping up the hose clamps is a visual reminder of their presence. Most of the tenon was turned off before using a handsaw to cut the rest off.
The split

Now for the fun part – if all goes to plan! Splitting apart the paper joint would be easier with two people (or three arms) but it is possible to separate the joint by yourself. You’ll need two wide sharp chisels (I used a 25mm and 19mm) and a mallet.
Line up a cutting edge with the paper line and gently tap one chisel into the joint; if you’re lucky it will split away now, if not grab the second chisel and tap it into one of the other joints. If your glue up went according to plan the wedges should split apart with minimal effort like the one seen here (photo 8).
If the paper slipped while you were gluing up you’ll need a bit more force to split it apart. Don’t worry about any timber that tears apart along the glue line, this can be cleaned up when you remove the leftover paper.

Now that we have three leg segments, it’s time to mark the centres and put them back on the lathe (photo 9). I used a sliding bevel set to 60° to mark the centre line and then a pair of dividers (set to half the length of the centre line) to mark the centre point. Once you’ve done this on both ends you can put the leg back on the lathe between centres.

Quick tip! The teeth on spur drives (especially old ones that may have been dropped and sharpened several times) are rarely identical and always seem to penetrate into the timber differently. If you remove a piece from the lathe to check, for example, the fit of a tenon, you need to make sure the spur drive teeth go back in the same position. To make this easier I stamp a line of centre punch marks along one tooth and use a pencil to mark this location on the timber (photo 10).
To aid with joint alignment and strength I used a stepped tenon on the end of the legs. The main section is 25mm diameter, 25mm long with a 28mm diameter shoulder that is 5mm long.

Luckily the pencil marks for these distances are easily visible on the white paper when the piece is spinning on the lathe (photo 11).

A pommel creates a transition from the flat faces of the leg to the tenon. The lowest point of the pommel is 5mm from the tenon. The pencil line shows me where to start the cut (photo 12).

The surface of the pommel must be as clean and crisp as possible as it cannot be sanded (photo 13). Normally this cut would be done with a skew chisel, but I used a 13mm bowl gouge.

The end of the leg receives another slight 5mm pommel to ensure no sharp edges contact the floor when the stool is assembled (photo 14). The finished size of the legs, including the tenon is 775mm long x 42mm.
Drilling holes
Now that we have made the legs, the next challenge is to repeatedly hold them firmly and accurately while we drill the holes for the stretchers. To do this, I constructed an ‘upside down jig’, where the workpiece is clamped up to a surface rather than down.

An ‘upside down jig’ holds the leg firmly while drilling holes for the stretchers. To construct the jig I used a piece of 70 x 45m pine (all dressed and square), some 18mm plywood and a few 50mm (or any long) roofing screws. The most important parts of this jig are the L-shaped ply pieces which need to be square, identical and accurate (photo 15). Ply is used for these as its cross- grain construction means it will be strong enough to not split apart when the leg is wedged up to the underside. I used a bandsaw for this but you can use any method that will yield two identical pieces.

Screw these L-shaped pieces to the pine board (make sure they are square to the board and the same distance above its surface). I cut two wedges that push or wedge the flat surface of the leg up against the underside of the L-brackets which means that the flat surface of the leg is parallel to the pine board. In photo 16 you can the jig in action while drilling a stretcher hole.
Turning the seat

The seat for this stool is 350mm diameter and around 65mm thick. I start by attaching a suitably sized blank to a screw chuck, truing it up and turning a tenon on what will be the bottom of the seat (photo 17). Leave a live centre mark to help realign the block later on.

Once the piece is mounted in the chuck I use a pencil to mark out the start and finish of the rolled-over edge (photo 18). Previous versions of this stool had an angular edge that was only comfortable if you had long legs.

The edge is rolled over and the seat is dished and sanded to 400 grit (photo 19).

Reverse the seat on the chuck using the live centre mark to help with alignment. I used a vacuum chuck (photo 20), but you could also use bowl jaws or a Longworth chuck.

The underside was turned to a straight- sided cone shape to complement the wedge shaped leg (photo 21). The rolled edge and underside of the seat were sanded to 400 grit.

Using my Vicmarc lathe’s indexing points I drew three evenly spaced lines and marked the drilling location (approximately halfway between the rim and the centre). I used some blue masking tape under my lines as it makes any mistakes easy to remove (photo 22).

Time to drill the holes for legs! Rather than tilting the drill press table I made an angled platform with two 14° wedges (cut on the mitre saw), a piece of plywood for the base and some off-cuts to keep the seat from moving around (photo 23). To suit the stepped tenon turned on the legs I drilled a shallow 28mm hole followed by a deeper 25mm one. Use the depth stop on your drill press to ensure all the holes are drilled to the same depth.
The purpose of the stepped tenon should become clear at this point. Without the 28mm diameter section the leg would not have anywhere to squarely butt up against, and this provides more strength than bottoming out the tenon in the hole. I contemplated using through wedged tenons but decided to keep a clean look for this design.
Turning the stretchers

The standard stretchers are 410mm long and turned to 20mm diameter with ends reduced to 16mm for the tenon (photo 24). For this bar stool I decided to make a footrest/ stretcher and thought it would be a fun challenge to make as much of it as possible on the lathe.

I glued up a blank for the footrest with a waste block glued on to make up the width. This will be spinning on the lathe, so an even block will allow the highest safe speed and the easiest cut. I drew the profile on the block including the lengths of the tenons (photo 25).

Once the piece was spinning on the lathe, the profile I drew on was easy to see so I could follow the lines and roughly shape the footrest. The tenons on the end of the footrest were turned to size (photo 26).
Once the piece was off the lathe, the waste block was cut off on the bandsaw and the hand shaping began. I shaped the front of the footrest to a convex taper and rounded over the back of the footrest with a hand plane. Further shaping was carried out with a die grinder and an aluminium cutting bur. These leave a great surface in harder timbers and the larger spiral produces bigger chips and less dust than other burs.

Once I was happy with the shaping I switched to sandpaper and smoothed everything out (photo 27).
Cleaning everything up
Now that all our components are made and the holes are drilled, it’s time to clean everything up before assembly. I start by removing the paper from the paper joint. I found running the legs over the planer was easiest and quickest way to do this but you can also use a hand plane.
The outer edges of the legs are quite sharp and fragile so I used a small round-over bit on the router table to smooth this out. As long as the outside profile is nice and straight this should be easy. If it isn’t straight, or you’ve turned a different profile, you can round over these edges with a spokeshave and/or sandpaper.

To strengthen the footrest attachment some 4mm maple dowels were added after the stool was assembled (photo 28). It’s the first time I’ve tried this so I hope it’s effective.
Assembly
Everything was very accurately sized and not particularly easy to get together so I didn’t feel the need to clamp the parts in position during the glue-up. Glue was applied to the holes rather than the tenons to minimise glue squeeze-out, and hammered into position with a soft mallet.
Finishing
I used a matte Whittle Evolution hardwax oil to finish the Split Stool. It’s my favourite finish to use on American ash as it doesn’t cause excessive yellowing, and it’s easy to apply and non-toxic.
The latest version of my Split Stool was a successful build and a fun exercise, as it allowed me to further hone ideas from previous pieces and directed me towards areas for future exploration.
Josh Stevens is a Geelong based woodturner and workshop instructor. You can see more of his work on Instagram @woodturnerjosh or at www.jsdesign.online.