Making the Catenary bedhead
Words and photos: Neil Erasmus
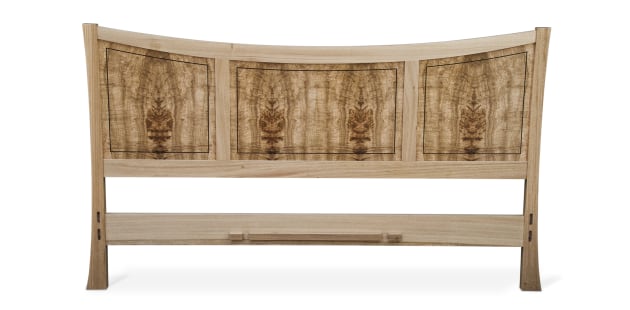
The word ‘catenary’ describes a symmetrical curve that is created when a chain or rope is hung between two points. Unlike an arc of a circle, a catenary curve, in which the radii are dynamic, is visually more pleasing.
The bedhead shown above has two of these curves in the crest rail, one tighter than the other. The effect is to direct the viewer’s eye to the central burl panel. The heavily buttressed end posts reference trees that support and connect to each other.
The bedhead is king-sized and made of West Australian blackbutt (Eucalyptus patens) and ‘eucalypt burl’, purchased in Tasmania. The three panels consist of 9mm MDF veneered in this burl, each bordered in a fine wenge inlay.
Making this headboard is reasonably straightforward, as long as a high degree of accuracy is maintained. You need very little in the way of tools and machinery, but having the sort of equipment described here would speed things up.
As the three panels are glued into 6mm deep grooves in the surrounding framework, structural integrity is assured without the need for time consuming mortise and tenon joinery. This, along with epoxy glued domino joints, provides insurance against failure due to side-to-side racking forces.
The posts are made of 50mm roughsawn (RS) stock, and are ‘FEWTL’d’ (Face, Edge, Width, Thickness, Length) down to 42mm thickness, while the frame components are made from 38mm RS stock, taken down to 32mm thickness. Some milling and drying practices will not allow these thicknesses to be achieved, so in these cases try to maximise. Either way, aim for 40 and 30mm respectively.
First, some decisions need to be made: double, queen or king size? What type of mattress? How deep (high) is it? How high do you want the mattress off the floor? Once these have been decided upon, you can work out a cutting list. The one below is for a king size bedhead with a mattress-to-floor height of around 580mm.

Templates for curved components

I begin by fleshing out all the shapes this project contains. The post shape is drawn full size on some 9mm MDF to make a template that is bandsawn and feathered to perfection by hand with a flexible sandpaper ‘plane’ (photo 1). Alternatively, a compass plane or spokeshave could be used, but expect them to lose their keen edges quickly on the MDF. Trace around the template directly onto the wood and bandsaw the curves. Spindle moulder jigs could also be made to mechanically shape the posts, see my story here.
Making the template for the crest rail, with its catenary curved edges, requires a different approach. I stand a sheet of 9mm MDF up against a bench and pencil a 120mm wide x 1800mm long band. Then I mark each end with the desired width and position on the post. By trial and error, using a chain and screws, I settle upon a pair of lines that look pleasing and draw them onto the MDF as accurately as I can, without moving the chain (photo 2).

If you want to be the perfectionist, you would hand shape a little over half the length of this curve and use it as a template to shape either end of a new piece of MDF to maintain perfect symmetry. This is desirable as the panels and vertical panel dividers will be symmetrical too, including the angle at their top end.

Photo 3 shows the resulting template being used to mark out the crest rail. In photo 4 the rail is being bandsawn to shape. The area on the crest rail where this angled end meets must be flattened slightly and kept square (photo 5).

Flattening buckled veneers
I then move onto those jobs that require what I call ‘dead time’—time it takes for glue to go off, for example. However at the top of my dead time list was to flatten then dry the burl veneers, a slow process that takes time to do properly. These were commercially sliced, 0.6mm burl veneers that were quite buckled. If you think you can skip this process be warned: buckled veneers will not press properly and the joins won’t line up.
Veneers flattened with the method below will not remain flat for long, so it is important to know the size and shape of the panels before beginning. You should cut and flatten only what’s required, allowing a little (5mm, or so all round) for trimming after pressing.
There are two ways to flatten veneers. The easiest way is to soften them with a 10% solution of glycerin and water. The other way is to combine this softening action with a ‘sizing’ that helps set the wood fibres when they have dried. Use the first method on lightly buckled veneers and the second one for stubborn, buckled and brittle ones such as the ones used in this bed. The sizing I use is as follows:
• 2 parts powdered urea formaldehyde glue
• 1 part plain wheat flour
• 3 parts water
• 1.5 parts glycerine
• 1 part methylated spirits

The glue and flour set the fibres together while pressing and drying, the glycerine softens or plasticises them, and the methylated spirits helps the drying process. Mix these ingredients together before brushing on liberally to both faces of each veneer (photo 6). Stir the mix regularly as the flour tends to settle.
Allow the size to soak into the veneer for between 30 and 45 minutes. I have found the best way to do this is to wrap them as a bundle in plastic cling film for this period. Don’t press them flat yet, as this is just the soaking stage. After the plastic comes off you will need to carefully prize them apart before gently wiping off all excess sizing with a dry cloth. Be sure to leave the surfaces relatively dry, or the next process will be problematic.
Next, have two flat pieces of 18mm, or thicker melamine ready, and pack the sheets of veneer and two or more pieces of clean, unprinted paper alternately in between them, and press. The vacuum press is a great way to do this, especially when a heated electric blanket is placed on top, as the combination of heat and very low pressure help to agitate the water molecules out of the veneer (remember, water boils at a low temperature in a vacuum).
Repeat this procedure at least another two times to ensure the veneers are fully dried. If this process begins with veneers that remain a little tacky to the touch from the soaking stage, the paper will stick to them. If necessary, wipe them down again before you begin. Once you are satisfied that successive paper changes have wicked up all moisture, leave them pressed like this until you are ready to further work on them. Don’t leave them exposed for any length of time before pressing, or they will begin to buckle again, albeit not as badly.
The veneers can be edged all at once on the spindle moulder by stacking them together and clamping them down onto a straightedged jig that runs against a bearing collar. The edges are glued together and taped, and the layons pressed to both faces of each panel in a vacuum press.
If you don’t have a spindle moulder, the edges of the veneers can be done in matching pairs with a handplane and shooting board, or with a router in a small stack sandwiched between 6mm MDF.
Jointing

I used the domino tool’s 10mm cutter and maximised the largest setting by dialling in the maximum oscillation position. This gave large 33 x 10mm slots which were combined with the tool’s deepest setting of 28mm.
Dominos of this dimension are not available so I made my own by creating longish sections that were cut into 16 lengths of 54mm. The wider rails get twin, side-by-side dominos (photos 7, 8). If you don’t have a domino machine you can use dowels or cut mortise and tenon joints by hand or by using a mortiser or jigs.
Panels

Once the bedhead has been jointed I did a dry assembly, clamping the panel framing parts, not including the legs, to mark and shape 3mm MDF templates of the ‘seen’ parts of the panels (photo 9). The templates are bandsawn and sanded, and then used to mark out the three panels.

A suitably sized washer, in this case one with a 6mm wide ring, is used to guide a sharp pencil around the oversized veneered panel to indicate exactly where to cut it so that it fits into the 6mm deep groove (photo 10). I aim to just remove the pencil line to ensure the panel doesn’t remain too big.

Now you are ready to rout a fine 3.2mm groove near the edge of each panel to take the wenge inlay. I set up a small plunge router with an upcut spiral cutter and fence, and rout between pre-marked stop positions (photo 11), and then chisel out the corners. A special radiused fence must be used on the curved parts. Inlay is prepared, mitred and glued in place with urea formaldehyde (photo 12). At this point, once the glue has cured completely, the veneered panels can be sanded to the desired grit: 180 for a sprayed lacquer, and 400–600 for a shellac or oil finish.
Grooving

The edge thickness of the panels is now measured and a slotting router cutter assembled to this dimension (photo 13) to create grooves in the frames on the router table. The 6mm groove depth is set with a fence (photo 14). Note: the grooves stop just shy of the domino slots, and don’t have to be centralised to the faces (photo 15).

The fit of the panels in the grooves should be just tight enough to prevent rattling when tapped with a knuckle—too tight, and you risk having to abort the assembly process, and that’s not worth thinking about as all that sticky epoxy glue will need to be removed. A dry assembly can be done, but I try to avoid this by making a short sample of a grooved rail that I run down the edge of each panel to identify tight areas, which are then relieved with a sanding block (photo 16).
Assembly and finishing
As this is a major glue-up, I opt for epoxy as it provides me with a big open time window and lubrication for all those joints. PVA is far too risky and is likely to grab well before all the joints are closed. I get all my cramps ready, together with appropriately shaped or angled protective blocks, before I mix up the glue. I apply glue sparingly to both parts of the joint, and remove as much ooze as I can with a sharpened stick before wiping any remaining smudges with a rag lightly dampened in acetone.
After cure I give the entire bedhead a once over with sandpaper, and if an oil finish is to be used, a hard rub with some natural hessian to bring a shine to the raw wood before the first liberal coat of oil.
First published in Australian Wood Review magazine, issue 77.
Neil Erasmus is a Perth-based furniture designer/maker who also teaches woodwork.