Making endgrain edgings

Words and photos: Darren Oates
The time had come for us to replace our dining table top. The base suited our chairs but the old laminate top had to go. I had some 300 year old Australian red cedar veneer which was 470mm wide. This meant I could veneer our 2000mm long table with just four bookmatched veneers, two for the top and two for the underside. I then decided to make the top look more like solid timber by adding cedar endgrain edges. I had done this once before very successfully for an extendable dining table that I was commissioned to make a few years ago.
It’s normal to edge veneered panels with veneer strips, but using a long grain veneer on the ends of a board is a real give-away. Veneers are generally thin ‘slices’ of wood, generally less than 3mm thick, but sometimes thicker, up to 5mm or so.
Commercially, logs are either sliced or ‘peeled’ on a rotary lathe type machine. Thin slices of endgrain would be brittle, so my solution to this was to machine much thicker strips of timber from a board and then glue these on to the ends of the substrate.
Edging the ends of the top
The 150mm wide solid red cedar board I had on hand was a pretty close colour match for the veneer I was using on the top and bottom of the table top. After machining the board on all four faces, I thicknessed it to be 1mm thicker than the 18mm thick marine ply substrate. On the panel saw I then cut 6 x 15mm strips to extend across the 900mm width of the marine ply.

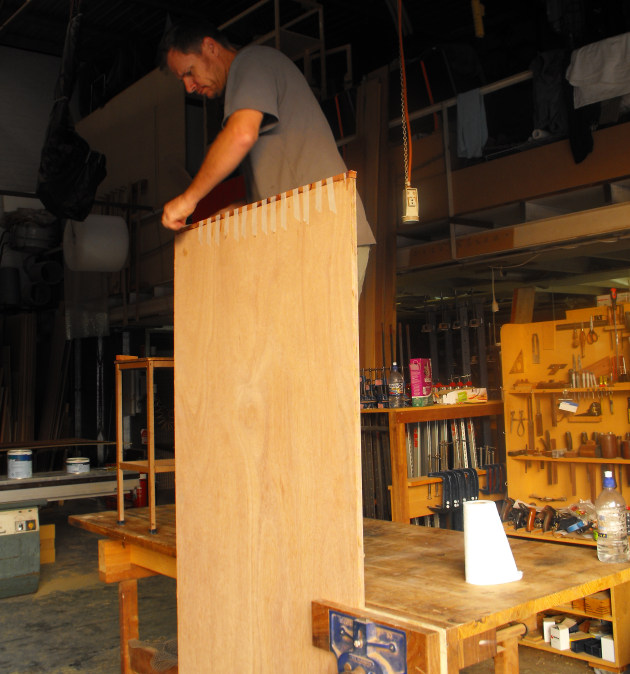
Because I was using the rip fence to size these pieces it wasn’t possible to use the saw guard so I made sure to use a pushstick to keep my hands at a safe distance from the spinning blade (photo 1).
The endgrain strips were glued to the end of the substrate using two part epoxy and left overnight. I glued between the ends of each of the strips as well. Masking tape was used to ‘clamp’ them all in place until set (photo 2).

Photo 3 shows the endgrain edges after the glue had set. The small overhang on the edges was sanded flush with the sides of the plywood panel.

I’m using a sanding block with a flat MDF base fixed to it that is fitted with 60 grit sandpaper (photo 4). Sanding in one direction only (towards the plywood) lessens the chance of detaching the solid edges.

An orbital sander was used to sand both faces of the endgrain edges flush with the top and bottom of the substrate (photo 5).
Veneering the sides of the top

THE 2000mm long x 19mm wide strips of veneer were ripped on the panel saw. These were glued to the sides of the panel with epoxy and left overnight. Once again I used masking tape to keep the edgings in place (photo 6). Make sure you cut your veneer strips with only 0.5–1mm overhang, or they will bow as you pull down on the masking tape.

After the glue was dry, the masking tape was removed and the veneer hand sanded flush with the sanding block and 60 grit paper (photo 7). It’s safer to hand sand rather than using a power sander which can pull the veneer off the plywood or damage it by splitting it.

Photo 8 shows the plywood substrate with endgrain edges and side veneers fixed and sanded flush.
Veneering the top and bottom

The main veneers are now glued on one side at a time. For tips on how to bookmatch and stitch veneers please see my article on veneering a tabletop. As this is a rather large glue up I used two part epoxy and plenty of packers to ensure the centre of the large veneers are pressed properly. This is left in the vacuum press for eight hours (photo 9).

Use belt sander to remove most of the veneer overhang on the sides, but make sure the belt is not moving in the direction where it could pull the edge of the veneer off the substrate (photo 10). Use the sanding block again to remove any remaining overhang.

After the first side has been sanded flat I veneer the opposite side of the plywood and then remove the overhang in the same manner. As I have a large enough edgesander I was able to easily sand the end square and straight (photo 11).
I went through the sanding belts and finished off with a 180 grit belt. If you don’t have access to this equipment you could cut a millimetre or two off the end with a panel saw, and then sand with your sanding block going through the grits until all machining marks have been removed.

In (photo 12) you can see how the ends of the table finished up. Although on close inspection you can still tell the top is veneered, I think this is a nicer way of finishing the ends rather than just gluing on a strip of veneer.
Darren Oates is a furniture designer/maker in NSW and teaches at Sturt School for Wood.