Making an Arts and Crafts style cube chair

Words: Gerald Coon
Photos: Kelly Pack
Diagrams: Graham Sands
The Arts and Crafts style was developed by English design-reformer William Morris in the second half of the 19th century. His ideas were to help reinvent interior design and the domestic ideal in the face of a growing trend of mass production. The Arts and Crafts style spread throughout Europe and North America, where it has seen a significant resurgence in the past few decades, especially among woodworkers. Lovingly handcrafting furniture is a timeless pursuit, and the simplistic, utilitarian ideals of what is now referred to as Craftsman furniture can still inspire the makers of today.
When English immigrants departed for North America they took this style of architecture, interior design and furniture design with them. Craftsman furniture has retained its popularity in the US, especially for woodworkers.
By the mid-19th century in America, white oak, Quercus alba, was the timber of choice for Arts and Crafts furniture. Quartersawn white oak in particular is highly regarded for its dimensional stability and nicely figured grain. When fumed with ammonia and then oiled, oak will darken to a golden brown colour, highlighting the medullary rays of the grain.
If you are attempting a historically accurate piece white oak is the correct choice. It is available from select Australian timber merchants. For the more adventurous or for stand-alone pieces I wouldn’t hesitate to use some native hardwoods. Craftsman furniture tends to inherently showcase the timber and joinery. It is part of the subtle beauty of this style of furniture and substituting a local hardwood is perfectly acceptable. I’ve had nice results with recycled eucalypts and other tropical exotics.
This cube chair for example has obvious North American origins, with its choice of quartersawn white oak, reminiscent of the work of Stickley or Limbert, who were in turn inspired by British Arts and Crafts, the Glasgow School and even medieval furniture design. The overall effect is historical, though some of the building methods are thoroughly modern. The use of a mortise machine, dado stack, biscuit cutters and routers, for example, spared some of the toil which in turn liberated time spent refining design details such as the armrest and the four-piece leg. The curves on the arm, inside and out, are very comfortable to the hand and reflect the subtle refinement only achieved through repetitive experimentation.
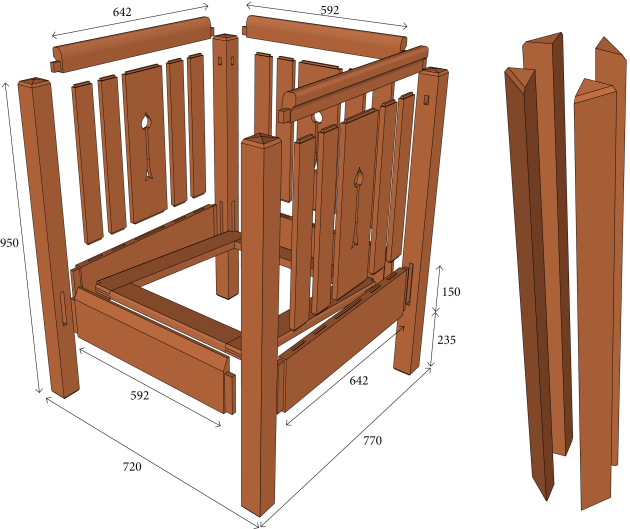
Fig 1: showing the dimensions of the cube chair in millimetres, and an exploded view of the four-piece leg construction.
The design of the four-piece leg dates back at least a hundred years and makes for a stable, attractive and large-dimension component. If well made their construction seems unremarkable, until the all-around face-grain and ends show how they are mitred together. The segments can be cut with a shaper-cutter or a mitre-lock router bit or, as in this example, a tablesaw, jointer, biscuit cutter sequence. The ‘obelisk’ detail at the top of the leg is a common Arts and Crafts element, as are the spade cut-outs on the interior panels.
Building a project using frame and panel construction such as used in this chair is very enjoyable work. Pegged mortise and tenons are about as strong a woodworking joint as you can make. Almost any intermediate woodworker should be able to handle this project with the diagrams shown above in fig.1.
Don’t be bound by this one example, however, or the choice of timber. Explore the style and choose design elements that suit your taste. The methods are adaptable to a larger number of furniture pieces. The basic construction techniques are universal. Measure carefully, cut squarely, apply clamping pressure evenly, and check your diagonals in each of the three planes as the panels come together. The end result will impress with its apparent simplicity, utility and obvious strength.
Making the four-piece legs

Photo 1
Typically, white oak has one side with golden hues while the other side will be more greyish. To determine the better side, turn the wood around and examine its colour and the appearance of the rays (photo 1). On one side the rays may be less pronounced and may look flatter or duller. One face will have better grain and appearance, and this is true of other woods, not just oak.
Use the ‘A’ faces for the outer leg faces and turn the other sides inwards. I select wood for the legs first, then the panels and armrests. The smaller pieces of wood left over become spindles or panels and seat braces, so there is very little waste. Working from big to small makes the most of the wood.
Cutting and joining 45° angled sections creates larger stock because the board thickness is doubled. Legs made this way are less likely to move over time, and face-grain on all sides looks really good. The 64mm square mitred legs are cut from 150mm wide x 32mm thick boards. The mitres are cut on the tablesaw with the blade tilted to 45°.

Photos 2, 3
The boards are fed against a pre-machined and flattened auxiliary fence. Photo 2 shows how a straightedge is used to set the fence at 65mm from the blade. It’s crucial there is no gap between fence and table because the first mitred edge might push into the gap when you’re taking the second cut and the dimensions of the leg segment will change.
Set the blade to just clear the height of the cut. Use a ripping blade (24tpi) as less force is required. In this application a cut-off or combination blade would create resistance. Any resultant scratch marks will be removed later on the jointer. The finished leg size is 64mm, so an extra 1mm is added for cleaning up the surfaces.
Cutting mitres is an advanced technique. You need constant steady pressure. Use pushsticks to keep your hands safe. Take the first cut and turn the workpiece around to cut the opposite mitre for each triangular section (photo 3).

Photo 4
The jointer is used to clean up the saw marks and flatten the mitred sections. The four components per leg need to be exactly 90° to each other. Set up the fence so it is precisely 90° to the table. I use my best Sheffield steel square and a light source for this (photo 4).

Photo 5
If a board is bowed it might take four passes on the jointer, whereas a straighter board might only require two passes. Do a test pass and check it for square (photo 5).
Some sections may end up slightly smaller on the outside and may therefore stick up slightly proud of the others when joined together. This won’t matter because the finished dimension is derived from the centreline. In this case the outer faces will need to be machined so the mitre corner joins are perfect.

Photo 6
The mitres are biscuited at the ends and in the centre to align the joints during assembly. I mark out for the biscuits by pushing the four sections square against the fence, transferring the line by pencilling against a square (photo 6).

Photo 7
Aim for accuracy every step of the way. The slots are slightly longer than the biscuit to be inserted, around 50mm in length (photo 7). Do a test dry fit as a final check before assembling the legs (photo 8).

Photo 8
Glue the legs up immediately—the best glue joint is one that’s freshly prepared. You don’t want machined surfaces to sit overnight or for weeks as they’ll oxidise. As soon as I cut the timber I glue it together. Machining and joining the leg should be carried out in the same session, so plan ahead.

Photo 9
PVA glues are good for white oak; I use Titebond 1, 2 or 3. G-clamps hold the mitres together. Clamp the middle and ends first then add more clamps in-between (photo 9). Let the glue dry overnight. Once the glue is dry the clamps come off and any excess glue can be planed off during the final dimensioning process.
Mortising
The rest of the components are now cut and machined to size. The rails and spindles are joined with mortise and tenons. Once I have laid out the joints I cut the mortises with a ½" bit and clean them out with a chisel. The tenons are cut slightly fat on the tablesaw and shaved with a shoulder plane to a snug fit in the mortises. I cut the tenons on the rails and stretchers, lay them out onto the set of legs and then scribe the mortises. I do the final surface finishing of the legs before gluing the components together.
Panel assembly
The spade cutouts in the panels are a traditional detail. I start the cut with a drill large enough to accommodate a jigsaw blade. I stay well away from the line as I cut because jigsaws tend to tear out a bit. Then I approach the line with files and finish with fine sandpaper. Start the gluing sequence with the interior panels, then proceed with the leg joints. Apply clamping pressure evenly and double-check the diagonal measurements frequently.

Photos 10, 11

Photo 12
With the panel fully secured I will then pin the mortises with 6mm dowels and cover the ends of the dowels with 10mm face-grain plugs (photo 12). With two side panels completed the four sides are joined, again checking diagonal measurements in each of the three planes as the cube comes together.
Seat construction
Make four braces from 150 x 25–32mm thick squares (photo 10). Shape them and pre-drill and countersink the holes for screws. Cut a 5° bevel on the corresponding faces so the seat inclines comfortably toward the back of the chair. Notch the interior corners to fit the legs and screw them in place with sturdy stainless steel screws. The seat frame is made from leftover 25–32mm thick oak and joined with bridle joints in the corners, cut on the tablesaw (photo 11). The webbing is natural jute woven with a stretcher and stapled.
Shaped details

The arms of the chair are rounded on the top surface and receive a curved shaping as shown in photos 12 and 13. The ‘obelisk’ tops of each mitred leg (photos 13, 14) are shaped using a sequence of cuts on the tablesaw and router. The pyramid at the tip is cut first with the saw set at a 13° bevel using a fine tooth crosscut blade. The shoulders are then removed with a ‘table edge’ bit on the router. A table edge bit is similar to a round-over bit but with a parabolic curvature rather than a circular radius. The intersection of the two cuts is then faired with a flat sanding block.
Finishing
This chair was fumed with ammonia then finished with a series of coats of linseed oil built up gradually in each successive coating with tung oil and marine spar varnish. How many coats I apply depends on the timber and how it is absorbing the oils. Light rubbing in between each coat with very fine steel wool keeps the finish and sheen level very even. A final buff with a good quality furniture wax, typically a carnauba and beeswax blend, is the final step.
First published in Australian Wood Review, issue 75. Gerald Coon is a Brisbane-based woodworker specialising in select reproduction Arts and Crafts and interpretive original furniture.