Making a Starburst Veneer Match
Words and photos: Damion Fauser
There are many reasons to consider using veneers in your work, not the least of which is the ability to create stunning geometric patterns using the inherent patterns in wood grain and figure.
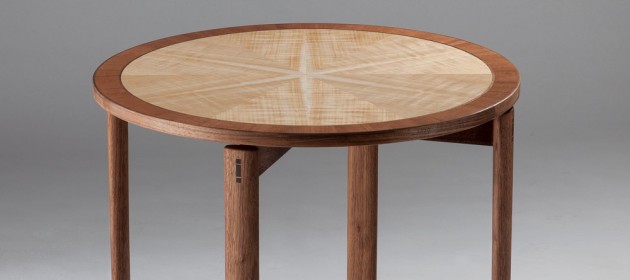
One such pattern is a starburst and by using a technique called radial matching you can form this pattern. Radial matching is where you cut a number of segments from the same location of a flitch of sequentially cut sheets of veneer and then join them together with the narrow point of the segments towards the centre. The resulting edge joints are all bookmatches which radiate from the centrepoint. in this article i will be making a starburst from some flatsawn walnut that i had left over from a recent project.
Stock selection and preparation
Veneers are like boards and can therefore be sourced quarter or flat sawn or in burl form. Any cut can be used for radial matching but quartersawn veneers will generally make a better starburst.
if you are not experienced with veneers try to source something that is straight-grained and known for being friendly with hand tools in the solid form, because when you are cutting and planing your wedges you will be dealing with very fragile end points and short grain.
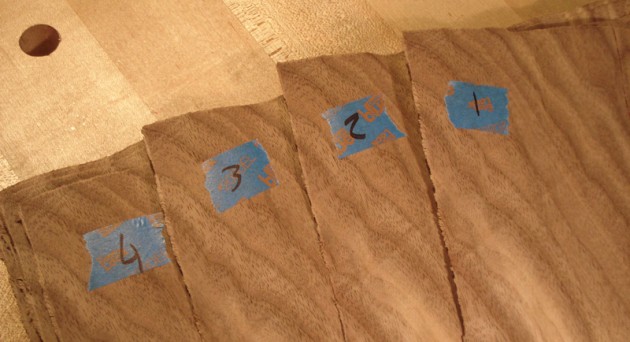
To better highlight the star, use veneer that has a clear delineation of colour in a reasonably straight line, such as the heartwood/sapwood line. For each point of your star you need two sheets of veneer. i’ll be doing a 6-pointed star so that means i’m using 12 consecutively cut sheets. When you unwrap your veneers maintain the order they were cut in by marking each with a small numbered piece of blue tape (photo 1).
Wedge size and location
Your panel size will determine the size your wedges need to be. The wedges have two critical dimensions, radius and central angle. The radius needs to be long enough to allow for some waste to be removed after the radial match has been formed and again after the panel has been pressed. The number of points you want on the star determines
the central angle. As discussed, each point requires two wedges, so double the number of points you want and divide that into 360. For my 6-pointed star that means 12 wedges, so an angle of 30°.

Start by seeking some interesting figure or grain on your veneer to place at the centre of the star and a good line
of colour demarcation. Get yourself two sheets of 1/4” mirror and tape them together at the short edge to form
a folding mirror. Place this on the veneer sheets roughly where you want to take your wedges from and spread the two mirror pieces by your central angle, in this case 30°. The reflection in the mirror will show you what your panel will look like. By shifting the mirrors around you can make minor adjustments and ensure you get just the right look without actually cutting stock (photo 2).

Try changing the angle to see the transition of the image to more or less starpoints. When you are happy with the look, trace around the outside of the mirrors (photo 3).
Wedge template
To cut the wedges you’ll need to make a template from ply, MDF or even clear acrylic. Mark out two straight lines at slightly more than the central angle.
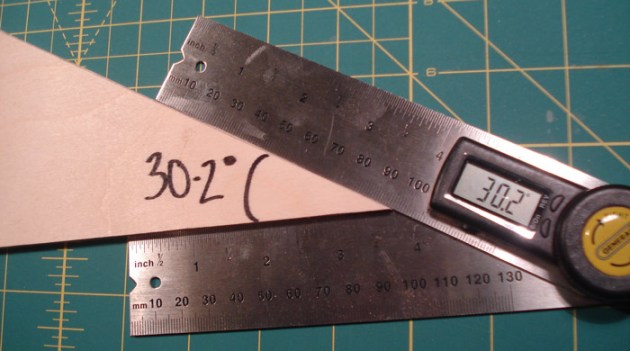
This is because you will be shooting the knifed edges clean for seamless joints and also because you want to end up with two halves of a radial match that have slightly concave edges, which lets you shoot those edges clean without planing the fragile points at the centre of the match. cut your template and use an angle gauge to ensure the angle is correct (photo 4).
Cutting the wedges
Align your pile of sheets on your bench on top of masonite or a self-healing mat (to protect your bench).


Place the wedge template in the marked-out location and clamp the whole assembly down (photos 5, 6).
Take a sharp knife like a box cutter or scalpel and take lots of light passes to gradually cut through the stack. even the sharpest of knives can follow the grain so try as best you can to follow the edge of your template. Take particular care near the corners as you will have short grain on at least one of the corners and a heavy-handed approach will tear rather than sever the fibres.

Arranging the pattern unclamp the template and lay your stack of veneer wedges on the bench. Take the top sheet (no.1) and lay it down. Take no.2, turn it over and lay it down on the right side of no.1. Lay no.3 down face up on the right side next to no.2. complete the circle of wedges with the odd numbers showing the blue tape sheet number and the even numbers not. This concertina-arrangement gives a bookmatch at each edge joint (photo 7).
Use new pieces of blue tape to re-number the even- numbered sheets. Remove the original tape from the now-underside of those wedges. You now have a master numbering system.
Shooting the edges
At this stage, if your knife lines are clean you could simply apply veneer tape across each of your joints and proceed with pressing the panel. i prefer to take the time to shoot each of my edges clean with a handplane, which results in seamless joinery. i also then glue the edge joints together, which is a simple process that means i can treat the assembled pattern as a single piece of veneer and saves on the arduous task of removing veneer tape after the pressing.
To shoot the edge of a piece of veneer, i use a few scraps of sheet goods to sandwich the veneer sheet, therefore providing some rigidity and support to the fragile edge. The masonite goes down first as this gives me a slick surface that my plane can glide over with little resistance. i do this because i have my plane set so fine that i feel and hear rather than see the shaving being taken. The slick surface of the masonite doesn’t interfere with the signal coming from the cutting edge. With a little practice you will know what i mean. Remember that veneer is wood and has a grain direction, so try at all times to plane advantageously to the grain.

Next is a sheet of 3/4” MDF, which raises the edge of the veneer off the surface allowing it to be cut. Then place your veneer sheet down so the edge hangs over the sheet of MDF by around 1–2mm. Last is another sheet of 3/4” MDF with a mitred edge. The mitred edge allows better visibility into the cutting area (photo 8).
You can clamp this assembly down, but to save time when using small pieces i just lean on it with my forearm and push the plane with my other hand. use the longest plane you have and one that has a long toe surface area ahead of the cutting edge. This is because if you’re new to this technique it’s easy to fall into the habit of crowning the edge of the veneer by putting pressure on the heel at the start of the cut, and the toe at the end of the cut.

i’ve successfully used a no.9 mitre plane and a no.62 low angle jack but i recently had a custom plane made by Wayne Anderson which has a toe length of 7”. i carefully register the toe of the tool on the edge and push forward, holding the tool at the toe (photo 9).

Once the sole of the tool is fully registered transition your hand to the heel of the tool and push the tool through the remainder of the cut, concentrating on placing pressure on the heel of the tool for the remainder of the cut (photo 10).
You’ll know when you are close when you can feel a shaving being taken along the whole length of the sheet. Joint two edges and then place them together. if you’ve crowned them they’ll be clearly convex when together. if you are crowning the edges, try pulling rather than pushing the plane.
Stand on the opposite side of the bench with the far end of the cut near you. Reach over, grasp the tool by the toe, register the toe and pull the tool towards you. Again, as the tool becomes fully registered, shift your hand to the heel of the tool and pull it through the cut. You’ll soon get a feel for the technique and be able to switch back to pushing the plane the traditional way.
Edge-jointing
Take two pieces of veneer to be joined and lay them down together with the glue face up. Take a short piece of blue tape, press it down on the near piece, stretch it over the joint and press it down on the second piece.

Repeat this at regular intervals along the edge joint. The tension on the blue tape is enough to ‘clamp’ the edges together sufficiently for the glue to successfully bond the joint. now lay a line of blue tape along the length of the joint (photo 11).

Flip the assembly over. Take a hard smooth surface such as the face of a small hammer and burnish the edge joint down flat (photo 12).

Now prepare your glue-up supplies. Place some pre- prepared pieces of blue tape loosely on the edge of your bench, get a small scrap of masonite covered in packing tape to act as a glue reservoir and a small roller (photo 13).

Fold the edge joint open and lay it down. Pour some glue onto the glue sheet, load the roller with glue and run a small amount of glue along the edge joint. close the joint again, lay it flat on your bench and remove the squeeze- out with an old blade or a razor (photo 14). Tape this side of the joint as you did before. Set this aside for 30 minutes or so, before removing the tape.
Gluing the star

Shoot the edges at the joint of sheet no’s 1 and 2. edge glue that joint, taking care to keep the points aligned (photo 15). Repeat for 3 and 4, 5 and 6 etc. now shoot the edges of the joint between 1–2 and 3–4 and glue together. Join this to 5–6 and you will have a half. Repeat for 7–12.

Because you made your template with an angle slightly larger than 30°, you should now have two semi-circular halves with slightly concave edges. check with a long straightedge to gauge how much material you’ll need to remove (photos 16)...

...and carefully shoot each edge and joint as before (photo 17). The hardest part of this whole process is bringing the 12 knifepoints together at the centre, so pay attention to this as you join the wedges.

If you’re not going to press your matched veneer for a while store it under MDF or similar. This helps keep it flat and prevents air getting into the joint which can cause joint failure in such a fine glueline. Photo 18 shows a completed starburst match with all the blue tape removed.
Basic radial matches can be used for tabletops, door panels etc but you can also consider advancing the technique by wrapping the resulting pattern over the edges of a box or cabinet for great visual effect.
Damion Fauser is a furniture designer maker in Brisbane and also teaches woodwork classes. Learn more at www.damionfauser.com