Making a scraper plane

Words and photos: Theo Cook
Diagrams: Graham Sands
I picked up the planemaking bug when I studied under James Krenov at the College of the Redwoods in California, USA. The year I spent at what is now known as the Krenov School of Fine Furniture was part of the apprenticeship I did with Barnsley Workshop in the UK. James Krenov taught his students to make wooden handplanes and I’ve carried that tradition on by also teaching my students at Robinson House Studio in London. Over the years I’ve made a variety of wooden planes, but this one, my scraper plane, is the one I find most useful and now teach as a set project.
The design for this plane is my own and quite different to the traditional James Krenov wooden planes, but it wouldn’t look out of place next to them. It’s not easily replaced with a metal alternative. It’s also very light, easy to adjust and the blade is made out of high speed steel and so keeps a sharp edge for longer.
In general, scraper planes are great on tricky grain and highly figured woods. They are also excellent for planing glue off veneers. If I were to choose my favourite hand plane it would be the Lie-Nielsen No.164 low angle, but my scraper plane comes up second.

Materials
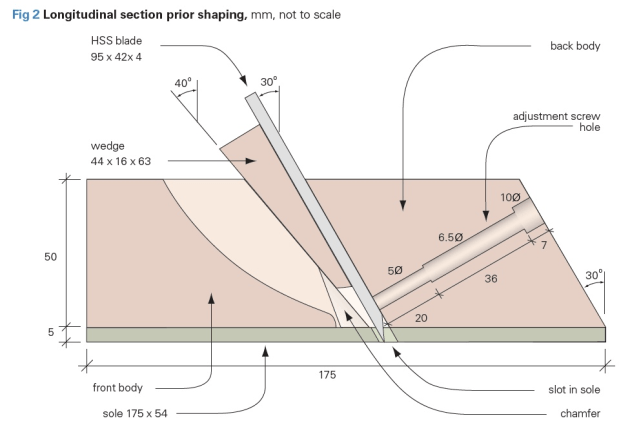
Blade The blades I use are made of high speed steel and sized at 95 x 42 x 4mm. I have these custom made or you can source a blade from elsewhere*. If you use a different sized blade you will need to adjust the dimensions of the plane.
The sole For this I recommend Lignum vitae for its hardness and natural resins. The finished size of the sole will be 175 x 54 x 4mm.
The body Exotic woods such as the pink ivory wood I’m using here have a special use for this kind of project, or you can substitute a stable and readily available hardwood. Here in the UK, I’ve made several from sycamore. The finished size of the plane body is 175 x 50 x 54mm but I would recommend starting with a longer piece so you can machine plane it. You could make two planes – a gift for a friend perhaps? The stock for the body will be sawn into three pieces and the well for the blade sawn and chiseled out before the pieces are glued back together to look as though they’re one piece of wood again. You’ll need a small piece of wood for the wedge as well.
Hardware You will also need a 70 x 6mm cheese head screw. This is to push the blade forward a tiny bit in order to achieve a bigger shaving. The screw will be cut to correct length when your plane is finished.
Step by step

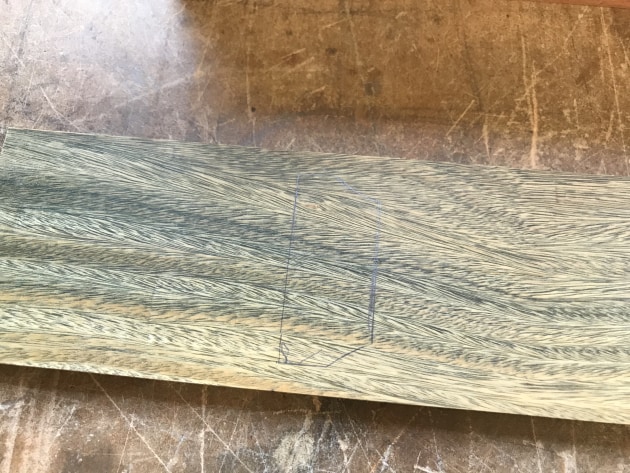
1. Plane your wood oversize to start with. Mark out where the saw cuts will go to cut your wood into three. Draw a ‘V’ on the top so you can put them back in the right order.

2. Bandsaw your wood into three pieces and plane the wood to size, see fig.1.

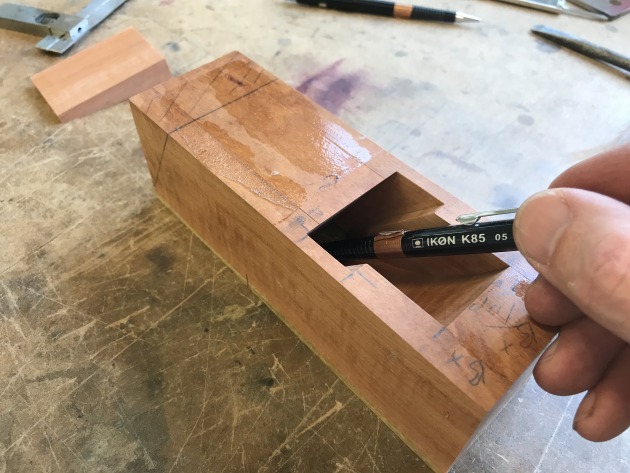
3. On the sides, mark out for the grooves for the blade and mark also where the waste will be.

4. You can rout these grooves using a jig, or you can do this with a chisel cutting to knife lines. Sand to clean the grooves up.

5. Mark out and chisel the small triangular-shaped chamfer that you see at the bottom of the grooves. This stops wood shavings getting clogged inside.

6. Mark out and cut the body into two parts. I used a bandsaw and a tablesaw but you could use a coping saw for the front body and a handsaw for the back.

7. Mark out and cut the wedge oversize in the length but to the correct width.

8. Plane the wedge to a 10° angle to fit the grooves. Take your time here as the wedge needs to fit evenly on both sides. The wedge will also be used to keep everything lined up when you’re gluing the body back together.


9. Sand the inner surfaces of the plane body now before they are glued back together.

10. Hammer the wedge in between the two sides, then position the two central body parts. Clamp these all together and plane the bottom and the top flat. If you don’t do this you will find gluing up will be very tricky.

11. Make a few flat clamping blocks to help keep everything flat when gluing up.

12. When gluing up the body use another packer to stop the wedge coming out at the bottom. Make sure to emove the wedge when everything is clamped up. Do a few test clamp-ups to get the process down. Use packing tape on the clamping block and packer to prevent them being glued to the block. Try not to not glue right up to the inner edges of the front and back of the body to limit the amount of glue squeeze-out in the cavity.

13. The cut-out on the wedge makes it easier to clean out shavings. You can rough this out on the bandsaw or by hand with a coping saw. I then used a die grinder or a rasp to get into the tricky part followed by a small drum sander attached to a cordless drill. A lot of this could be done with carving chisels as well. You can then sand the shaped surface. After the glue has set on the plane body clean up the inner slope where the blade will sit. Use a chisel or a flat tool with sandpaper stuck to it.

14. If you haven’t already done so, cut the Lignum vitae for the sole.

15. Cut the plane body and sole to exact length, and plane the sole to the exact width. This is a very important step to help with gluing the sole on. Plane also the underside of the plane.
16. Place the plane on the sole and mark through the body to show you where you need to cut the slot for the blade.

17. I used a milling machine to cut the slot but you could mark out a 4mm slot with a scalpel or marking knife. I then used a router to cut through before cleaning up the line with a chisel. The corners can be filed square.

18. Chisel a slope on the inside of the sole. This is to prevent the shavings from clogging.

19. Dry clamp the sole to the body to make sure everything fits. Before gluing up clean the sole with acetone to help the glue stick as this species of wood is very oily.

20. Glue on the sole once again using a packer covered in packing tape. I used a medium viscosity superglue as this sticks really well to Lignum, but you could also use epoxy. Make sure you don’t put too much glue around the central cavity (the area you drew around earlier). Another advantage of superglue is the fast drying time, about 20 minutes should do. After the clamps come off you can clean up the mouth a bit more on the underside of the sole. This can be done with a file and a bit of sanding.

21. Mark the 30° angle at the end of the plane body and cut off the excess. I did this on the tablesaw but you could use a handsaw.

22. Next mark out exactly where you need to drill for the adjustment screw.

23. Select the drill bits you need and use tape on them as a depth gauge.

24. Drill the 10mm hole first, then the 6.5mm, then 5mm.

25. Use an M6 tap to cut the thread for the adjustment screw. Test the screw and cut to length if need be. The screw should only just touch the back of the blade.

26. Now for the fun part – well the shaping of the plane definitely is for me. I used a disk sander to rough out the shape.

27. A spokeshave was next used to refine the outside of the plane before sanding up to 240 grit and then using 0000 steel wool. Take care sanding as the Lignum wood dust can contaminate paler timbers.

28. The wedge needs to be trimmed to length. 29. Here you can see the wedge trimmed and finish sanded.

30. Mask off the contact areas of the wedge prior to applying oil. Oil or wax on the wedge as it tightens into these areas will prevent it from working properly.

31. When the finish has dried, flatten the sole by sanding it on a flat surface like a machine bed.
Setting the blade
This blade should be sharpened at 30° and the edge then burnished using a burnishing tool. Make sure the adjustment screw is set back before you start. Place the plane on a flat piece of wood and then put the blade in until it contacts the wood. Position the wedge and give it a gentle tap with a hammer.
A hammer can also be used for the lateral movement of the blade as well. The adjustment screw can be used to achieve a bigger shaving.
I hope this article will help you build a Theo Cook scraper plane of your own. I have enjoyed using mine so much over the years.
* Lee Valley Tools supply Hock Tools Krenov style blades in 1.5" (38mm) or 1.75" (44mm) widths. They come with breakers but can be ordered without them. The size of the scraper plane can be adjusted according across the width.
Theo Cook is senior tutor and vice-principle at 'robinson house studio furniture school', London, UK, see www.robinsonhousestudio.co.uk