Making a Hope Chest
Words: Damion Fauser
Photos: Donovan Knowles
Illustration: Graham Sands
Photo above: Naman Briner
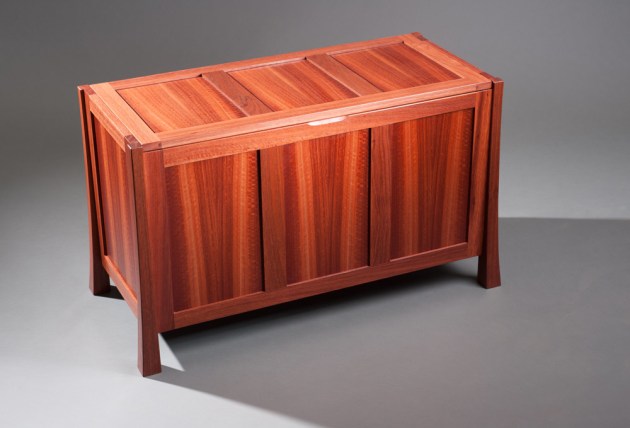
This is one of my most popular designs. Whilst essentially a box, the subtle curves of the legs and the elevated carcase add a simple elegance to an otherwise rectilinear piece.
Two processes are central to the construction of this piece. Firstly, the joinery at the corners of the frame and panel assemblies is made much faster by running the grooves through at the tablesaw, and then backfilling the exposed gap with a solid wood endgrain plug. Secondly, by making fully self-contained frame and panel assemblies I am able to utilise the solid long-grain stiles to cut fast and strong domino joinery to fix the legs to the four walls of the carcase.
These two concepts make this design suited to limited production runs. Recently I made a batch of three, the one shown here from jarrah.

Design
This project is very flexible in terms of dimensions and scale. Most of my clients use them as blanket chests at the end of their bed, so the ability to adjust their height and length is useful. The cutting list and diagram relate to the chests shown, but I’ve made this piece in four differing scales. When adjusting the dimensions, I always do a half-scale sketch to check that I’m happy with the overall proportions.

Be selective in your stock selection. When making frame and panel assemblies, I like to choose straight- grained stock for the frames. This ensures the frame is not visually competing with the centrepiece panels. Using veneer for the panels cleats screwed to rails base screwed on top of cleats from below gives me two distinct advantages. Firstly, it allows me to glue the panels in, adding to the strength and rigidity of the piece. Secondly, it allows me to use decorative book and slip matches, wrapping the grain up from the front panels onto the lid as you can see in the photo opposite. If inclined, you could also easily incorporate parquetry or marquetry into your panel work.
Frame and panel assemblies
The foundation of this piece is a series of frame and panel assemblies, so I usually start there. When I machine the frame stock, I leave the rails and stiles approximately 2mm wider than the final dimensions. This allows me to treat the completed assemblies as a single entity and trim to size post glue-up.
Ensure you also leave the stiles approximately 75mm longer. Doing this makes disassembly after a dry-fit much easier, and it supports the fragile short grain during cutting at the end of the mortises.

1. Twin passes on the tablesaw will centre your grooves.
Set your tablesaw fence to run a groove on the inside edges of all the frame components, noting the muntins get a groove on each edge. As I use veneered panels that are around 6.8– 7mm thick and my tablesaw blade has a kerf of 3.4mm, I set the fence to run two passes, one from each face of each component (photo 1). This ensures the grooves are perfectly centred on the stock, and the resulting double- kerf groove is perfectly sized for my panel stock. I set the height of the blade to cut the grooves 7mm deep.
Now lay out and cut the 6mm domino slots at each corner, as well as at the intersections of the muntins and rails. Dry fit the frames together and measure the windows to determine the size of your panels. Remember to add twice the depth of the grooves.
Cut the panels to size, being careful to centre any decorative effects in the frame windows. I then go through my regime of surface preparation and pre-finishing the panels prior to glue-up, as it is much easier now than post-assembly. I also run the machine marks off the inside edges of the frame components with a handplane.
Glue the assemblies together and while the glue is curing, mill down some 7 x 7mm stock from the offcuts of your frame stock. These will get cut into short lengths of around 10mm and glued into the exposed groove holes from the tablesaw at the corners.

2. Remove the plug excess when trimming the assemblies to size.
Once these have been glued in and you have trimmed your assemblies to the final size, the excess will be trimmed off perfectly (photo 2).
As you are gluing an endgrain plug into an endgrain face at the end of the stiles, the result will be seamless and not visible unless you are really looking for it. Whilst at face value this may seem an excessive process, the fact that I can avoid doing stopped grooves means that I definitely end up in front from a time point of view.

3. Completed frame and panel assembly.
Take the time now to go through surface preparation and also pre-finish the inside faces of your frame and panel assemblies (photo 3). I like to use shellacs and waxes on the inside faces as it gives a wonderfully soft and odour-free finish. If you plan on storing anything perishable, such as antique silks or linens, you should probably go to the extent of using a specific conservators wax product, which will help contain the natural off- gassing of the timber as time goes by.
Shaping the legs

4. Layout leg-to-carcase domino mortises with a story stick.
Now machine your leg stock down to blanks sized as per the cutting list. Design and use a pair of story sticks to lay out the domino slots for fixing the legs to the four carcase components. By staggering the slots you can avoid any conflict of opposing mortises, hence the pair of story sticks – one for fixing the front and rear assemblies and the other for fixing the sides (photo 4).
Because you want to end up with a seamless transition between each panel inside the carcase, ensure you reference and cut your domino slots from the inside faces of each component.

5. Completed legs in rock maple and jarrah showing staggered domino mortises.
Once the domino slots are completed (photo 5), transfer the curved profile from your design to the leg blanks*.

6. Cutting the curved legs at the bandsaw. Tape the offcut back to the leg blank for an easier and safer second cut.
Cut these out at the bandsaw, noting you’ll have to make the first cut on each leg blank, then fix the offcut back in place with some tape. This will ensure you maintain a square and flat blank to register on the table when making the second cut (photo 6).

7. Adjusting the toggle clamps for a secure fit. Use a pattern bit and template jig for production curved legs.
There are two methods for removing the bandsaw marks and fairing the curved faces. Firstly, you can make a pattern-jig for use at the router table or shaper, as seen in photo 7. Note that you’ll need to make the jig with a mirror-image of the profile on the opposite edge, to allow you to always have a square corner safely registered into the jig. Note also how I’ve used the toggle clamps to secure the piece in place and the large dowel handles for safety and control in use.

8. Using a spokeshave to remove saw marks and fair the curve.
The other method is to do it by hand. I use spokeshaves to do the curved faces as well as softening the edges and find this to be an extremely cathartic process (photo 8). When deciding which method to use in my own work, I use a rule of 12 – if I have 12 or less to do, I use the handtools. More than that and it’s off to the router table.

9. A low-angle jack is used to smooth the reaming flat faces. A curved offcut serves as a platform caul when planing the flat faces.
I also then run the machine marks off the remaining flat faces of the legs with a low-angle jack plane. To do this, I utilise a leg offcut as a profiled platform to rest the leg on and fix between the bench dogs (photo 9).

10. Easing the edges with the spokeshave.
Take the time at this point to add a small chamfer to the bottom edges of each leg (photo 10). This creates a delicate shadow line from the floor and also protects the fragile fibres from being chipped out if the piece is inadvertently dragged into position on the floor.
Assembly

11. Clamp sub-assemblies using the curved offcuts to give square clamp surfaces.
When assembling this project, it is far easier to do it in stages. I usually join the legs to the side assemblies first and then do a subsequent glue-up to join the two completed end assemblies to the front and rear components to complete the assembly. Ensure you keep the curved leg offcuts for these glue-ups. By putting them back in place against the curved faces of the legs you’ll give yourself square registration faces for your clamps (photo 11).
Fitting the lid and base
Cut your base component to size and machine some 19 x 19mm stock to use as cleats for fixing the base panel to the inside of the carcase.
I like to use veneered ply for the base panel. Fixing the panel firmly in place adds enormous rigidity to the overall piece. Begin by screwing the cleats along the inside bottom edges of the four walls of the case, lower the panel into place and screw it in place from underneath.
For fitting the lid, you’ll see how I’ve designed this piece so the two end assemblies sit 19mm higher then
the top edges of the front and rear panels. This means the lid can simply nest into place and the top face of the finished piece is one seamless flat plane.
Scribe the as-yet slightly oversized lid assembly against the reality of the assembled carcase and handplane to a seamless fit, as you would fit an inset door. You will need approximately 1–1.5mm reveal at each end to allow for the seasonal expansion of the lid stiles.

12. Hinge mortising jig for a trim router with guide bushing.
For this piece I like to use the Rockler torsion hinges, as they are very robust yet do not require any lid stays. Make a simple mortising jig (photo 12) to use with a trim router fitted with a guide bushing and straight bit, remembering to carefully calculate the offset from the outside edge of your straight bit to the outside of the guide bushing. I also trim the end off the jig to the exact dimension that enables me to simply register this reference end against the inside face of the end of the carcase and go to work.
This eliminates any requirement for repetitive layout. Once the mortises are cut, lay the lid in place, transfer the mortise locations and drill the holes on the back underneath of the lid to accept the hinge screws.
When new, these hinges do have a little springback, so I find it necessary to install some double-ball catches to hold the lid in the closed position. To soften the closing action, I fix small circles of suede, felt or leather (whatever I can find that colour-matches the stock) to the top edge of the front face.
Finishing touches
To avoid having any visible external hardware at the front of this piece, I like to use a 5/20 gouge to carve a simple scalloped recess as finger placement to open the lid.
Soften all exposed edges, complete final surface preparation prior to applying an external finish. I like to seal the surface with a dewaxed shellac and then I usually choose between a top surface of wax or a wipe-on polyurethane.
This is an elegant and relatively simple piece from a design and construction point of view. Pay careful attention to your use of reference throughout and this will be within the capabilities of the average woodworker. Varying its dimensions and panel decoration also means you can personalise it to your space and style.
On a personal note, please understand that this is my design. I acknowledge that it is now in the public domain, and I am therefore more than happy for home-based woodworkers to have a go at one of these chests for their personal use. If you would like to discuss reproducing this design for your business or for financial gain, I would very much appreciate it if you would contact me in the first instance.
* Damion Fauser’s article Drawing and Fairing Curves appeared in AWR#88.
Damion Fauser designs and makes furniture to order in Brisbane. He also teaches woodwork from his Darra workshop.