Making a Hand Tool Chest, part 2
Words and photos: Troy McDonald
In part 1 of this article I outlined the construction of a tool chest suitable for any number of storage solutions, which in my case was aimed specifically at housing an assortment of carving tools and chisels. Here we’ll explore some methods for fitting typical brass hardware to a chest of this sort as well as an option for efficiently constructing internal tool trays to keep everything in fine condition.
Fitting the hardware
The half mortise lock has been the lock of choice for the majority of quality case furniture for centuries. On a chest like this a variant of the half mortise lock called a chest or box lock is used which includes a keeper for mounting to the chest lid.
The main benefit of half mortise locks are the flush surfaces that are left on all cabinet surfaces including the interior. Although the shallow housings that are required to fit these locks were designed initially with hand tools in mind, the modern trim router now makes this job much easier and more accurate.

1. Some lock configurations have a key that is off centre to the body of the lock.
The first crucial step to accurate fitting of these locks is to be aware that the lock configuration can result in a key that is off centre to the body of the lock (photo 1). For this reason it is important to always start the layout from the location of the keyhole rather than centring the lock body on the inside of the chest.

2. Set your trim router to cut a shade deeper than the total depth of the lock.
With the position confirmed, use a marking knife to mark out the housing that will take the main body of the lock mechanism and set your trim router to cut a shade deeper than the total depth of the lock (photo 2).

3. Mark the sides of the lock carefully with a marking knife.
Square up the housing with a chisel and place the lock into position to accurately mark the sides of the lock with a marking knife (photo 3). Note there are two housings to be cut next: one for the top edge of the lock, and one for the brass backing plate covering the lock mechanism.

4. Mark the width of both the lock body and top edge with a marking gauge.
Mark the width of both the lock body and top edge with a marking gauge (photo 4) and finally set the trim router to the depth of the brass lock plate and trim to the scribed lines. Clamp a batten to the top of the chest to ensure the router is supported by a surface of adequate width while routing the top housing.

5. After routing, finish both housings with a hand chisel.
Again, finish both housings with a hand chisel (photo 5)...

6. Testing the final fit of the lock.
...before testing the final fit of the lock (photo 6). Hopefully you’ve managed to get things spot on, but should the housing be too deep some scrap veneer works well to pack the surface of the lock flush.
The next step is to cut the opening for the key but first we need to choose a key escutcheon. The escutcheon is designed to protect the keyhole from wear whilst also providing some decoration. Surface mount escutcheons are available that can be nailed or screwed to the chest, but I prefer inset escutcheons which are fitted flush with the cabinet front.
These escutcheons do require very accurate fitting, but when properly installed will add to the traditional look of the piece. The best inset escutcheons are manufactured from cast brass although many these days seem to be extruded and then bent to a keyhole shape. Regardless of how they’re made, always look for escutcheons as seen in photo 1 that are tapered front to rear to assist in achieving a tight fit.

7. Transferring the measured dimension of the lock to the front of the chest.
Mark the location of the keyhole by first measuring the depth from the lock and then transferring the dimension to the front of the chest (photo 7). Continue to mark in pencil the shape of the escutcheon dimensions measured from the inside of the taper.
Next, measure the diameter of the top circular shape of the escutcheon and choose a clean cutting brad point or forstner bit just slightly under the required diameter. Do not use a twist drill for this initial step as it will tear the surface of the chest and make for an inferior fit.

8. Use a fine blade coping saw to open up the keyhole.
Open up the remainder of the keyhole with a fine blade coping saw (photo 8) and finally widen the opening to final shape...

9. Widen the opening to final shape and taper with a fine rasp or file.
...and taper with a fine rasp or file (photo 9). You should be left with an opening that allows the escutcheon to fit three-quarters of the way into the hole with finger pressure.

10. Press the escutcheon into final position with a suitable clamp.
Once this is achieved, you can press the escutcheon into final position with a suitable clamp (photo 10).

11. Sand the escutcheon flush to leave a gap free fit.
The final step is to sand the escutcheon perfectly flush with the chest leaving a gap free fit (photo 11).
With the lock fitted and tested for operation, the hinges must be fitted to the chest lid prior to fitting of the keeper for the lock. The hinges for this chest were simple butt hinges hidden within a thin 3mm bead that also adds some simple decoration to separate the main chest from the lid.

12. Place the tape on the keeper to be rebated into the lid and lock the keeper into position.
Fitting the keeper to the chest lid is made easier with a small piece of double-sided tape. Place the tape on the surface of the keeper to be rebated into the lid and lock the keeper into position (photo 12).
Close the chest lid and apply some pressure to the lid to activate the double-sided tape before unlocking the lid and reopening. You should end up with the keeper stuck to the lid of the box in the exact location where the housing is to be marked.
After marking with the marking knife, cut the housing with a trim router before cleaning up and screwing into position. At this stage the chest is complete with all hardware fitted.
Internal tool trays
There are a multitude of methods to make divided trays suitable for tool storage but I opted for the simplicity of a mitred frame with a plywood base glued into position for additional strength.
Trays like these look best when made with material in proportion and for this application the sides were machined to a sectional size of 35 x 7mm. I chose to cut a very small decorative bead with a scratchstock on the top outside edge of the tray sides before cutting the rebate on the router table that would house the plywood base.

13. Cut the tray sides to length on the tablesaw.
With both rebates and beading complete, the sides can be cut to length on the tablesaw. For accuracy, set up your tablesaw with stop blocks for repeat mitre cuts to ensure the trays will be perfectly square (photo 13).

14. Tape across the mitred joints then turn the taped pieces over to apply glue to the mitres.
To simplify the glue up of the trays, lay out the sides end to end on a flat surface and tape across the mitred joints before turning the taped pieces over to apply glue to the mitres (photo 14). Fold the taped joints together to form a box and apply small pins or brads to the mitres to hold them in position.
Glue and nail the base into position prior to the mitred joints drying to ensure everything is held perfectly square. Making trays in this way is very quick and accurate and if done correctly will require close to no clean up and final fitting.
Internal dividers
To avoid the need for cutting housings into the tray sides to take dividers I decided to cut dividers with a cove shape that not only supported the chisels but also provided a wider base suitable for gluing to the tray bottom.

15. Cut the coved dividers as long strips on the router table.
Avoiding housings in the sides allowed for greater flexibility in positioning the dividers for tools of different sizes. Cut the coved dividers as long strips on the router table or spindle moulder as shown in photo 15. To improve access to carving chisels, I chose to position individual dividers for the handles and blades, each separated by a gap that allows for the chisels to be easily picked up in use.

16. Made this way the dividers are very functional in use.
To further improve access I mitred the ends of the dividers at 45°. To ensure the dividers are in perfect alignment, cut a spacer to guide their position before applying a small amount of glue to their base and firing a brad into the spacer from beneath the base. Positioning the dividers in this way was both simple and accurate and the result is very functional (photo 16).
Some carved decoration
With the tool trays complete it seemed appropriate to put the chisels to use in producing a small relief carved monogram to fit to the inside of the chest lid. The monogram shown here is 5mm thick with relief carving to a depth of only 3mm.

17. The bulk of the waste was removed with a trimmer and 3mm bit.
The outside edge of the oval shape was rounded over on the router table before carving some beaded decoration.
The monogram pattern was then transferred to the carving blank with carbon paper before removing the bulk of the groundwork with the trim router and a 3mm bit (photo 17).

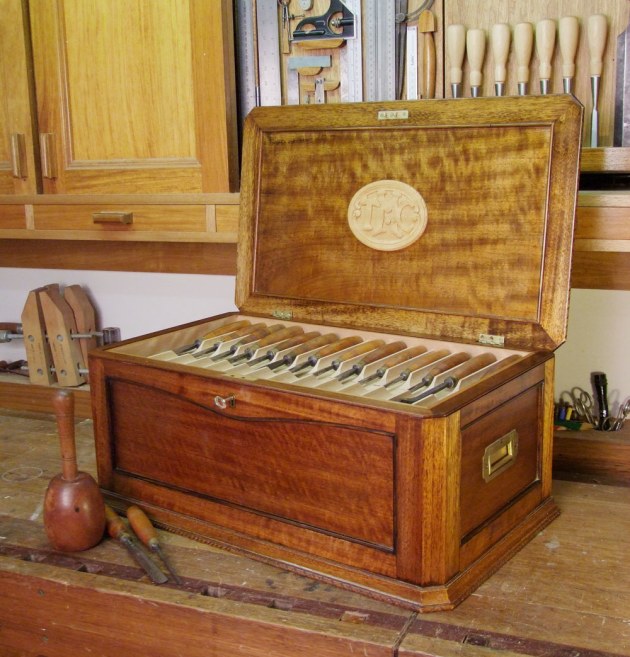
18. The fnished monogram after oiling and waxing.
With the bulk of the waste complete the pattern can be set in with a selection of gouges and straight chisels. The real challenge comes next whereby gouges are used to impart some ‘life’ to the letters by hollowing and rounding over. This creates depth in the design which is further enhanced by ensuring the lettering overlaps in places. After a coat of shellac and wax the final monogram is shown in photo 18.
Plenty of additional storage was provided within the chest for mallets, strops, punches and sharpening stones, and with some creativity there are plenty of options available to accommodate other tools as well.
With only a relatively small quantity of timber required, projects like these present plenty of opportunity for further developing your existing skills whilst trying your hand at a few new techniques as well.
Troy McDonald is an engineer and woodworker based in Brisbane who writes regularly for Australian Wood Review.