Making a dowel hinged box
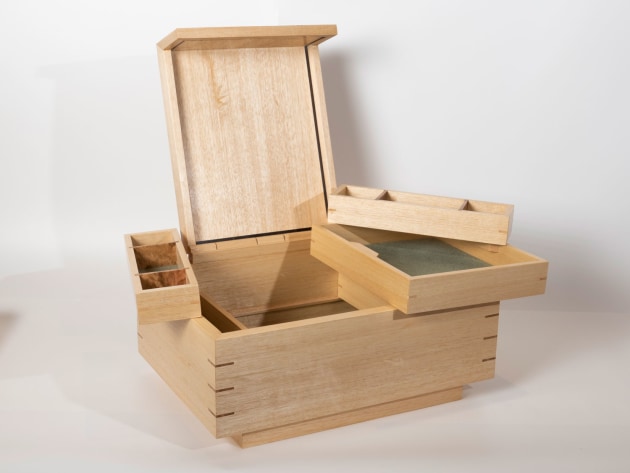
David Hall's multi-layered box, made from silver ash, with grey box burl veneer trimmed with ebony and silver ash on the lid.
Words and photos: David Hall
Illustration: Graham Sands
Facing retirement and an accumulation of off-cuts from many years as an amateur woodworker, it was time to make a plan for using all that wood up. My back was also telling me that I needed to reduce the scale of the pieces I wanted to make.
The solution was to concentrate on boxmaking – but there would be two rules. The first was to use only my own designs, and the second was to make those designs as individual as possible – without being different just for the sake of being different.
From that starting point I feel my work has developed in both quality and direction, to the point where it is starting to have some consistency of style and features. One feature in particular is the use of wooden dowel hinges. There are others who employ them, but they are not as popular as they deserve to be.

Apart from a guide to make the dowel, and another to bore it for a steel pin, there is little cost in each dowel, and if defrayed over a number of jobs, the cost of a good dowel guide is small compared to that of high-end proprietary brass, plated or stainless steel hinges.
Recently I was asked by an overseas client to produce a box for their Australian resident daughter and the making of that commission allows me to show how these dowel hinges are made.
The client’s brief
The starting point of the brief was ‘a very special jewellery box for my daughter, large and with three or four levels of storage’. A liking for a particular box on my website was expressed, but not much beyond that. After a meeting with the end user, some ideas and material choices were sorted but the final instruction was ‘surprise me’. That was both delightful and a little bit scary.
Designing to a brief
The construction of the box, its lid and internal trays are fairly conventional, although the secondary lid/cover that gives access to the lower trays and is itself held in place by the main lid is something that is a little different, although somebody else will have surely used this idea before.

The stepped base elevates the box and reflects, while not exactly matching, the width of the top lid. A shallow drawer in the base opens from the back. It doesn’t constitute a hidden drawer but is more subtle than having its pull visible at the front.
Straight-grained silver ash is used for the box and central Victorian grey box burl veneer is used to provide figure for the lid. I’ve split this stuff for firewood for years in my youth. It is very hard, very heavy and is considered the best burning firewood known in this part of the world, but this is the first time I have used it in my woodwork. A narrow edge trim of ebony and silver ash adds some highlights to the lid.
Making the box

The four sides of the box are cut from a single board of silver ash, resawn on the bandsaw (photo 1) and bookmatched for grain continuity. The same process is used for the shopsawn veneers used for the lid and bottom.

Cut the sides to length, mitre the corners and fine-tune for length with a shooting plane (photo 2). The longitudinal grooves for the bottom and the tray support rails are cut after mitring to avoid tear-out.
Make up the veneered bottom panel and trim to exact size before attaching the wool felt lining. There are certainly more durable materials for this use but felt provides a much wider colour selection. Finish the inside faces and apply a 50/50 glue/water size to the endgrain mitres before glue-up.

Glue up the sides and base for the body of the box (photo 3).
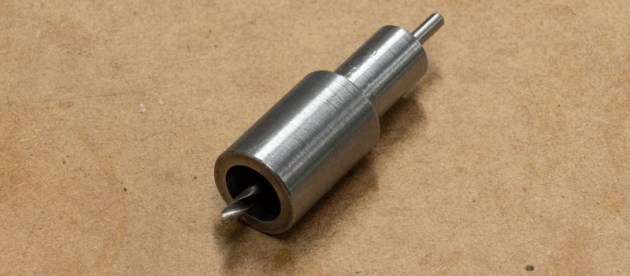
Photo 4 shows a small custom made guide bush is used to hold the dowel when drilling each section for its dowel pin.
A shopmade guide on the tablesaw (photo 5) is used to cut slots for corner splines. The Veritas dowel maker has two blades for a rough and then finishing cut. These are both structural and decorative. Fine-tune the spline thickness on a drum sander.
The fun bit – the dowel hinge
While it is possible to purchase commercial dowel in a number of sizes, the choice of timbers is very limited. By making your own dowel, you can use not only the same species as that of the box, but even wood from the same board for maximum continuity of colour and grain. Some people take this grain matching a step further by flattening the back of the completed hinge so that it is hidden until the lid begins to open. My preference is to let the hinge be seen and serve as an obvious point of difference.
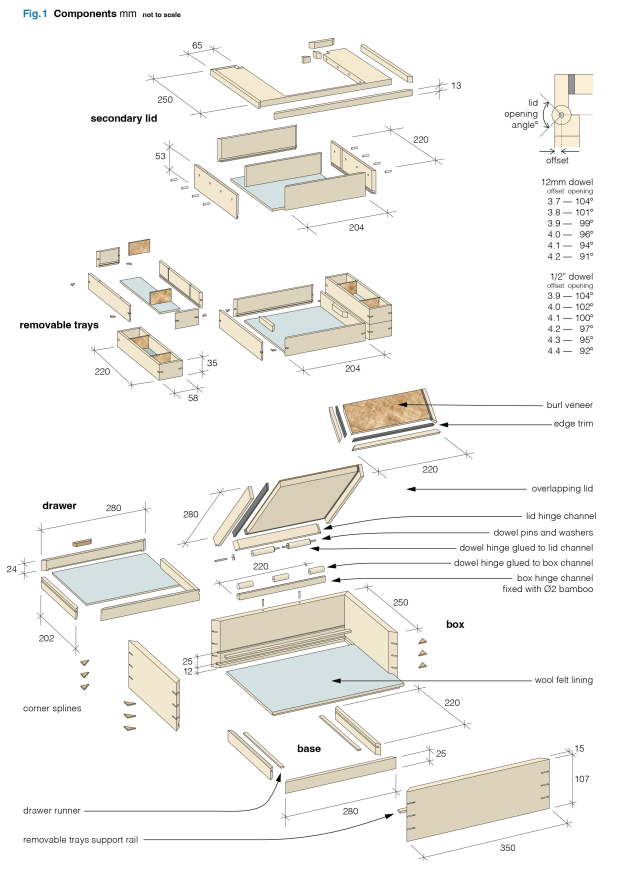
The hinge diameter and its centreline offset from the back of the box determines the opening angle of the lid, see fig.1 above. A value of around 100° is usually suitable.

The dowel needs to be cut using a guide. The simplest of these utilise either a chisel or a plane blade mounted in a wooden block through which the starting stock of square or hand planed octagonal section material gripped in a drill chuck is fed. That can be rather fiddly and a better result can be obtained using a proprietary dowel maker such as the Veritas jig shown in (photo 6) which has two blades configured in tandem.
The first blade takes an initial rough cut while the second makes a finer cut to produce a consistent diameter and clean finish. The jig comes with guide sleeves for infeed and outfeed, and a square socket to hold the stock. A number of different size guides allow for a range of dowel diameters and the blades can be set very accurately.
Once set, further adjustment between uses on the same nominal size is not required until sharpening is needed. Whilst the blade settings and guides are for imperial dimensions, it is possible to tweak the blades to a metric dimension if you wish. So, while using a 1/2" (12.5mm) guide sleeve, the second blade can easily be set to produce a 12mm dowel.

Secure the dowel maker to your bench top, fix the stock into the square socket and the socket into the chuck of a substantial drill. Run at low to medium speed at a slow feed rate and use one hand to support the dowel as it emerges from the tool (photo 7).
The stock needs to be about 150mm longer than required for the finished dowel as the first 50mm or so of dowel can sometimes be a bit inconsistent in diameter and the last 75mm will not feed into the tool.

Cut to nominal length and run a pencil line down the length of the finished dowel to maintain grain orientation and then cut the dowel into an odd number of shorter lengths. In most cases five lengths are suitable – number them in order as you cut them (photo 8). Each can be made the same length but it is better to have an equal glue length for both lid and box.
For example, for this five section hinge, the first, third and fifth lengths are 36mm long and glued to the box channel. The other dowels are 54mm and glued to the lid channel. Add for the washers and with a bit of final adjustment the total length is 220mm. Sounds complicated but it’s fairly straightforward and logical when you lay it out (fig.1).

To drill for the dowel pins, I had a small guide bush shown in photo 4 made into which each dowel section is pushed and held while drilling. A No.30 size drill works well for the 3.2mm (1/8") diameter stainless steel hinge pins. The guide bush was made for 1/2" but the dowel can be wrapped in tape for a snug fit if slightly undersized, or when using 12mm dowel. Don’t take short cuts with a loose fit as the appearance of the finished hinge can be spoilt by even a small misalignment of the pins (photo 9). I set the drill depth to around 15mm.
Individual short pins between each dowel, rather than a single long pin helps compensate for any slight misalignment in the drilling.
Overlapping lid
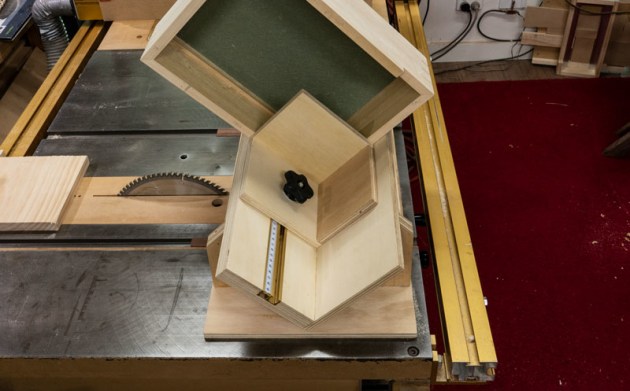
For this design with its lid that overlaps the front of the box, next make up the lid. Here bookmatched veneer with edge trim is used. Before cutting the lid to final size, cut the hinge channels in the rear of the lid and the box back. These are cut on the router table with a core box bit. Care is needed in setting up for the correct offset, but a small variation in the lid opening angle is not usually a problem.

Dry fitting the lid onto the hinge allows for final adjustment of its length. A jig on the tablesaw is used to safely cut the mitre joint between the top and front lid components (photo 10).
After a final check for fit and final length adjustments of the dowels, it is time for the glue-up. This can be done in one step but doing this in two stages is a little less stressful. Yellow glue is used as being both simple to handle and adequate for the purpose. Glue the dowels that are fixed to the box first, then those to the lid second.
Wax applied to the box and lid at the joints between each dowel section prevents any glue squeeze-out from sticking adjacent sections together and locking up the hinge. Carefully open the completed hinge after an hour to check that squeeze-out is not causing problems and then re-clamp, usually overnight. Just remember that there is no dismantling a glue-up hinge, so it is crucial to ensure everything is as it should be before glue-up.
Trims and dividers
For the secondary lid, bookmatched veneer and edge trim was again used. The tray that forms part of this piece and the internal trays are all constructed from silver ash with plywood and felt bottoms. Splines were used on the mitred corners.

Sub-dividers within individual trays are secured in cross grooves that are cut using a router guide sled (photo 11). The router sled makes it easy to cut grooves for the sides that hold the trays.

For the mitred corners, a guide fence and blue tape assist with alignment and glue-up (photo 12).

For these smaller internal components, blue tape stretched over the joints provides sufficient glue clamping. A large sheet of sandpaper fixed to a flat laminated board enables final flattening of the glued-up boxes (photo 13).
Finishing touches
After carving my logo into the back and giving everything a final sand, the finish is applied. For this box, blonde or white shellac with an overcoat of wax was used. I use a microcrystalline wax for the improved resistance to finger marks it gives. It’s expensive but goes a long way. Shellac gives a beautiful look and is very convenient for finishing internal surfaces prior to glue-up although it is not as scratch-resistant as I would like. Fingernails and box lids are not happy partners, so I’m looking at other options that do not require spray equipment.
At the end of it all, it’s time to take some photos, make up the bill, start thinking about the next project, and call the client. Hope she likes the surprise!
First published in Australian Wood Review magazine, issue 119.
David Hall is a life member and past president of the Victorian Woodworkers Association. After a career in engineering, he has retired to North East Victoria, where he is loving the blue skies and pursuing his love of woodwork. Learn more at www.davidhallwoodworking.net