Making a carver's bench

Photos: Phoebe Everill
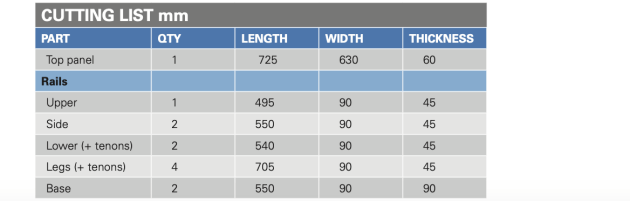
Illustration: Graham Sands
This compact workbench is designed to be demountable and can even double as a kitchen island bench, or sit on a small balcony. The top is 725mm wide x 630 deep x 60mm thick with a 40mm overhang front and back and 25mm on each side. It’s made from 190 x 45mm F17 KD Vic ash, quartersawn and clear of defects, which is cut into thin strips that are glued up into a panel.

To create the strips, rip each length of the hardwood twice, using the same setting on the bandsaw to get as close to 60mm finished as you can, not forgetting to factor in the blade kerf. Saw the strips to rough length and width, and then dress them on the jointer and thicknesser. They only need to be the same, not completely finished as there will be more planing and sanding once the top is glued up.

Keep the best quality strips to the outside as these will be your working edges. Chalk on an orientation triangle to keep them in order. Clamp your work before marking out for the joinery, and also to check for any gaps between the strips (photo 1). Three biscuits were used to strengthen the joins, and to help keep the surface flat during glue-up.

The biscuits are placed 100mm from the end and also in the centre. Do not extend the lines to the very edges – this is so a slot cannot be cut in the outside face (photo 2). Set the biscuit cutter for centre of the thickness, in my case this was 30mm for size 20 biscuits.

Glue up the panel when satisfied that the joinery lines up. Balance the clamps, top and bottom to ensure the top stays flat. I used a polyurethane glue similar to the type used to laminate F-17 structural timber. Check the top is flat with a straightedge and adjust or add side clamps if required (photo 3).
The base frame
This is made from 90 x 45mm recycled oregon, but most hardwoods are also suitable. For the base, glue two 90 x 45mm sections together, again using polyurethane glue.

After they’re in clamps, cut the rest of the pieces to rough length and dress to final width and thickness. Once the base sections are dry and excess glue removed, joint and thickness these to 90 x 90mm and dock to final length. Do the side rails with the same setting (photo 4). Mine are 550mm long leaving a 40mm overhang front and back. I cut the angles off the top and bottom rails at 30° on the mitre saw.
Marking and measuring
This bench is all about the mortise and tenon, a super strong and foundational joint. You can cut this whole job by hand, or use machinery as I did – just take your time as the results will be better for it!
For any joinery to be a success the mark-up is the most critical part of the process. Just making sure your pencil is sharp can mean the difference between joins that come together, or those that are tight or loose. It’s also crucial to mark out waste areas so you know which side of the line to cut to.
I use a pencil gauge, ruler and try square to do the initial lines and then bring both pieces back together to check if it actually lines up and makes sense. Once I’m happy with the pencil lines I change over to a knife line for more accuracy, and also to reduce
tear-out. Then, to minimise confusion when machining, I erase all the pencil lines. I only ever want the minimum of lines to work to.
Cutting the blind mortises
The legs, side rails and base sections are joined with blind mortise and tenons. This means the mortise has a flat base that does not go through to the opposite face, leaving the tenon end fully enclosed.

Having marked out your mortises on the side rails and bases make sure they’re on the same face as the angled ends you cut off earlier (photo 5).

Set the mortiser to a 30mm plunge depth, and check the bit is sharp and set parallel to the back reference fence. Start at the ends and work towards the middle (photo 6). You can chisel the mortise out by hand of course, or use an overhead drill with a forstner bit.

Once you’ve completed the four base mortises you’ll need to reset the depth plunge as the side and upper rails are only half as thick. With eight mortises cut, pare them clean, making sure the sides stay vertical. It can help to clamp an off-cut with a true 90° face to your work (photo 7).
The leg tenons


Using an off-cut of the leg stock, I mark up the tenon, and then use this sample to set the bandsaw for both width and depth of cut (photos 8, 9). Ensure the blade is on the waste side of the line, and make the test cut. Pull the test piece out, flip the work 180° and cut again.
Cut off the face cheeks then check your sample tenon against the actual mortises. If you need to adjust the fence on the bandsaw, a piece of masking tape on the table can be a handy record of the fence movements.
You are aiming for a ‘push’ fit, but err to the side of tight. If you need to redo the cuts, simply cut off the end of the sample and try again. Setting the bandsaw correctly can save a lot of time later in handwork refining the fit. I use the tablesaw with a stop set to cut away the cheeks of the tenons – this gives a clean shoulder and uniform length to the tenons.

Test the tenon on the sample piece into the actual mortise until you get a firm fit that hopefully fits all the mortises, then proceed to the actual leg stock (photo 10). Once the face cheeks have been cut, readjust the fence, not the depth stop, and cut the edge cheeks.

Same on the tablesaw – cut all the face cheeks off using a depth stop; reset the blade height and cut the edge cheeks again use the same length stop for a clean shoulder cut (photo 11).
Fitting the joints

Take your time fitting the joints, and don’t despair if it takes a while. If the tenon is too tight by less than 1mm, adjust with a shoulder plane, tenon float or rasp. Chamfer the corners to reduce tear-out, this helps with fitting as well (photo 12).

If the tenon is more than 1–2mm larger in size take it back to the bandsaw for another cut and then fine-tune with hand tools. If the tenon is too loose, a commercial veneer or two glued to the cheek will make it bigger. Mark them once you have a good fit as this is also your test run for glue-up (photo 13).
Through mortises
The through mortises that bring the lower rails into the leg assemblies are next. These need to be cut before the leg assemblies are glued up.

These mortises are 60 x 20mm on the outside face of leg. As before, use pencil and then a knife line to get a clean opening to the mortise. Use the first mortise as the datum, then with a square and knife mark up the other three leg mortises as cleanly as you can as they will be seen (photo 14).
At this stage we are only doing the lower rail mortises. The upper rail is getting a knock-down bolt connection. When setting up the mortiser for these joints, add a sacrificial piece of ply underneath to minimise tear-out.

After each drilling process, move the sacrificial ply so you are always drilling into a clean surface. Cut these mortises and clean up as before (photo 15).
Fitting the bolts
Using bolts makes it easy to bring the bench together. You could also bolt the lower rails, but I prefer the look of a pegged mortise and tenon.

It’s easier to drill the first bolt hole before glue-up, locating the centre of the side rails on the outside edge (photo 16). For the 1/2-inch bolts I used a 13mm drill bit, so the bolts can slide easily through.

Using the overhead drill ensures a vertical and true result. Secure the rail to the worktable and drill slowly. It’s important to get this square if it is to meet up with the upper rail and its mating connection (photo 17).
Check everything lines up for glue-up, then sand all faces to remove pencil marks or tear-out. Remember to move your orientation marks to places that won’t be affected by sanding, or have them on masking tape.
Lower rails
Position the completed leg frames on the top and allow a 25mm overhang on each side. Measure between the inside of the legs to find the distance between the shoulders of the rail. The tenon should extend 25mm through the vertical leg – this aligns the frame with the width of the top (see fig.1).
Cut these as for the leg tenons on the bandsaw, tablesaw or by hand. The dimensions are governed by the size of the mortises that were cut earlier in the legs. Be careful to keep these tenons tight and crisp as they are ‘seen’ and not blind.
Creep up on the fit (with a shoulder plane, rasp and chisel), and chamfer the front of the tenon so it is less likely to get damaged when fitting. The joint you are after is a push fit that only needs a little ‘persuading’ with a rubber mallet.
Use a permanent marker to label the orientation of the tenons to their mortises, this will help later if you need to disassemble the bench and put it back together.

Clamp the frame together and mark the outside top surface of the tenon, I use a marking knife and a sharp pencil (photo 18). This indicates where the back of the locking pin will be located.
While still in the clamps, measure for the final length of the upper rail. Cut this to length, then place vertically in your vice, cross for centre and punch the location with an awl before using a dowelling jig to drill a pilot hole 10mm diameter and 70mm deep. Change over to a 13mm drill and increase the diameter to accommodate the knock-down bolt.

I find these knock-down bolts can be tricky to locate if your holes are not drilled accurately, something that is hard to do into endgrain. The dowelling jig gets the pilot hole set right and then the final hole is easy (photo 19).
Using a 25mm forstner bit in the overhead drill, locate the hole for the locking nut 50mm back from the edge. Set a depth stop 35mm deep to give enough clearance for the bolt to locate smoothly into the locking nut.

Photo 20 shows what the top rail should look like prior to fitting into the frame. Test fit the bolt to ensure it engages properly.
The hole for the locking peg was drilled on the mortiser with an 8mm chisel bit and a sacrificial block underneath the tenon to reduce tear-out. This can be done just as well on an overhead drill – pare out afterwards to fit your peg.

The important thing is to have your hole 1mm back from the line to give the peg a drawbore effect and maximum grip (photo 21).

For the pegs you need a very dense hardwood like the gidgee I used. Machine to 8 x 10mm and at least 100mm long, longer is fine (and safer). Plane a very gentle taper onto the peg and keep checking the mouth of the hole in the tenon. You want the pegs to ‘drop’ into it and grip at the top (photo 22).
Once you have four fitting, it is time to file a taper into the peg hole. I use a sharp paring chisel and a fine rasp to open the front of the peg hole. Start your taper 2mm back and fine- tune slowly as the results will be seen.
Dry fit using clamps to help ‘locate’ the joinery, don’t hit the pegs too hard as you may split the endgrain. Fit the top rail, locate and tighten the bolts, and the frame is now ready for sanding and coating.
Finishing the top
Flatten both sides of the top with a jointing plane, first with diagonal passes, and then with the grain as you check with a straightedge – my top then went through the thickness sander at 120grit. My benchtops get two coats of hardwax oil (top and bottom) to protect them from glue spills, and also to help keep them flat.
As a knock-down bench, the top is not permanently located with fixings – it simply sits onto dowels in the top of the frame. I used 10 x 40mm dowels, drilling 20mm into both surfaces.

A drilling jig will ensure the dowel holes are vertical in the frame (photo 23), or sight them using a couple of squares. To mark the corresponding drilling positions in the top, insert dowel centres (up-ended screws work fine too) into the holes and position the top so the overhang is even before tapping with a rubber mallet on the top.
Drill the top using the same system as before and then countersink the holes to prevent damage when the top is positioned onto the frame. Mark one corner as the datum to locate the top from and glue the dowels into the frame. Test fit the top and make adjustments by increasing the size of a hole that isn’t lining up properly – but don’t make the top loose!
Bench hardware
This thick top is ready to take any under-bench woodworkers vice, or if you don’t want to permanently fit one of those, then the clamp-on style of carvers vice may be for you. You can also drill holes to receive bench dogs and holdfasts for extra holding power. With a compact and knockdown bench like this, you are now ready to take your woodcarving anywhere!
Phoebe Everill is a furniture designer maker who runs her own woodworking school in Drummond, Victoria. Learn more at www.phoebeeverill.com In the December issue of Wood Review magazine Phoebe shows how to make a light and simple stool with a Danish cord woven seat.