Machining small parts safely

This article deals with safe practices when working with small wood pieces on saws and planers. Most woodworkers use dry, rough-sawn timber. The drying process causes and then ‘locks’ in some stresses, especially in figured woods. The aim is to arrive at a finished component that is not still trying to pull this way or that due to stresses within its structure. By ‘component’ we mean a wooden part that is dimensioned to final specifications.
Downsizing is better
While many makers plane and thickness full length and full width boards to final thickness prior
to downsizing into individual components, it is better to take rough-sawn boards down to the smallest, workable section and length on the bandsaw before further individual machining.

1. The minimum length for planing and thicknessing should be the distance between your machine’s in-feed and out-feed rollers, plus 100mm.
These smaller pieces must still retain enough ‘meat’ on them for proper dimensioning later, and yet cannot be too short to plane and thickness safely. The minimum length, I would say, is the measurement between your thickness planer’s in-feed and out-feed rollers, plus 100mm – around 300mm in total (photo 1).
How to downsize safely

2. Marking out for downsizing – shorter components may need to be ganged end-on-end.

3. A batch of bandsawn chair parts stacked in groups.
If I’m making a structure that is curvilinear and uses mainly shortish lengths (such as chair parts), I would make several, precise 9mm MDF copies of all the shapes, together with copies of the rectilinear parts. Being careful with grain direction, these are placed directly on to a rough-sawn board and marked out with a felt- tipped pen, then bandsawn just to the outside of the line (photos 2, 3).
This should ensure that enough material remains for later machining. Components shorter than 300mm may need to be ganged end-on-end if there are more than one, or simply downsized longer than required. Longer rough-sawn boards may require careful, staggered cross-cutting with a jigsaw to make them more manageable on the bandsaw – a kind of pre-downsizing downsizing! Another bonus in this downsizing method is that twisted, bowed or cupped boards will still yield components of the desired thickness once machined.
FEWTEL
This acronyms describes the correct sequence of machining to arrive at a perfectly dimensioned piece of wood: F = Face, E = Edge, W = Width, T = Thickness, E = End, L = Length. So let’s ‘fewtel’ some wood...
Face
Each of the smaller roughed out pieces first needs a face created on the surface planer. Some, if not all, will be too small to pass over the planer in the standard way, so we need a way of doing this that keeps fingers well clear of the blades. Let’s say we’re discussing a range of small sizes, some as small as 300 x 25 x 25mm in the rough.
Never place hands or fingers directly on top of small sections of wood, especially at the pushing end. For standard machining of boards, so-called Euro guards are cleverly designed to force the feeding hands safely up and over the guard, the wood underneath. Euro guards should always rest against the fence, and only ever retracted for edging purposes, and positioned just above the wood. Standard hold-downs and push-blocks with rubberised pads are too cumbersome for smaller pieces, and tend to completely obscure vision of the workpiece.

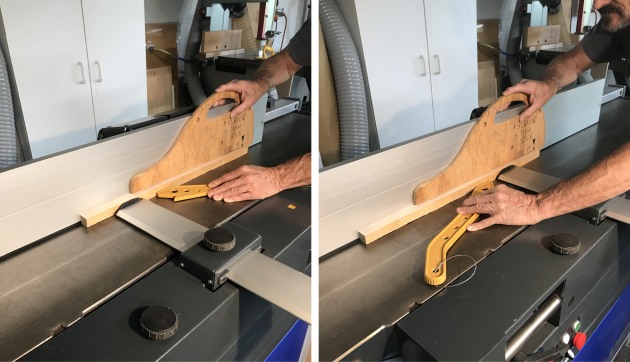
4. The author’s large shopmade push-stick has a ‘hook’ at one end and can be used while machining parts from 250mm to 900mm in length.
Typically, sections of wood as small as 15mm square can be safely planed with the right aids. I have a push- stick made from 12.7mm plywood and shaped a little like an old car that extends just above the fence of the machine, and is long enough to hold down pieces of wood anywhere between 250mm and around 900mm long (photo 4). It has a ‘hook’ at its trailing end that drops down over the end of the component to push it along.

5. Get into the habit of standing behind the planer, not over it.
This first step – creating a face, is a simple matter of gently holding the piece of wood down while pushing it along past the cutter-block. When planing, try to get in the habit of standing behind the cutter-block while pushing away from you (photo 5). A light cut, and several passes is better than one or two heavy cuts.

6. Showing how to present grain direction to the planer.
In some cases you’ll understand the analogy that a dog only likes to be stroked from head to tail, rather than vice versa, so grain direction is an issue to consider too (photo 6). It is always advisable to place the concave rough face down on the table as this gives the piece a positive ‘heel’ and ‘toe’ to engage the table, steadying the piece, but be careful to apply just enough downward pressure, mainly at these points to move it along.

7, 8. Safer planing is achieved by using a push-stick and applying hand pressure only over the tables, not past the cutter-block.
Small-section pieces that are longer than, say 800mm, must be pushed manually over the cutter-block, hands not leaving the in-feed table, before placing the push-stick over the ‘heel’ to safely complete the cut – the free left hand now resting safely on the wood on the out-feed table (photos 7, 8). Mark the face with a pencil once cut (photo 9). There is no need to push the wood hard up against the fence as edging comes next.
Edge
10, 11. Edging small section pieces using two push-sticks, one to push...the other to hold up against fence.
The next stage requires a little more thought and effort. Place the newly planed face up against the fence and, as before, make sure the edge facing the table is concave. This time you need to hold this face hard against the fence while pushing the component along with the push-stick. I use a hold-in stick in my left hand, which rests stationary on the in-feed table for all of the cut excepting the last few inches, when I transfer it to the out-feed table (photos 10, 11).

12. Using the EURO guard to push the edge of a component against the fence.
Alternatively, the Euro guard performs this task to great effect, as its rounded plastic end (photo 12) can be held and pushed in with the left hand, following any irregularities on the rough surface. If your fence is properly set up you will now have planed two adjacent faces to exactly 90°. Mark this new face too for later reference (photo 13).

13. Marking the next machined face for later reference.
Width and thickness
Now, it becomes somewhat easier, as we move to the thickness planer to arrive at the desired thickness, and the saw and/or the thicknesser to take the piece of wood to its final width. The end result will mean that you have four faces/edges that are flat and parallel with one another.

14. Don’t exceed a ratio of 1:7 when thickness-planing on edge – use the rip-saw instead.
It’s good to note that it’s not sound practice to exceed a ratio of 1:7 in terms of thickness-planing on edge (photo 14). If pieces exceed this, your only recourse is to rip-saw it, and clean up with a hand plane – a common method with thin drawer sides.
There are two other points to take note of when thickness-planing small-section pieces on edge. Firstly, the serrated in-feed roller may leave nasty marks when taking shallow cuts (photo 15), and secondly, if an individual piece is fed through one side of the machine rather than in the middle, the feed rollers will likely begin to push the piece over, taking if out of square (photo 16). The solution to the latter is to feed material straight down the middle of the table, and at right angles to the cutter-block. Ideally, gang-feed more than one at a time to avoid the problem associated with the former, or have some sacrificial pieces handy.
End and length
Small pieces, like bigger ones, must be square-cut at both ends to complete the FEWTEL process. Shaped pieces will only have been faced and thickness-planed at this stage, still requiring edge and end shaping.
Cross-cutting short lengths
From the outset, it should be stated never to attempt to saw rough-sawn wood on the circular saw. Every saw should be equipped with both a rip and a cross-cut fence. While these names should be self explanatory, we sometimes use both simultaneously when cross-cutting. The general rule in using a circular saw is that the longer edge (or end) of any given piece of dressed wood should always be up against either one or the other fence.
Many rip fences can be flipped over, presenting a much lower fence surface to the work, and they can also be retracted backwards clear of the blade. It is in this retracted position that the two fences can be used together for cross-cutting long strips into precise length, short little pieces, determined by the rip fence setting. In this mode, the off-cut (the piece you’re keeping in this instance) can’t bind between the fence and blade.

17. A 100mm drop-on plate is used here instead of retracting the rip fence for multiple short length cross-cutting.
You can also achieve the same result with a drop-on, 100mm plate that obviates the need to retract the fence (photo 17).
The method above is the safest possible way to dock multiple identical pieces from longer pieces, however short and small dressed sections can also be square-ended safely, within reason, as long as your saw has a sliding table that runs within a few millimetres of the blade. In this case, slide the cross-cut fence as close to the blade as possible and place a piece of self-adhesive sandpaper to the table to add grip to the workpiece.

18. Using a hold-down stick to push small and short lengths against the cross-cut fence, with sandpaper adding grip.
You also need to make a special hold- down stick to help keep fingers at a safe distance (photo 18). This way, you can safely cross-cut small sections of wood down to a minimum of about 30mm in length.

19. A mechanical hold-down clamp prevents twisting forces for larger, short- length pieces.
When bigger, short pieces need cutting in this way, it is advisable to use a dedicated mechanical table clamp to help resist the greater twisting forces (photo 19).
Ripping on the circular saw

20. A safe ripping length equals the diameter of blade and riving knife, plus an extra 100mm.
Ripping solid wood, especially short pieces, can be risky in spite of guards and riving knives, so I would advise that lengths are never shorter than the diameter of your blade, plus riving knife, plus about 100mm. This is about the minimum safe length to ensure the riving knife is engaged before the blade completes its cut (photo 20).

21. A zero clearance blade insert can prevent blade jamming.
Ripping often entails moving your hands directly towards the blade as a piece of wood is fed through, so a guard is clearly a must, as is the need to lock the sliding table, if you have one – very important! A zero- clearance table insert also helps to prevent narrow off-cuts jamming the blade (photo 21).

22. Ripping a standard width component safely using a suitable push-stick.
It should be said that, wherever possible, it’s better to take small pieces to their desired dimension on the planer and thicknesser, so there is no need to rip-saw them. Only very rarely do I rip-saw such components on the circular saw, and those that I do, are pieces that exceed the 1:7 ratio of thickness to width as discussed earlier (photo 22). Most of the other rip-cuts I do entail blind or stopped ones only – where the blade doesn’t penetrate through the top of the wood. Of course, in cases like this, you are forced in some cases to remove the guard, but as before, the wood is still controlled with push- sticks, not directly with fingers.

23. Using a fence-mounted sliding push-stick for ripping small sections keeps hands clear while still allowing space for the blade guard.
However, when it’s absolutely necessary to rip-saw small sections of wood, such as a 15 x 15mm one for example, I use a special push-block with a handle positioned at a safe distance from the blade. To avoid the guard fouling the fence for standard ripping on very narrow settings, this block fits loosely over the fence and allows it to track properly without wandering (photo 23).
In this way the guard can remain attached to the blade and can be dropped to a safe height without it fouling the push- block or the fence. A separate stick is used in the left hand to hold the wood against the fence as it moves through the sawblade, or a feather board or two can be attached to the sliding table.
Other ways
A story such as this can only highlight the most obvious solutions to the areas of risk on these two machines. Hopefully the seed is sown for you to come up with other solutions that enhance safe practices. Push-sticks can be replaced, fingers can’t. The secret, in my years at the bench, is to design them for easy, simple use to ensure that they are used.
Note, in some cases the blade guard is removed for image clarity.
Neil Erasmus is a designer maker, teacher and writer. See Instagram @neilerasmus