Jules’ Box
Words and photos: Richard Vaughan
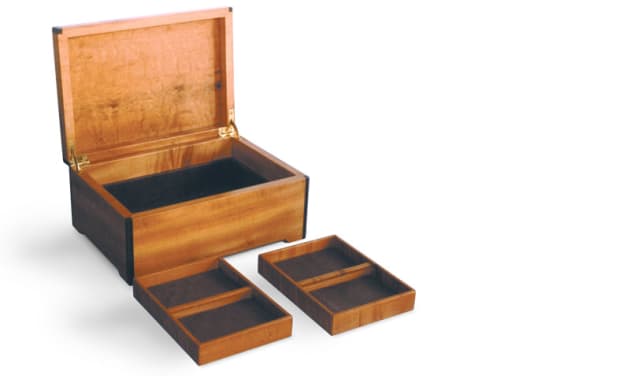
Boxes make welcome gifts, and making a box is a delightfully absorbing but manageable project. The box shown here was straightforward to make but was received with great pleasure by my niece.
Making this box depends on the router so this story offers more reasons why the router is such an indispensable tool. Using a router table makes interesting variations much easier. Hopefully there are also some techniques which you can make use of whether or not you choose to make this box.

Making the box
Tasmanian myrtle is a pretty wood and one I love working with. Its fine, firm texture cuts very cleanly and it comes to a lovely finish. I dressed a length to 110mm wide x 12mm thick then marked it out so the figure would flow around the box.
If you don’t have access to a tilting arbor saw you can still have mitred corners. Dock the components to the finished sizes. With a 45° bit in your router table you can gradually cut the mitres in a series of passes, raising the bit a little each time. You will minimise the chance of breakout at the end of each cut by pushing a piece of same thickness scrap against the back of the workpiece as you rout.
I veneered 4mm ply to form the lid and the base. Make the ply about 20mm oversize and put veneer on both sides to balance it. Laying the grain of the veneer at 90° to that of the faces of the ply will aid stability. Clamp it firmly between two flat surfaces. PVA glue is fine for this but remember to put paper or plastic between the veneer and the clamping surfaces.
Once the veneered ply is thoroughly dry–give it at least six hours–and sanded, you can use vernier calipers to determine the thickness and therefore the dimensions of the rebates in the sides which will house it.
Set the router table up to cut the rebates for the ply in the top and the base (photo 1).
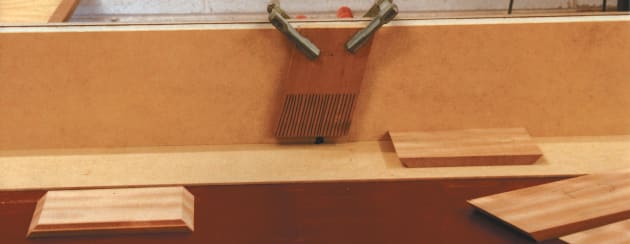
I clamped 3mm MDF to the fence and the table and then the router bit was raised through it. This technique gives zero clearance around the bit and maximum support for small items. The shop-made featherboard is held by two clamps so it won’t pivot and jam the work. It is positioned so the component can move without forcing but also without the chance of vibration.
You should take three passes to get to full depth. The rebate for the base ply is set back 8mm from the edge. Dry clamp the sides then cut your ply for a snug fit.
Give all the interior surfaces a final sand to at least 240 grit and put masking tape along the interior edges to catch glue squeeze-out. Then do a full dry clamp to be sure all is perfect.
You’ll probably recognise the clamp in photo 2 as a luggage tie-down. Its ratchet action and quick release make it a very handy tool. Watch out for them on auto accessory shelves but be aware that the not so convenient version with hooks seems more common.

The corner clamping blocks were made decades ago, specifically to make strap clamps more effective on mitred boxes and frames.

The blocks put uniform pressure along the full length of the joint. I made strips of them on the tablesaw from 19mm ply, though you could also make them on the router table if you don’t have a tilting arbour saw. I then docked these into sets of four in several sizes. They were sealed with polyurethane and rubbed with paraffin wax to reduce the chances of an errant drop of glue bonding them to a box. Strips of newspaper add reassurance.
Since my gluing tests (see AWR #47) I have more confidence in endgrain gluing, at least in small scale work, so cross-linking PVA was used for this box. Letting the glue sink for a minute and then brushing a second coat on the endgrain of the mitres ensured enough for sound joints. Gluing the ply for the base as well as the top further strengthened the box.
Once the glue had dried and the surfaces smoothly cleaned up, the corners of the box could be routed (photo 3).

Once again the sacrificial MDF on the router table ensures no wobbles in the cut. Australian red cedar 8mm square was glued into these rebates to provide contrast. Masking tape held the cedar in place while the PVA dried.
The veneered panel in the lid has a 4mm border of the same cedar which gives a pleasing visual definition. It’s also a convincing way to cover up any imperfections in the fit of the ply.
To cut the groove for this inlay I used a trimmer with the straight fence (photo 4).

The fence has been extended by attaching strips of ply—it’s more stable than solid wood. The ply has been sealed then wiped with paraffin wax so it glides without a stutter.
To be sure of crisp edges on the channels for this inlay they were first defined with a sharp cutting gauge. By loosening a screw on the gauge I can reverse the bevel of the cutter and make a vertical rather than chamfered edge cut on each side of the rebate.
The box was held in the vice to fit the inlay—you probably don’t need the extra excitement of a moving target at this stage.
The 4mm square cedar (of course extra lengths were cut to be safe) was mitre sawn and pared to a pressure fit. Once again give the glue at least six hours before delicate use of the cabinet scraper and fine sandpaper brings it flush with the lid. The reason you need to give the glue time to fully dry is that the water in it will expand the wood and if you rush to make it flush it may dry and shrink to below the surrounding surface.
Lid
With the bandsaw or tablesaw and a fence the lid is now cut from the box. Some careful planing will remove the surface roughness left by the sawblade and make a seamless fit. By making the box as a closed unit and then sawing to make the lid you can be sure that the lid will be exactly the right size with perfectly matched grain and figure.
After a trial run on scrap, the depth of the rebate for the hinges is set with the cutting gauge and the edges are marked with the knife for paring to depth. The cavity for the hinge stay was made on the drill press (photo 5). The brad point drill bit is less likely to wander off course at this critical stage than a standard jobbing or metalworking drill bit.

The photo also shows how the centres of the hinge screw holes have been marked (by eye) with an awl (a sharpened nail also does the job). A tapered drill bit, also in the drill press, was used for the screw holes. I used 9mm screws (3/8”) in two of the three holes on each hinge flap to make sure the hinge worked. For the final assembly 12mm (1/2”) screws were used to get a longer lasting snug fit.
Base details
Once again the router table came into service, this time to make the clearance between the feet. The depth of cut was marked with the cutting gauge. Then the edges of the feet were sawn to that line to prevent the splitting that could make the feet shorter than intended.
Blocks of wood were clamped to the fence on the in-feed and out-feed sides of the router bit. They were positioned so the box could be rested against the first block then swung into the router bit just inside the saw cut. It was then pushed along the fence to stop at the second block inside the other saw cut. Only a couple of millimetres were removed all around then the fence was moved back another couple of millimetres for another round of passes.
This is a simple box, just right angles and mitres, so the detailing is just 45° chamfers using a chisel, skew chisel, cabinet scraper, square, mitre square, cork sanding block and Japanese saw (photo 6). Note that the jaws of the vice have been faced with leather so that whatever it holds is less likely to be bruised, or to slip.

The little yellow rectangle between the small square and the 150mm steel rule may puzzle some—it’s sandpaper glued to a small piece of ply so the narrow edges can be sanded flat right into the corners. Using your fingertip and/or folded sandpaper tends to round the surface and this is a simple technique to keep the facets crisp. The top corners of the lid were pared to chamfers with a chisel.
Note also the lamp/magnifier in the photo above. Perhaps you don’t yet need such assistance but it seems that on small items even tiny flaws really stand out and such a lamp helps avoid that embarrassment.
The trays were simply made of 3mm myrtle mitred and glued. They rest on 3mm myrtle mitred to fit snugly in the box.
The box was sanded to 400 grit, given two rubbed coats of Floorseal, two rubbed coats of Fine Buffing Oil and was ready in time for Julia’s 18th birthday.
Router Rules
Lightness Of Touch: This is a reminder of one of the standard mistakes made with the router. The router should be used in the way you use a sharp chisel to pare, as if you are peeling a peach, not chopping down the tree.
Trying to take out too much with a single pass will, at best, result in splintered or ragged edges. But it can also cause the router bit to grab, and rocket the tool and/or workpiece across a room with disastrous consequences.
Secure the Workpiece: On the router table the workpiece is controlled by feather boards. When the router is handheld you need to hold the workpiece with at least two clamps, because using only one clamp allows the work to pivot.
To be extra sure I generally clamp the work onto a piece of rubberweave mat (available under various trade names) laid on the bench.
First published in issue 49, Australian Wood Review.
Richard Vaughan is a designer/maker and teacher in Brisbane. See www.richardvaughan.com.au