John Jordan: a turned and textured vessel

Word came this week of the passing of US woodturner John Jordan on February 28, 2023. John is well known for his elegant turned and carved forms, many of which now reside in public and private collections all over the world. John was equally known as a teacher and demonstrator, and also a producer of tools of his own design. The article below was written by John Jordan for Wood Review magazine, issue 26 in 2000 and is republished below.
Words and photos: John Jordan
Hollow turned vessels form the basis of all my work. They provide the ideal palette for the different surface treatments and textures which are what interest me most. Smooth, rough, patterned or random, it is the look, feel and contrast of these surfaces that excite and motivate me. This article will describe the basic steps I use to produce a carved and textured hollow vessel.
All of my work is turned using green wood from start to finish. There is little danger of cracking since the walls are relatively thin (1/4 to 1/2 inch), so the drying rate is pretty even. This type of vessel is oriented with the grain at right angles to the axis of the piece, and the blank is cut from one side of the tree, along or excluding the pith, depending on the size of the piece. This means that the vessel will become somewhat oval. If I were using one of the more volatile woods, it would become quite noticeably oval.
The carving that comes later will work to de-emphasise, or make the oval shape seem natural and intentional. I sometimes turn endgrain pieces as well, with or without the pith, depending on the type of wood that comes along. One of the keys to working with green wood is learning to work with the wood rather than fighting it. Some woods lend themselves better to certain types of turning than others, and a good, sound knowledge of the properties of wood, and the particular wood you are using is vital! What are not needed are tricks and complicated procedures.
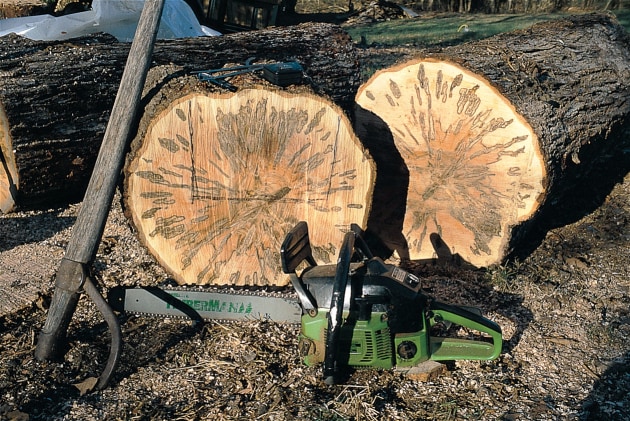
This turning starts in the log pile where I select a piece of wormy red maple (photo 1). The end of the log is sawn off to ensure there are no cracks in the endgrain and to expose the clear colours and patterns. I carefully mark out the piece to include as much of this colour and pattern as possible.
The piece will be sawn along the pith, and ultimately the inch or so of wood closest to the pith will be turned away. In this case it will provide a waste block for the screws before being turned away.
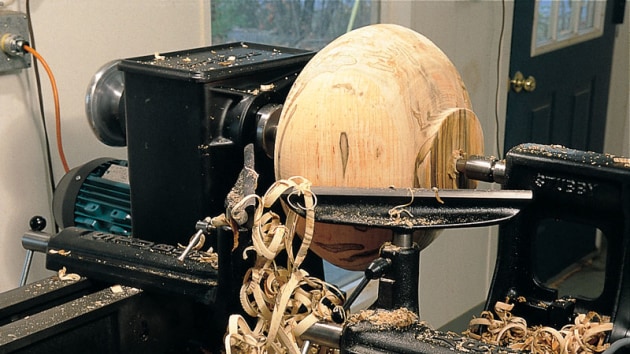
The blank is mounted between centres on the lathe. This gives me an opportunity to shift the piece around to take advantage of colour, grain patterns and also to avoid defects. I consider having the option of shifting the piece fundamental to the way I work. Using a side ground bowl gouge, the blank is rough-turned to near the final shape – close enough to know that I’m satisfied with the orientation, and that there are no surprises (photo 2). I’ll shift the piece during the roughing as needed.
Once I’m pleased with the basic shape, the bottom is flattened to accept a faceplate, 4-1/2" for this piece. On modestly sized pieces I often use a Oneway Stronghold chuck in lieu of a face plate, in which case a tenon is now turned on the bottom for the chuck to grip.
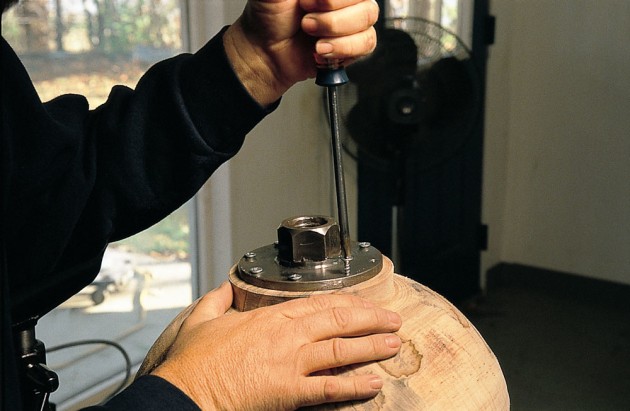
The rough-turned blank is then secured to the faceplate with 1-1/4 " long #12 screws (photo 3), and put back on the lathe. Final shaping is done using the same side-ground gouge, using the long edge as a shear scraper for the finish cuts. Further subtle refinement of shape or smoothing is done with a l" wide shear scraper. I spend a lot of time at this stage, since it is the elegance of line and form that will determine the ultimate success of the piece. Often it’s helpful to take the piece off the lathe and view it in its normal, upright position. The area at the foot is left large at this point,
Notice how this waste area is clearly defined from the finished turned surface. This makes it easier to visualise the unturned portion. I sometimes draw the remainder of the shape on the waste area to further help visualise it, and then mark the inside bottom. Since this piece is fairly flat in the bottom it wasn’t necessary. A small gouge is used to open up just inside the lip and then make a small dimple in the centre to start my drill, which is a 3/8", 15" long twist drill that I hold with a wrench.

The drill is simply pushed in a inch or so at a time, then backed out to clear the chips, then pushed in again until the depth, marked with a piece of tape, is reached (photo 4). If you try this with a hand held drill, be very careful, and clear the chips often so the drill doesn’t bind. Also, I’m very careful with the measurement, as leaving too much wood in the bottom isn’t desirable, and leaving too little is a sad thing indeed.

The hollowing is done using a boring bar type system that uses a rear tool rest that counteracts the leverage and torque associated with this type of turning (photo 5). On smaller pieces, I usually use the armbrace style handle. The type of handle/shaft is more a matter of comfort and preference than any other consideration.
The cutting tip is another matter. A small 3/16" tip with a fingernail shape has proven to be the most useful for hollow turning. Anything smaller is too aggressive and makes smoothing difficult. Larger tips can present too much edge to the wood and may tend to catch, although some find them useful for smoothing in pieces with larger openings. Virtually every turner I know that produces quality hollow turnings with relatively small openings uses the 3/1 6" tip, regardless of the type of handle/shaft used. Cuts are made toward the centre when possible, and from the centre to the left in fairly short movements.
Grain direction is not too important, and I’ll cut whichever way is most convenient. I alternate the hook tool with the straight tool, using whichever reaches the easiest. Sometimes a second hook tool or a simple angled tool is used to reach farther over into the shoulder area. The first stage in the hollowing process opens up the piece for working room, the next takes the wall thickness to approximately double the finished thickness. This thickness is then reduced by half in small steps, starting at the top and working down. Once the thickness is pretty even in the section I’m working, the tool is lightly moved up and down the wall for the final smoothing of what will be the finished surface. For this piece, the thickness is about 3/8"-thick enough to allow for the flutes that will be carved along the piece.
After the hollowing is completed, I measure the depth with a simple gauge to ascertain the mark is correct. Using a wasteblock on the faceplate, a tenon is turned that will just fit inside the lip. The piece is slipped over this tenon, and the tailstock is brought up to the bottom, shifting it around until it is well centered. Moderate pressure is applied with the tail stock.

Care is called for, as too much pressure will break the piece. Carefully the waste block is turned away with a bowl gouge (photo 6). Using a small gouge or round-nosed tool the bottom is slightly recessed, and most of the stub turned away (photo 7), and the remainder is pared off with a sharp chisel. This piece only needs a simple recess. A foot or an elaborately detailed recess would not be appropriate.
The piece is allowed to dry for a week or two, as carving the deep grooves while it is green may cause cracking in the thin areas. The flutes on the piece are spaced by eye, but it could be done with the index wheel.

The main consideration here is that the grooves are aligned in a way that is sympathetic to the oval form of the piece. This is very important, and I’m not afraid to erase the pencil lines and try again before committing the lines to the carving tool. A simple gauge is used to extend the lines along the piece while it is held between centres (photo 8).

The initial carving is done with a V-tool in a reciprocating carver (photo 9)...

...and then shaped with die grinders with carbide burrs, various gouges, rasps /files and sandpaper (photo 10).

The lip is shaped with a saw (photo 11), knife and files, and the piece is then sanded to 320 grit and sealed with an acrylic sealer.

Texturing on this piece is done with a reciprocating carver with a round point, which embosses or dents the wood (photo 12). This carving and texturing process is by far the most time consuming part of making the piece. and takes several times longer than the turning. The bottom is flattened with a sanding block, then textured with a small gouge.

Finally, the entire piece is given another light coat of lacquer sealer, and finished up by signing and dating the bottom with a small vibrating engraver.
First published in Australian Wood Review, issue 26, March 2000