Intarsia: open-ended, no-rules woodworking
Words and photos: John Tucker
Intarsia is a form of woodworking in which pieces of different woods are fitted together to create a design or pattern. The word ‘intarsia’ comes from the Italian word for ‘inlay.’ This type of woodworking dates back to the 13th century and was popularised in Italy during the Renaissance.
What is unique with Intarsia is that there are no fixed rules or methods for carrying out your project. You are only controlled by your imagination and patience.
Using plans
Plans and designs for intarsia are available in books, on the internet and on YouTube, starting from very basic up to more complex layouts. Kathy Wise is a renowned American intarsia artist with a number of books published. Beginners can use published plans to start with and then progress to using drawings and other imagery to produce templates. Project themes can range from simple to complex to abstract – I lean towards the realistic style as with the work shown here.

My way
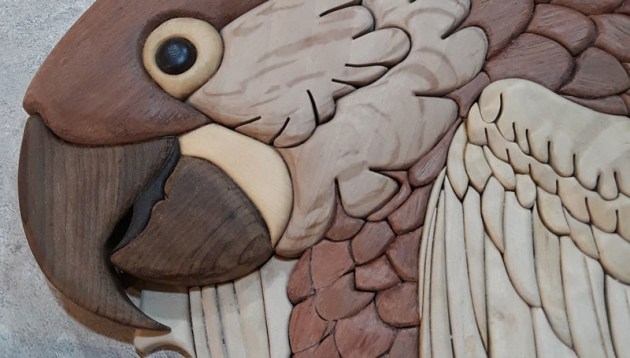
After 30 years of creating intarsia projects, I prefer not to use drawn plans but instead work from an image which I blow up to the desired size – the parrot piece shown is an A2 size. Images give me the depths, heights and shapes that a drawn plan does not provide.

I make copies of the image, using one as a template to lay pieces of wood on to check individual sizes and shapes. The cut-out shapes are glued to my selected woods and then cut out on a scroll saw. I always keep a copy of the image in case I make a mistake, which happens a lot.
Selection of wood
The most important ‘rule’ of intarsia is – never dispose of any offcuts of timber, regardless of the colour, grain or type! If you know a furniture maker, wood merchants or even local hardware stores that cut timber, go and ask for their offcuts. What you will soon be looking for are woods of certain colour and grain, for example, tight, coarse or wavy.

The character that grain can convey is an important aspect to intarsia. Here, lengthwise grain works well for the parrot’s oregon tail feathers, while the tiger oak grain for the head resembles feathers. It’s the grain of the wood on the foot that gives a scaley impression.
Sanding and fitting
After cutting out the pieces it is time to shape, sand, sand and sand some more until they fit together. When your project is glued onto a backing board the naked eye will not see very small variations.
I use a bobbin sander and a belt sander to remove larger bits of lumps and defects, and also to smooth and shape because unless you are expert in using a scroll saw, you will need to do a lot of sanding.
I also use two Dremels, one with a coarse disc and the other with a fine disc for sanding, and a good reserve of sandpaper is essential. A set of riffler files are an asset to have on hand. Really you can use any system that works for you. Remember, there are no set rules as to how you work.

One piece of equipment that is of most use in my little shed is my light box, shown above. Due to having only one eye I find it a little difficult to see gaps between cut pieces. I made up a crude box, installed a lamp holder (I could do this myself as a retired electrician), covered it with perspex and presto, I have a light box to find gaps between pieces that I want to fettle. This makes your project just that much neater.
Putting it all together
After you have achieved your desired effect with grain, colour, shapes and fit, it is time to glue. Gorilla glue in small tubes works best for me. I can glue two pieces together, wait just a minute or two and then scroll saw or sand the piece if necessary.
The next stage is gluing your project to a backing board. I mainly use 4mm MDF and white Aquadhere followed by clamps and weights to hold everything in place until dry and completely stuck.
Matt or gloss
Depending on the effect I am looking for, I use semi-gloss or full gloss clear lacquers, or sometimes an oil finish. I find the lacquers are more acceptable as I can brush into all the little gaps and edges of each piece to avoid a blotchy appearance.
I find intarsia woodwork very satisfying as you can see each project take on its own personality. Practice makes perfect as they say, however with intarsia there is no perfect – it’s just how you want it to be.
John Tucker is long-time wood artist who lives in Victor Harbor, South Australia.