How to make inlay bandings
Words and photos: Neil Erasmus
Inlaying or embedding wood or other materials into the 'background' of objects or furniture made from wood can not only add focal points of colour and vitality, but also accentuate line and form.
The woodworker's palette of inlay materials can include contrasting or rare woods, mother-of-pearl, tortoise-shell, bone, ivory and metals. The art of inlay goes back thousands of years, and continues today in both traditional and contemporary styles. Some of the world's finest guitar makers continue to create intricate work in shell and rare woods. So too does a growing group of studio furniture designer/makers who add subtle, yet strong, geometric embellishment to their work.
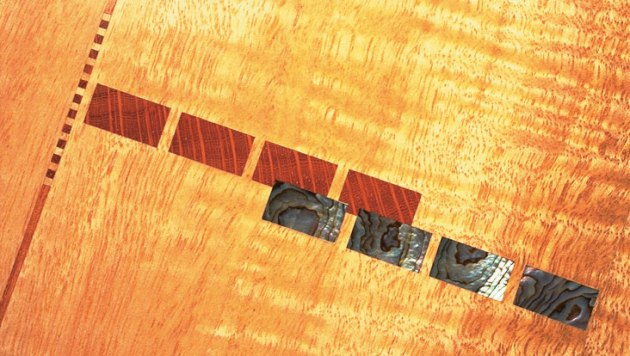
This article is about making traditional inlay strips or bandings that can be set in to a background or substrate in straight or gently curving lines. My early bandings were bold at I /2 inch (I 2. 7mm) wide but as the years went by they shrunk to 3mm or so. Now I prefer to set in place very narrow 1.6mm solid bandings of either dark or light woods with some unexpected detail asymmetrically placed as shown left.
Much of my work contains no decoration at all. It doesn't suit all styles or situations and doesn't appeal to everyone's aesthetic.
Inlay strips are available commercially (the best are French made), but these don't satisfy the client who wants a piece made from specific woods, or someone who wants to make everything in-house. Besides, quality 'off the shelf' inlay can be expensive, and is not available in the narrower, less showy sizes.
Practically any combination of woods and orientation is possible when making inlay strips. Cutting and gluing individual pieces of wood can be a complex and lengthy process but here's a way of cutting and then gluing contrasting strips into blocks which can be later re-cut into decorative strips.
The process
Let's assume that you need to make some inlay strips 1000mm long, but you only have light and dark material that you are able to dress to 700mm long x 100mm x 20mm. You are making 1/8-inch (3.2mm) wide by 1/16-inch (1.6mm) thick strips like the one shown at the top of this page. Each strip consists of two 0.6mm.outer border strips in dyed black commercial veneer and two strips of alternate dark/light wood, each 1.0mm wide, making a total of 3.2mm.
Those of you who like to work in metric should learn to convert back to imperial measurements as most router cutters are only available in imperial sizes. Remember you will be using an I /8-inch cutter to rout the groove for this inlay. This is a very fine inlay and can sometimes be difficult to make successfully, so if you prefer, start with a I/ 4-inch (6.35mm) inlay. In this case the inner strips will be wider at 2.57mm each.
Step by step
1. Set up the fence on the handsaw to cut consecutive 4mm strips from the edges of each of the two pieces of wood, for example one of myrtle and the other of Huon pine. This allows 1 mm for sanding down to 3mm. Mark the face of each piece to help keep the strips in cut order. You should be able to get 18 strips from each, as long as you don't re-dress the edge after each pass. The latter would only waste wood and also becomes risky as the piece gets smaller. The calculation is 100mm divided by 5.5mm (4mm plus 1.5mm for the handsaw blade kerf).
2. Take each of the 36 strips down to 3mm in thickness, using a thickness drum or wide belt sander. Don't panic if you don't own one of these, as they can be thickness planed if carefully done with sharp blades. Remember to apply a little upward pressure both when feeding in and tailing out as this helps to eliminate the snipe that can occur when dimensioning thin sections on a thickness planer. It's not crucial that these strips are precisely 3mm thick.
3. Glue the strips together alternating the myrtle and the Huon. Wipe or vacuum away all traces of dust from the faces of each piece. Ensure your work area is well ventilated, then mix up some UF glue and place it in the pan, allowing it to stand for 10 minutes before use. I use a liquid resin and clear liquid catalyst to ensure invisible glue lines, and calculate the square meterage that I then multiply by 90 to get the required weight of glue in grams.
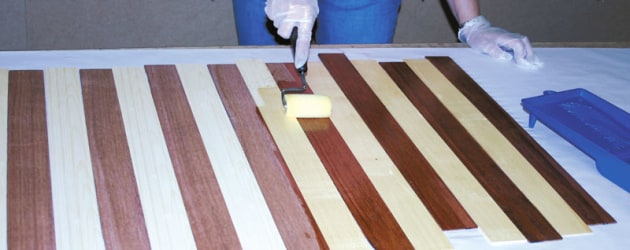
Photo 1
Spread all the strips out next to one another on some waxed paper, and then roll a coat of glue on, leaving it to penetrate for a few minutes before rolling on another (photo 1).

Photo 2
Place all the strips together alternating light and dark (photo 2) (remember the first and last must be different), and then slide them around a little to wet the opposite faces. Carefully wrap the assembly in waxed paper.
Clamping this slippy-slidy thing is not an easy task and needs to be thought about before the glue up commences. Making a pair of cauls to place around the glue-up will help to keep everything flat and square and this is important for the following steps to succeed.
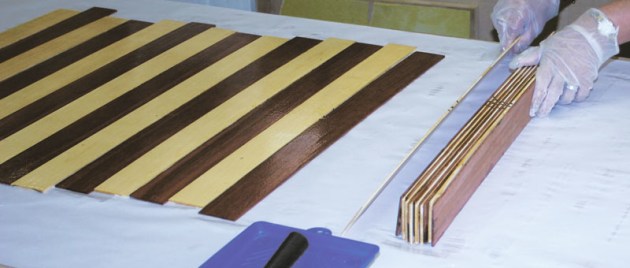
Photo 3
4. Once the glue has fully cured, remove the assembly from the cauls and clamps then scrape and/ or sand one edge flat and square (photo 3). Don't plane this as the glue is brittle and abrasive and will quickly dull or even chip the edges of your plane. The 'edge' we are describing here is the face created by all the 3mm edges. Don't touch the faces of the first and last strips (one light, the other dark), other than to scrape off any bits of glue that may have found their way there. These faces have to remain true and clean for further gluing. The assembly may now be thickness sanded to clean up the opposite face, leaving a square cornered, flat-faced, rectangular section.
5. Because this length of wood must be crosscut into short pieces at 45°, it is much safer to biscuit join and securely attach a sacrificial piece of 18mm MDF end to end. This gives something to hold onto at a safer distance from the blade when the last couple of pieces are cut.
6. Some important, but simple calculations are now needed. Remember we need I 000mm long inlay pieces from our 700mm long assembly of strips. To work this out, 1000mm has to be divided by the diagonal measurement (hypotenuse) to give us the number of pieces we need (152), 7mm if the width is 108mm (36 x 3mm).
The answer of 6.55 may as well be rounded to 7 and represents the number of individual pieces we need to cut to yield inlay strips measuring I069mm long. The last value we need to work out is the width of each of the seven pieces. On paper, the ends of each piece will measure 78.18mm (700 minus 152.7 divided by 7) and represents the hypotenuse of the width required. The thickness therefore is the diagonal which is 59.8mm.
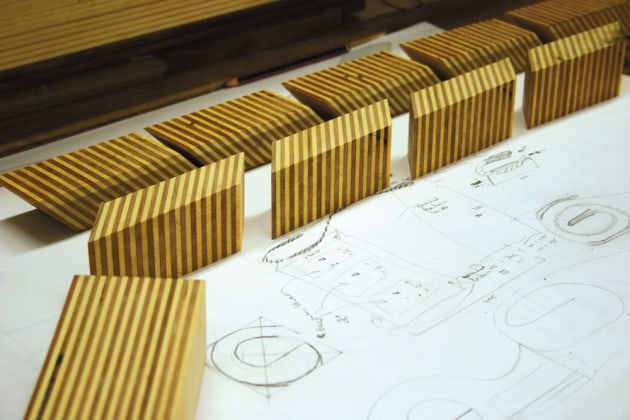
Photo 4
7. Set the tablesaw crosscut fence at 45° and a stop against the ripping fence that allows a cut of 59.8mm including the blade thickness. Whenever I cut at an angle such as this, I fix a strip of 120 grit sandpaper against the crosscut fence to better grip the wood. This prevents slippage that would otherwise occur as the blade draws the wood in to it. (This, by the way, is one of the most common causes of ill-fitting mitre joints-especially when blunt blades are used.) Cut all seven pieces, keeping track of their order (photo 4). This can be done by marking a long triangle stretching from one end to the other.
8. The edges of each block must now be wiped with acetone to remove any traces of wax left from the waxed paper before the next glue-up. Because of the nature of the previous cutting procedure, each block may have a small, protruding piece still attached that needs to be chiselled off. A 45° MDF sacrificial clamping aid must now be rub-glued with PVA to the first and last piece and allowed to dry for several hours.
9. The next gluing setup is the most difficult of all. Again, as before, cauls of MDF or better still rectangular hollow section steel (RHS) of 50 x 25mm is used together with one long sash clamp and at least six shorter ones. Cut a piece of 3mm or 6mm MDF for the new assembly to rest on. This must be slightly shorter than the assembly and narrower than the combined width of the two cauls and the assembly itself. Cover it with waxed paper and place it on the six or so evenly spaced short clamps. As before, mix up some UF glue and glue up this new assembly. Carefully arrange it along the flat piece of MDF, fold the paper around it and place the two cauls on either side. Lightly clamp. Now place the long clamp on top from end to end and gradually start applying pressure to all of them until tight. Make sure that all the blocks are flush with one another.
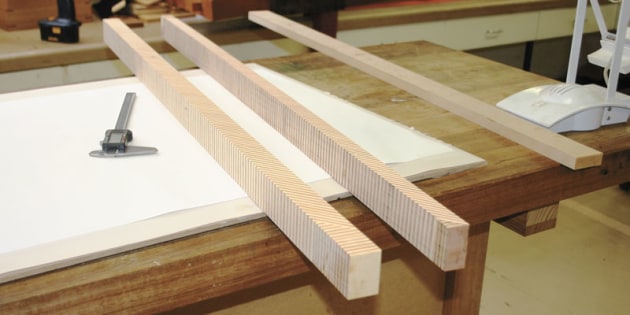
Photo 5
Leave in clamps for at least 12 hours before removal, and allow to settle for several days to fully cure. Either cover it up completely or allow the air to circulate all round it, otherwise it will bow (photo 5).
10. Repeat step 4 to flatten the four faces, before gluing on yet another long piece of sacrificial MDF along one edge. Use epoxy glue for this as most other glues either contain water or suck moisture from the wood, causing severe bow or spring. No clamps are needed for this-just glue and allow to cure. Keep covered until ready for the next stage.
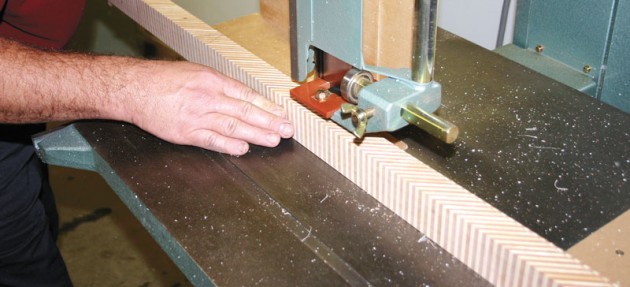
Photo 6
11. Set up your handsaw fence to cut strips of around 1.5 to 1.7mm. You will also need a tailing out table to support the fragile strips and prevent them from breaking. Mark the assembly with a triangle to help identify the consecutive order afterwards, and cut the entire block into strips all the way down to the sacrificial piece of MDF. You should get 18 or so pieces (photo 6).
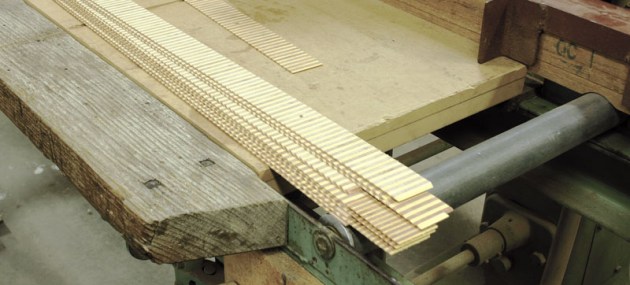
Photo 7
12. Take a break, because the following is very fine work indeed and requires every bit of concentration and all the calm you can muster. Get a piece of MDF or chipboard that will take six to eight strips side by side and pass it through your thickness sander until every part has been abraded. Mark the top face with an arrow indicating the leading end. This is your thicknessing platen and will allow you to thickness perfectly dimensioned pieces across its width. Dust it off and lightly spray its surface with 3M re-positionable spray (obtainable from craft shops). This leaves a tacky surface the strips will cling to as they are passed under the sanding drums or belt. Place the strips down so that they are sanded with the grain, taking very light cuts to prevent them from disintegrating. As they get thinner they become increasingly fragile. Sand both surfaces until they measure exactly Imm (photo 7). Occasional dusting of the platen will be necessary from time to time.
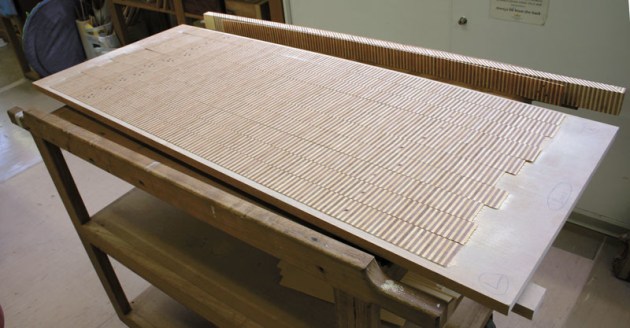
Photo 8
13l Phew! You are now ready to cut some black veneer. Cut as many similarly sized strips as the ones you have just bandsawn (photo 8).
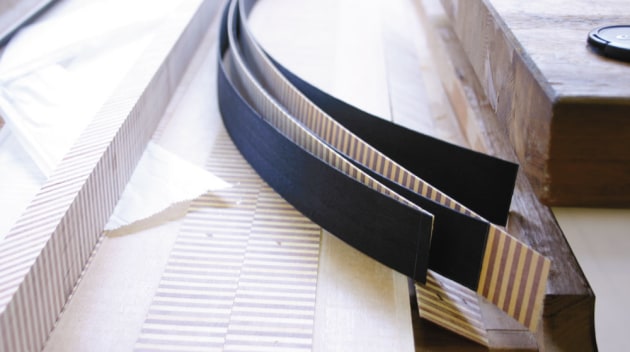
Photo 9
14. Again, using UF, glue up each set of inlay strips using two black borders and two of the light/ dark strips arranged in the pattern of your choice. As before, use cauls and waxed paper to spread the pressure evenly and to keep all the parts from slipping around (photo 9).
l5. After the glue has fully cured, sand any excess glue from one edge of each glued up block of veneer (you should have nine), and set up the handsaw for the last time with a very fine blade to cut 2mm strips. Place a piece of 3mm MDF against the fence and partially cut into it. This offers more support to tht: fine inlay strip that you will now be cutting. You should get six inlay strips, making a total of 54 metres.
16. Repeat step 12 to thickness sand these to around 1.6mm. Project done! Not including 'dead' time, the entire procedure should take no longer than three or so hours.
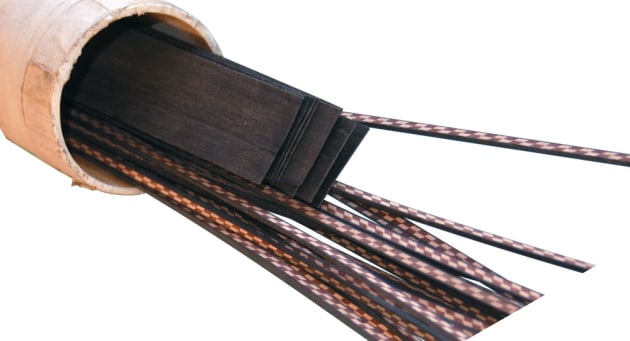
This procedure will have yielded a very valuable stockpile of inlay from very little material-do the sums and you'll be surprised! You will now want to store them, together with a copy of these instructions, safely in a small diameter PVC pipe with end caps for future decorative use.
Neil Erasmus is a furniture designer maker in Pickering Brook, West Australia. Learn more here www.erasmusdesigns.com