How to make better push/pull sticks for jointers
Words and photos: Darren Oates
A lot of timber I use these days is roughsawn and usually two to three metres in length. I have a very large jointer with 2.6m long tables that are 500mm wide. Even with a machine this size it can be hard to safely manoeuvre long pieces of timber across the surface.
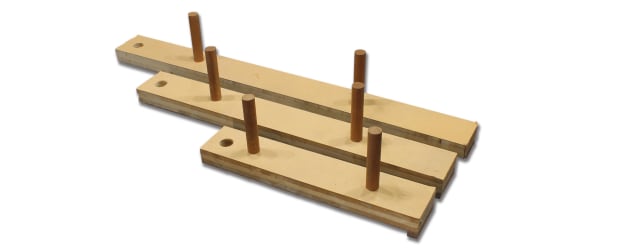
1. I thought there had to be a better way and the three push/pull sticks shown above were the answer. They were made back in 2008 and I’ve been using them ever since.
Made for varying lengths of timber, they range in size from 550mm to 1000mm in length and all are 100mm wide. They are made from blockboard, because this is was what I had on hand at the time. If I were to remake these now I would use two pieces of 18mm marine ply glued together to make a push/pull stick that was 36mm thick.
They need to be quite thick as all the pushing motion will be through the two dowels that will be bored into this surface. If using this construction method use an epoxy for gluing the two pieces together so that you are not introducing any water into the plywood as you would with a PVA. This is to ensure stability and to keep the stick flat and straight.
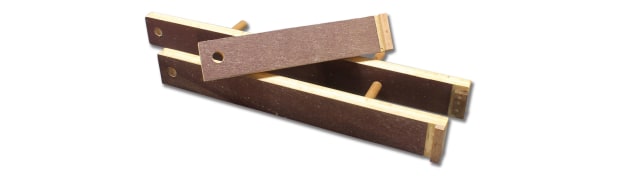
2. This photos shows how 60 grit sandpaper is glued to their underside to them to give a non-slip surface. This eliminates any sideways movement as you are passing the wood over the cutters. Once again, try to use a non-waterbased glue for this setup. The tab you can also see in the photo locks onto the end of the board you are jointing. The tabs are glued to the underside of the stick and then strengthened with wooden dowels. This is also a safety precaution for the day when the tabs hit the cutters. Using wooden dowels means no damage will be done to the machine cutters as would be the case if you held the tab in place with metal screws.

3. At the start of the cut I am pushing down on the front of the timber and also pulling it across the machine surface via the forward handle on the push/pull stick. This gives a very positive feel to this operation as there is no slippage at all incurred even on a heavy piece of timber.

4. The piece of timber is now one third the way across the cutters. I have switched from pulling to pushing, still using the forward handle. I am still pushing down on the front of the timber which is essential for achieving a flat surface.

5. This is the end of the jointing procedure. In a smooth motion, I have moved my left hand onto the forward handle and my right hand onto the back handle to finish passing the piece of timber over the machines cutters. I am also pushing down on the front handle and pushing forward on the back handle.
For ten years these push/pull sticks have always been my go-to tools for jointing all sizes of boards, but especially large and long pieces. They are also great for keeping your hands well away from spinning cutters and a much safer way to carry out this essential procedure.
Darren is based in the Hawkesbury, NSW and writes regularly for Australian Wood Review. Learn more about Darren at www.darrenoatesfinefurniture.net
See a video of the pushsticks in use below: