How to make a Whiskey Cabinet
Words: Cat Cook
Photos: David Howlett
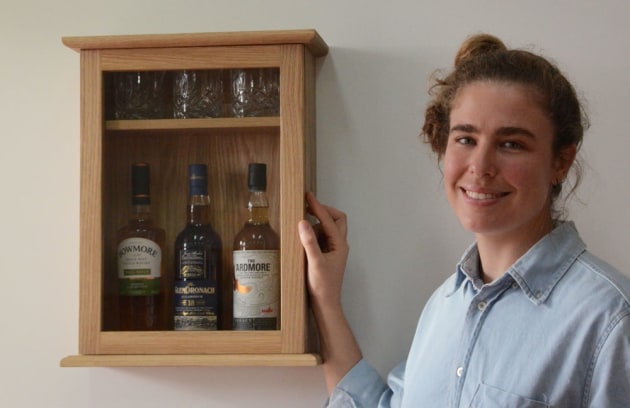
This small cabinet can be built over a weekend or two and is an ideal way to store and display your favourite bottles of whiskey. Add a small shelf and there’s a place for your glasses too. This is a great project to practise some fundamental woodworking skills on – the outcome is a beautiful and functional cabinet made with minimal expense.

Materials
I used American white oak for my cabinet both for its clear and attractive figure and for its workability. The glass for the door came from my local office supplier – a $4 picture frame kit gave me a ready-cut A3 size piece. Designing the cabinet around this known measurement works for our purpose.
Joinery options

The sides of the cabinet frame can be joined with housings (photo 2)...

... or sliding dovetail joints (photo 3).

No right or wrong here, it’s purely down to what you can do in your home workshop. You could quite simply just butt the whole thing together if you wish.

For the housing joint I measured and marked out with a mechanical pencil and combination square and then used a 1/2 inch plunge router with a fence to create a 5mm deep housing (photo 4). I had to do some back routing in this process and suggest doing several test cuts on scrap first.

Once both housing joints are made, square up with a mallet and sharp chisel, test the fit and make adjustments accordingly.
To show you the sliding dovetail option shown in photo 3, I used a router table with a fence and dovetail bit (photo 5). You’re aiming for a friction fit here, so once again a few test runs will make sure you have the right setup.
Test fit

The next step is to do a dry fit, that is assemble the carcase without glue (photo 6).

At this stage it’s good to also trial the best placement of clamps and (photo 7)...

...check for square so you can plan any adjustments before the actual glue-up (photo 8).
Profile the top and bottom edges
Once satisfied with how the frame comes together, take the whole thing apart again so you can profile the top and bottom edges of the cabinet.

I used a 9.5mm round-over bit, stepped down in a small trimmer router (photo 9). Of course you can use a different profile if you wish. Remember you only need to profile the sides and front of the top and base. Some back routing on the side edges will prevent any tear-out occurring.
Pre-finishing saves time
Pre-finishing the components before glue-up means an easier clean-up process further down the line as it can prove tricky getting into right angled joinery once glued.
Sand the faces and edges, working through the grits. You’ll spend more time with 120 grit removing machine and pencil marks and then less following up with 180 and 240.
Gluing up

Having done a test fit you should be ready to glue up the cabinet frame using Titebond III (photo 10). After checking for square and making any necessary adjustments I used a damp cloth to clean up any squeeze out.
Making the back

A board of solid American oak was resawn to 6mm thickness for the back. The pieces were bookmatched and glued together with Titebond III (photo 11). You could also use 4mm/6mm plywood or veneered MDF.

Masking tape was used to secure the join (photo 12).
The inside faces of the solid oak were planed first before cleaning up the outer faces to help prevent cupping though this cannot always be a sure thing.
When the panel was dry, I removed the masking tape and thicknessed down to 5mm, then sanded the back and front faces once again working through 120, 180 and 240 grits.
Door joinery

For this cabinet, slip joins cut on the tablesaw with a tenon jig were used to make the door frame (photo 13). Once again I recommend cutting and dry fitting some test pieces before diving into the timber you spent so much time carefully selecting and machining up. This helps to eliminate any potential issues without the stress of glue being involved.
Titebond III was also used to glue up the door frame and once again I had clamps, glue and a wet rag on standby. And again, I checked and double checked for square. I like to recheck for square after clean up, just in case I have unintentionally knocked my project out of square when removing squeeze out.
Cutting and fitting the shelf
I took measurements from both the front and back of the 11 cabinet just in case there was any variation. A piece of solid timber was cut for a not-too-tight fit before machining down to 15mm thickness.
Placement of the shelf took into account bottle heights and brass shelf mounts were fitted into the sides 15mm in from both the front and back of the cabinet depth to carry the load of the whiskey glasses.
Wall mounting

For the mounting piece I measured the internal width and then cut and machined a piece of solid timber to a snug fit (photo 14).

The back edge was rebated to house the back panel later on (photo 15).

Both faces were sanded, then clamped and glued to the carcase. For strength, I drilled and tapped in two Japanese tapered nails to each end. These were cleaned up with a flush cut saw (photo 16). I find the nails give a nice aesthetic too.

Carefully, I created a 5mm rebate to the back of the cabinet frame, stopping shy of where the wall mount was added. This was squared up by hand using a mallet and sharp chisel. Measuring the rebate width and length I then cut the back panel to size, testing the fit and making any adjustments where needed before gluing the panel in (photo 17).
Completing the door

After unclamping, I used an orbital sander to clean up the faces and edges of the door front. Testing that the door fitted well to the cabinet, I selected the back face of the door to make a 10mm rebate for insetting the glass. Again, a mallet and sharp chisel were used to square the corners of the rebate before checking the fit of the glass (photo 18).
Beading is used to hold the glass in place. Instead of glue, small tacks are used to pin the beading in place. If the glass is ever damaged, the beading can then be easily removed and replaced.
As a pre-caution I pre-drilled for the tacks into the beading using a pin that I had snipped the head off to create a chisel point. I drilled at a slight angle to help pinch the beading in place.

The tacks were then tapped in flush with the beading. A cabinet scraper was placed underneath to protect the glass (photo 19).
Finishing off
With the hinges selected, mortises were marked (photo 20) and the trimmer used to clear the waste. Three holes for wall mounting were drilled and countersunk into the back mounting piece of the cabinet. Finally I gave the cabinet a wax finish taking care to mask off the glass with tape so it wouldn’t smear. All that remains is to find a special place to mount your newly made whiskey cabinet...and of course don’t forget to stock it up too (photo 21).
This whiskey cabinet is one of the projects you can undertake at Perth Wood School under the tutelage of Cat Cook and David Howlett. Learn more at www.perthwoodschool.com.au
Wood Review's Maker of the Year competition is open for entry now. There are four categories: Furniture, Bowls & Boxes, Art & Accessories and Student, and over $15,000 in prizes and cash to won. For information and entry see www.woodreview.com.au/moty