How to make a simple chest of drawers

Words and photos: John Spiers
The design of this chest of drawers has many features that make construction easy. The use of MDF veneer removes the problems of timber movement while the solid legs, top and drawer faces break the monotony of the MDF side panels. Assembly is made easy by the carcase being joined with screws, and fitting the drawers is simplified by setting their faces back from the front legs and using metal runners.
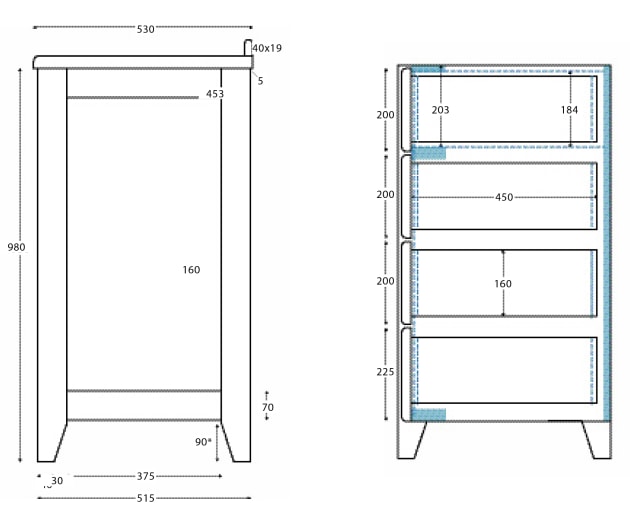
Basically we are making a big box with jarrah veneered MDF sides, a plain MDF back that holds the box square and three drawer blades to keep the sides apart. We also need a 25mm MDF muntin to separate and support the inside drawer runners. Cut out all the MDF panels accurately using a saw. Ensure the grain of the veneer runs down the length of the two side panels. It is worth giving some thought to the cutting of the plain MDF to maximise the use of the sheets.


Side panels
Glue and tack 19 x 5mm solid timber strips to the front edges of the two side panels and a piece of 27 x 5mm solid timber to the exposed edge of the 25mm MDF muntin. Punch the brads below the surface and fill. When dry the filler can be sanded and the excess material trimmed flush with the sides of the panels with a hand held electric trimmer or router with a template bit. It’s important to expose just enough cutter to remove the waste.

1. Aligning the dowels. The middle blade requires a loose dowel on its inside edge; elsewhere screws are used to attach the three blades.
The panels will need accurately drilled holes to receive screws for assembly. Mark out following the diagram of the panels and pay particular attention to which side the countersinking will be. Drilling is best done on a drill press with a stand to support the larger panels. The middle blade requires a loose dowel to support the inside edge as it is not possible to hide a screw head in this position (photo 1).
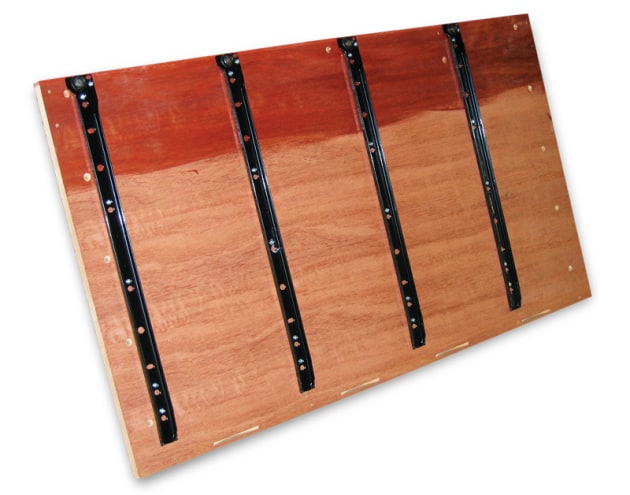
2. Fast tracks. Metal drawer runners simplify construction – these are set back 2mm from the front edge.
Mark out the drawer runner positions with the two panels side by side. The diagram gives you the centreline for the screws. Lay your runner on this line ensuring that the front edge of the runner is set back 2mm from the front of the carcase (photo 2). Mark the position of all the holes and drill these with a portable drill ensuring you mark the drill bit with tape so as to not drill through the panel.
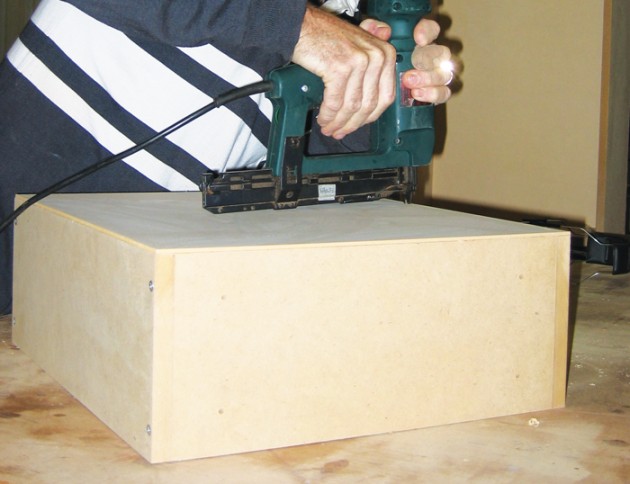
6. The bottom is stapled on after checking the drawer is square.
Drawers
Drill and countersink the holes in the front drawer panel to attach the false drawer face. Drawers are made by screwing the sides to the front and back panels. Ensure you drill the correct pilot hole in the MDF or the screws will cause the material to split. Check the drawer is square—this is critical or the drawer will not close flat—and staple the base on (photo 6). Rounding over all the top edges with a 5mm bit neatly finishes the drawers. The drawers will need to be sealed with a coat of sanding sealer and two coats of matt polyurethane.
Cut the drawer faces and round over the front edges with a 10mm bit before finishing them. If you can’t access boards wide enough these will need to be glued up from smaller stock.
Legs
The leg assemblies are cut out and dowel joined with the rails flush with the inside faces of the legs. The two front edges of the rails will need to be rounded over prior to assembly. Leaving the inside of the edges that frame the panel, all other edges can be rounded over with a 5mm bit after assembly.
Top
The top is glued up with epoxy using biscuits to keep things in place. I removed the front corners with a 6mm chamfer to make things safe before shaping the top edge with a table edge bit and the bottom edge with a 5mm bit. The back edges are left square for the placement of a pediment that is shaped and sanded before being biscuit and glued to the top with PVA.
Drawer support structure

4. Drawer support structure: screws attach the vertical muntin to the blades. It is located in position with biscuits.
This consists of two blades and the muntin that was edged and trimmed earlier. The muntin will need to have drawer runner holes marked and drilled. I have allowed 27mm space for the runners. The 25mm MDF prevents opposite drawer runner screws hitting each other.

3. A No.10 biscuit locates the vertical muntin to the front blades
Screws hold the assembly together (photo 4) but a No.10 biscuit is used to positively locate the muntin on the blades (photo 3). The muntin will also need a biscuit to locate it in position on the back panel. Two clearance holes will need to be drilled in the back panel to attach the drawer assembly later.
Assembly
All components are sanded and finished and the drawer runners are attached into position prior to assembly. The finish I chose required one coat of sanding sealer that was cut back hard before applying two coats of oil. This maintains the natural feel of the timber while bringing out the figure of the grain.
With the aid of a bench and a couple of fully charged cordless drills you should be able to assemble the structure by yourself. Use 4.5 x 45mm Superchip screws for the carcase assembly. You will need a 4mm pilot bit to prevent the MDF from splitting.

5. The side panels are screwed to the 16mm MDF back. The screw heads will be hidden by the leg assembly.
First assemble the drawer support structure. Attach one side panel to the back (photo 5). Attach the drawer support structure to the side panel and the back panel. You can access this point from underneath by sliding the assembly carefully over the edge of the bench (photo 7). The other side panel can then be attached and the bottom blade screwed into position.

7. The middle muntin is located with a biscuit and attached by screws to the back panel.

8. Attaching the first of the leg assemblies to the carcase.
Now off the bench and on its side on the floor a leg assembly is clamped square to the carcase and screwed into position with 4.5 x 30mm screws (photo 8). I have allowed for a 5mm overhang at the back to ensure total cover of the MDF and to accommodate the rounding over on the inside back edge of the leg.

9. Clamps hold the leg assembly to the carcase while it is screwed on. A 5mm overhang at the back allows for rounding over
of the leg.
The unit can be stood up and the other set of legs clamped into position (photo 9). When these are square and level they too can be screwed into position.

10. The drawer faces are clamped and screwed on. The bottom drawer is attached first and a 5mm spacer placed between each face while fitting.
Drawers are labelled on their bottoms and inserted one at a time from the bottom up. The drawer faces can be placed in position using some rubber coated clamps (photo 10). Each one is screwed from behind with 4.5 x 30mm screws. A 5mm strip can be used to position the drawer faces parallel. I also rest a 5mm strip down the inside of the front leg to get the side drawer clearance even. The process is repeated until all drawers are attached. Care needs to be taken so that the top pair of drawers are level and grain matched.
The drawers are removed and holes are drilled and countersunk on an angle through the top drawer blade to attach the solid timber top. A biscuit joiner set to a No.20 biscuit slot 16mm deep provides a small groove for table clips to attach the top. The top is clamped into position while the table clips are screwed down with 10g x 25mm wood screws. Handles are carefully marked out from a centre line originating from the centre of the small top drawers.
The drawers will make a welcome addition to any bedroom and are a lot quicker to make than traditional solid timber versions.
First published in Wood Review magazine issue 45. John Spiers is a furniture maker in Geraldton, WA.