How to Make a Simple Box
Words and process photos: David Lim
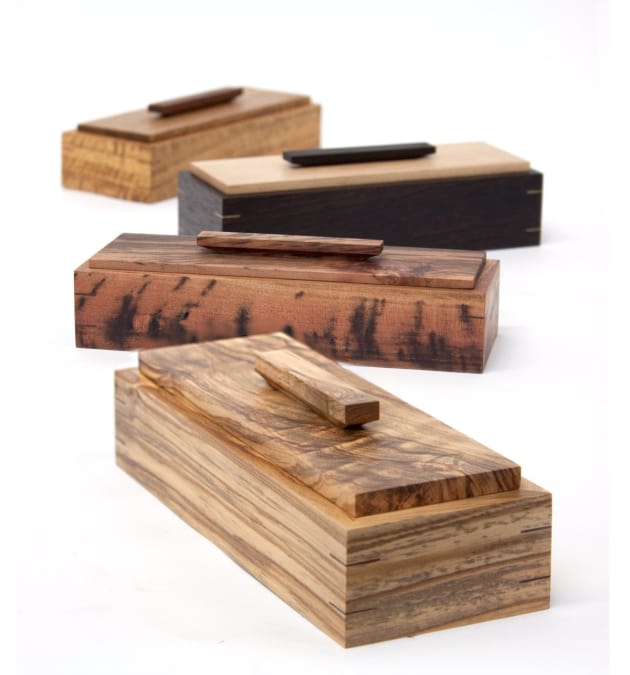
Being precious with all the left over timber from furniture making, I took up the craft of pen turning, transforming offcuts into individual handmade writing instruments. When giving pens as gifts, the ‘tradition’ has been to present them with one of the many mass produced pen pouches or cases that are available.
However, presenting your hand turned pen in a handmade pen case can really bring a gift to the next level.This design is simple, yet elegant and modern, and combining different timbers makes a huge number of variations possible.

Preparing the timber
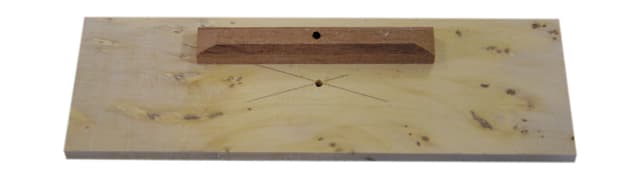
Cutting the box sides so the grain ‘wraps’ around makes a big difference to the look. Start with a piece of 270 x 35 x 25mm board (preferably quartersawn) and mark a centre line along the edge. Cut the board down the centre line with a bandsaw. You can see two faint pencil Xs on the ripped board shown in photo 1 below.

These keep track of how the two pieces bookmatch. Where the lines of the X cross (point of the ‘mountains’) will be the outside face of the box, where the open end of the X is will be the inside face of the box. You can also see in this photo how I have marked the sides, short (A), long (B), long (D), short (C). Arranged like this the grain will run continuously around the sides.
Once you’ve cut the sides it’s a good idea to rack the timber with ‘stickers’ in between and let it rest and season. Sawing the wood can release internal stresses that can result in some boards bowing or cupping. The latter can be machined out later. I make these boxes in batches and usually leave the stacked pieces to rest for 4–6 months.

When using highly figured or cranky timber such as fiddleback, curly or burl boards, you can use a linisher to flatten the outside face of the board (photo 2) rather than a planer, as this may cause chip-out or tearing on the timber.

I then pass the timber through a drum sander to thickness it to 10mm. Sand the inside of the box (open end of the X) to 240 grit sandpaper.
Rebate the sides for the base. Make a rebate ¼” wide and 5mm deep on the inside of the box using a rebate router bit on the lower half of the box 3mm from the bottom (photo 3).

The mitres on the box sides need to be cut. Rather than moving the drop saw blade from 90° to 45° each time, I use a mitre jig which I clamp to the saw. If you make an accurate and sturdy jig, you are guaranteed to end up with perfect mitre joints without having to make fine adjustments to the blade each time.
Before I cut mitres on a batch of box sides, I make test cuts on a piece of scrap timber to confirm that the jig is still accurate (photo 4). Two box sides are then cut from every board, the long piece at 175mm and the shorter piece at 65mm.

Box base
You can use ¼” plywood as a base or machine up a solid timber base. The size of the base is roughly 165 x 50 x 6mm thick. If your box is also for pens you can cut two 3 x 3mm rebates into the base to house the pen rests 40mm from the end of each side of the base.
You can use a tablesaw jig to cut the rebates quickly and accurately (photo 6) or use a 3mm straight router bit. The advantage of the tablesaw is that you get very little chip-out or tear on the cut.
Glue-up
Gluing up is relatively simple, and if you’ve cut the sides as described earlier the grain on the box should wrap around. Using PVA glue, lightly coat each mitre with a fine brush. Place a small dot of PVA within the rebate of the shorter side of the box side. Be careful not to get glue squeeze-out on the inside of the box as it is difficult to clean away.
You can clamp the piece together with a piece of rope and eight pushblocks as shown in photo 5. To apply pressure on the joints, simply pull two blocks further away from each other. Allow the piece to dry overnight before undoing the clamp.

Mitres on endgrain are relatively weak joints. To strengthen the joint, use a veneer key to lock the piece together. This not only adds strength to the joint but also a decorative touch to the box. I have found commercial veneers have a thickness of roughly 0.8–1.2mm. You can cut a slot for the veneer using a Japanese pull saw (photo 6).

The kerf size of these saws is thick enough for most commercial veneers. European push saws seem to create too large a void which results in less attractive detail.
For production slot cutting work, I use the router table, and it’s possible to also use a jig set up on the tablesaw. This saves time and cuts identical slots easily. Choose a contrasting colour veneer and glue it into the slots. You can squeeze PVA from the bottle directly into the slots. Coat each side of the veneer with PVA then slide it into place and leave it to set overnight (photo 7). You can then either pare away the excess veneer with a sharp chisel or use a linisher to sand it away.

Lid and handle
Machine a quartersawn board 165 x 55 x 11mm for the lid. The lid is rebated underneath so it seats into the box (photo 8).

Use a tenon cutter router bit to make the rebate. Cut the endgrain of the lid first because any chip out will be removed with the pass on the long side that goes with the grain. Slowly cut away small amounts, constantly checking back with the box until you get good snug fit.
You can make a handle of your own design. The box handles shown here are easy to make and add an oriental flavour. I machine a length of 10 x 10mm timber that I pass on both sides against a raised panel router bit. After docking to an 80mm lengths (photo 9)...

...I used a linisher to put a cove on both ends (photo 10).

Drill a 2.5mm hole into the centre of the top of the lid and the bottom of the handle to take a tenon made from a bamboo skewer (photo 11).
The tenon skewer reinforces the joint and holds the handle in place during gluing. I use a toggle clamp to keep the pieces together while the glue sets (photo 12).

Small boxes like these are great for presenting pens or other gifts. You can use up all your valuable off-cuts and be creative with the looks you can achieve. They are also an excellent item for limited batch production and are saleable in their own right.
Reprinted from Wood Review magazine, issue 68, Sept 2010.
Photos of finished boxes: Raf Nathan
 David Lim is a woodworker who also retails tools, machinery, clock parts, pen making supplies and other accessories. Learn more at www.timberbits.tools/review