How to make a (better) box

Clockwise from above: Walnut and curly maple hinged boxes with sliding internal trays; 50mm square micro box made from workshop offcuts; lift-lid box in American oak and black walnut. Photos: Frank Pronesti
Words: Damion Fauser
Process photos: Donovan Knowles
I enjoy making small boxes for several reasons. Firstly, they represent an opportunity to utilise offcuts from larger projects, or smaller pieces of special wood. Secondly, they give me an outlet for creative expression and the trial and development of new detailing techniques. Finally, using simple production and assembly techniques it is possible to make these items in volume as a production run.
This process is for the production of trays and boxes with mitred corner joinery. The lid can be added later, either as a drop-in or hinged. Or, as shown here, you can build and assemble the lid and the main box as one integral assembly. With this option, you separate the lid from the base after the glue has cured and you are left with a lid that not only fits the box perfectly, but you have a lovely continuation of grain between the two.
The fundamental principles of building a tray or a box are the same. I use this technique for smaller projects, no larger than 300mm in width or length. Any larger than that and you’ll need a different assembly method to the one described here.
Stock preparation
For very small boxes, I like to keep the thickness of the sides in proportion to the overall size, around 6–10mm thick. Sometimes the hardware I’m using may also affect this thickness.
To minimise the risk of distortion of thin stock, I like to machine down in several stages, stacking and stickering the stock between sessions to allow even airflow. Once at final thickness, rip to your desired width, noting that you will lose 3.2mm of this from the tablesaw kerf when you separate the lid after glue-up.
Cutting the mitre joinery

1. Using the 45° crosscut sled.
You can cut the stock to length and with the mitred end in the same operation. For me, the best way to be safe, fast and repeatedly accurate when cutting the mitred ends of small box sides is with a 45° crosscut sled on the tablesaw (photo 1).
With a sled that has been made to exacting tolerances, and a quality blade, one pass will yield a surface that is ready for gluing right off the tooth. If you are not happy with the resulting surfaces, you can shoot them clean with a 45° ramp on your shooting board, but this really shouldn’t be necessary.
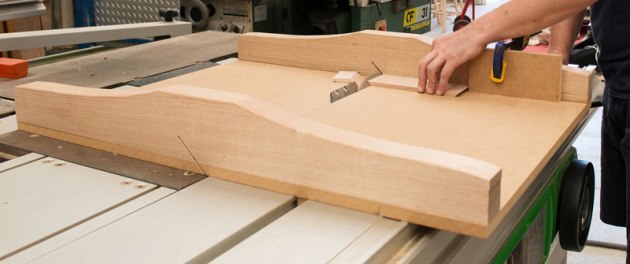
2. Note the blade tilts away from the stop block.
Cut one end of each piece and then clamp a stop block to the fence of the sled at the desired length. Just be aware that you should set the stop block on the side that the saw blade tilts away from. This gives you additional room for securing smaller pieces and also means you aren’t trapping your workpiece between the stop block and the acute angle of the blade to the table (photo 2).
Now you can cut the opposite end of each piece. A quick check of accuracy is to place two opposite box sides or ends against each other with the internal faces towards the outside. The ends of each piece should both meet at a perfect knife edge across the width of the stock, meaning they are exactly the same length and the cuts are square across. Provided your blade was set at 45°, this means you’ll now have seamless mitre joinery at all four corners of your box.
Internal joinery
You can now cut grooves to accept the base, lid or tray runners. If you desire a drop-in lid, you can now run a rebate around the inside top edge of each piece to create a shelf for the lid to sit on.

3. Cutting shallow grooves for the base and lid component.
To cut a groove for the base I run one tablesaw kerf with a rip blade (photo 3) along the edges. Set the height of the blade to cut through no more than half of the thickness of the stock. This will give enough room to allow for wood movement, yet leave enough thickness in the base of the groove to not weaken the structural integrity of the piece.
Set the fence to cut the groove at the desired distance from the bottom edge. I usually make my base the same thickness as the sides and then rebate the outer bottom edge of the piece to create a lip that fits neatly into the saw kerf. This means that
I position the groove far enough from the edge to leave some room for the extra thickness of the base stock.
Base and lid
Now you have established a new reality with which you can make your base and lid components. Take a rule and measure the length of the base inside the groove. You need to allow for wood movement in the width of the lid. As a rule of thumb I subtract 1mm per 100mm of width in winter, and half that in late summer.
Cut your base and lid components to size. For the base you can now cut a rebate or raise the field for a snug fit in the groove you’ve cut for it in the sides. Cut any desired edge profile for the lid now.
Lid to side joins
This joint secures the lid panel in position and also allows for seasonal wood movement. It can also be cut on both components with one machine set-up.

4. Cutting the grooves in the lid to join to the sides.
Having left the blade at the same height, adjust the fence so it is exactly the same distance from the blade as is the diameter of the saw kerf. Run some scrap stock through and use calipers to dial this set-up in precisely.

By running the groove on the inside top edge of the sides and the edges of the lid piece (photo 4), they will slot together nicely (photo 5).
Make sure you do any cleaning up that involves stock removal prior to this step, such as removing saw marks from the edges of the box sides or smoothing the inside face of the lid component. Doing this after cutting these joins will result in a loose and therefore unacceptable fit.
Pre-finishing
Pre-finishing the inside faces of all components is much easier to do before assembly. Remove machine marks, smooth and apply your chosen finish. For small boxes I use shellac and wax for ease and speed of application, lack of odour and beautiful tactile end result.
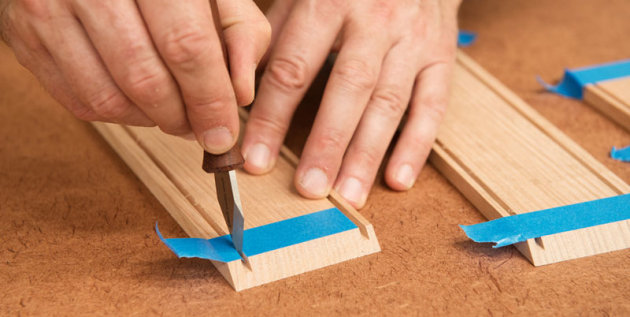
Now take some blue tape and lay it across the inside face at the end of each box side, so the edge of
the tape is precisely at the intersection of the inside face and the mitred face. This will act as a surface to capture any glue squeeze- out during assembly. Use a marking knife to remove the excess tape across the grooves (photo 6).
Assembly and glue-up

7. Lay the box sides in sequential order on the packing tape.
The beauty of this technique is that no clamps are required – just a roll of clear packing tape. Lay out long pieces of tape sticky side up on your bench.

Then lay your box sides down on the tape ensuring the knife edges of the mitres meet perfectly (photo 7).
8. Apply glue to the mitred faces only.
Apply glue to the mitred faces (photo 8), ensuring you don’t get any in the base or lid grooves, then slot the lid and base into their respective grooves (photo 9).

9. Position the lid and base components.
To fix the lid and base in position, you can apply a small drop of glue into the midpoint of the grooves on the ends of the box. The edges of the components then remain free to expand and contract, yet they will stay in place relative to the whole piece.

10. Roll the assembly together.
Now simply roll the assembly together (photo 10). When you get to pulling the final mitre joint home, pull hard on the tape to stretch it prior to wrapping around the corner and fixing it down (photo 11). The tension on the tape in this case is what pulls all four corners tightly together and holds your box in place while the glue cures.

11. Put a lot of tension on the tape, this is what brings and holds it all together.
Post-assembly
Once the glue has cured, remove the tape and clean up any squeeze-out around the corners. With tight joints and modern adhesives, your box will be sufficiently strong as is. If however you wish to reinforce the corner joinery, you can cut slots and insert long grain splines. By choosing a contrasting wood, this is also a decorative choice.

12. Using the mitre key cutting sled.
To cut the slots I use the sled shown in photo 12. Set the fence from the blade so the slot is cut at the desired distance from the edges of the box, and the height so that it doesn’t quite cut through the mitre joint. Use a rip blade with at least some teeth filed to a raking profile so that you end up with a flat-bottomed groove.

13. Gluing in mitre splines – ensure they bottom out in the groove.
Machine some stock to fit snugly in the slots, cut small pieces and glue them in, ensuring they are bottomed out in the slots (photo 13). When the glue has dried remove the waste and flush down to the surface. I use a flush-cut saw and handplanes (photo 14), but you can also use a stationary belt sander.

14. Using a flush-cut saw to remove mitre spline waste.
Separate the lid
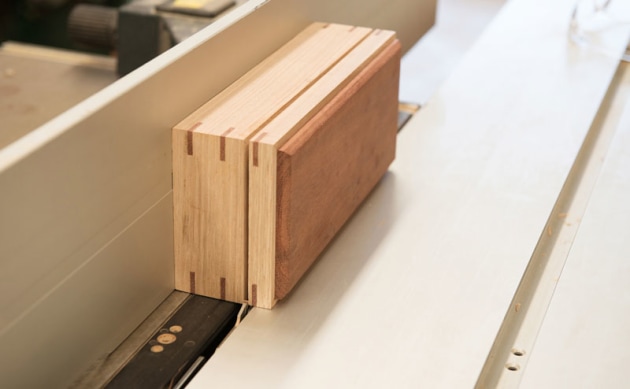
15. Sawing off the lid at the tablesaw.
To separate the lid set a rip blade so it cuts almost through the thickness of your box sides except for a tiny amount, perhaps 0.1mm. Test cuts on scrap stock will assist with this. Set the fence from the blade at the required distance and run the box through on all four sides with the base registered against the fence (photo 15).

16. Removing the lid with a fine knife.
The lid will still remain firmly attached after the fourth and final pass. Then it is a simple matter of taking a knife and slicing through the remaining thickness to remove the lid (photo 16). The residual fibres can then be sliced away with a chisel or handplane.
The lid can now be hinged, or you can cut and install a secondary lining to the inside of the box that protrudes above the edges of the main box. Because the lid and the main box are precisely the same, the lid can now be installed over the secondary lining with a piston fit.
Final finish
I like to use shellac and wax but you can use the finish you prefer. Small boxes will be picked up, inspected and held. The wonderful tactile feel of a hand rubbed shellac and wax finish is hard to beat in my opinion.
If you pay close attention to your initial machining set-ups and finishing processes you will achieve an accuracy of joinery that will allow you to produce very high quality boxes and trays. There are many ways these simple and elegant constructions can be varied, but there is no end to the detailing you can introduce.
Damion Fauser is a furniture designer/maker who lives in Brisbane. Learn more at damionfauser.com