How to build a kauri tool chest
Words and photos: Andy Groeneveld
I’ve always had a soft spot for hand tool chests. Perhaps it’s my passion for boxmaking that attracts me to them, but the idea of having all of my cherished hand tools neatly stored in a purpose built chest was very appealing.
A few years ago I had to travel to undertake a woodwork course. I had all my tools stored in a plastic tub, and although it did the job, it was a pain to work out of during the course. Since then I have continued to use the tub but recently I decided it was time to build a tool chest that could contain enough tools to complete a variety of woodworking tasks when I was away from my workshop.
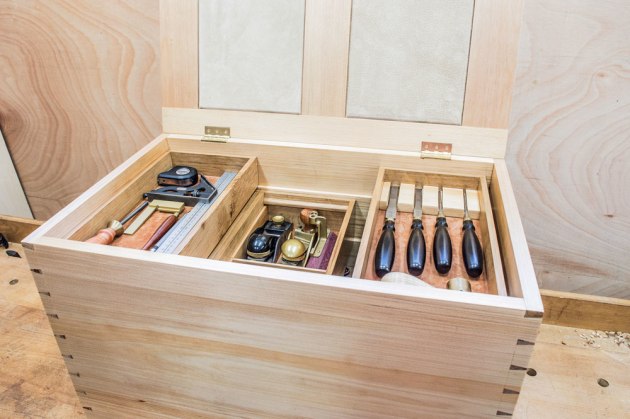
The chest shown was made from kauri pine to keep the weight down, with European oak trays for a nice contrast. There are three levels of storage. The floor of the chest houses essential hand planes, handsaws and sharpening stones. Above that are four narrow trays that sit on two tiers of kauri and slide sideways for easy access.

The trays store a collection of chisels, marking out tools, squares and block planes that I have acquired over a number of years. I can swap these tools for others if needed for certain projects.
At home in my workshop I still prefer the use of tool cabinets. The convenient thing about this chest however is that the trays and planes can be lifted out and stored on my workbench or in a wall mounted tool cabinet for easy access. Then when I need to travel I can place the tools I need in my chest and away I go.


Making the carcase
The chest is a basic box construction with hand cut dovetail joinery on the carcase and trays. The lid has a solid frame with leather covered panels of MDF. The floor has 6mm thick dividers for the planes. The four trays are lined with leather and have dividers, however you can customise your chest to suit your needs.
Kauri has a pleasing but fairly neutral grain so it was easy to match up boards for the side panels. To mark the dovetails I used a magnetic 1:8 dovetail guide made by UK craftsman David Barron. It’s a handy little CNC-cut aluminium guide that produces consistent and accurate results.
First steps
To begin, I marked out all the boards identifying the inside and outside faces. I cleaned up inside surfaces with my smoothing plane as any hand planing done after the dovetails were cut would have affected the fit.

1. Running a 2mm deep rebate on the inside face of the tail board to assist with accurate marking out of the pins.
I used a cutting gauge to scribe a line around all the boards. I began with the tail boards first using the thickness of the pin boards. The tail boards then received a 2mm deep rebate on the inside faces only (photo 1). This makes it easier to be accurate when transferring the tails to the pins as the rebate sits firmly against the pin boards, preventing it from moving. The new thickness of the tail boards is transferred to the pin board with a cutting gauge.

2. Fretsawing the waste from the tails.
I layed out my dovetails using dividers and began sawing to the baseline using the guide and my dovetail saw. Once all dovetails were cut I used a fretsaw (photo 2) to remove the bulk of the waste. I then used a freshly sharpened bevel edged chisel placed in the scribe line to lightly tap with a mallet to about halfway. Next, I turned the board over and placed my chisel into the scribe line to chop out the remaining waste.

3. The blue tape left after the tail markings are transferred shows the waste to be cut for the pins.
The half pins on the ends were sawed close to the scribe line and paired down with a chisel. I applied blue painters tape on the endgrain of the pin board and transferred the tails to the pin board with a marking knife. After peeling away the tape to reveal the waste that needs to be removed on the pin board (photo 3), I used the guide again to cut the pins, and the fretsaw and chisel to remove waste.
A dry fit of the carcase allowed me to pare any excess material away with a chisel. Once I was happy with the fit I set my router table up with a straight bit and created a 15mm wide groove set 20mm up from the bottom edge to accept the base. Seating the base up higher gives more strength to this load bearing area. I decided on a relatively thick base made from 15mm birch plywood as it would be responsible for supporting the entire contents of the chest. The inside of the chest was pre-finished with thinned shellac as a sanding sealer and three coats of oil. The chest carcase was then glued up and set aside to dry.
Making the trays

4. Showing all four trays resting on top of the chest.
The oak for the tool trays (photo 4) had been jointed (photo 5), thicknessed slightly oversize, stacked and stickered in my workshop for two weeks to allow to acclimatise.

5. Jointing oak sections for the trays.
When I was ready to work on the tray pieces I dressed them down to final dimension and cut them to length using my mitre gauge on the tablesaw (photo 6).

6. Final sizing of the tray components on the tablesaw.

7. Shooting the endgrain before dovetailing the tray sides.
I overcut them by a few millimetres and used my shooting board to trim them to the correct length (photo 7).

8. A very small chisel was used to clear the waste on the tray dovetails.
This ensured I had a nice square and clean endgrain in preparation for dovetailing. The dovetails were cut as before however the spacing was much tighter than for the carcase so I used my tiny 1/8" chisel to pare away the waste (photo 8).
Once all the dovetails were cut I used my router table again to create the groove for the base to sit in. The base was made from 10mm MDF and was lined with leather. It is said that leather has been known to rust tools if stored in direct contact unless it is vegetable tanned leather. While I am not certain as to whether the leather I have used has been treated, I have used this same leather for two years to store some of my tools without any problems.

9. A support was made from kauri to protect chisel edges.
I created dividers for the block plane tray to help prevent them from moving around when transporting the chest. My chisels sit in grooves (photo 9) created on the router table from a single piece of kauri pine (photo 10).

10. Grooves for the chisel support were run on the router table.

11. Dividers in the base keep handplanes from moving around in transit.
Dividers are also fitted to the floor of the chest to separate my hand planes (photo 11).

12. Thicknessing the base dividers down to 6mm.
These were thicknessed down to 6mm (photo 12) and cut to length to fit in dados created on the router table. The handsaws sit in a block with saw kerfs that fit the width of the blade. As mentioned, you can customise your chest to suit your tools.
Tray supports
The trays are supported by two pieces of kauri pine screwed to the inside of the chest. The bottom tier is 16mm thick and the top tier is 8mm thick. The offset between the lower and upper tier is what the bottom trays run on and the top trays run along the upper support.

13. Detail of lid frame and leather covered panels.
Double frame and panel lid
The lid is a simple double frame and panel design (photo 13). Two 6mm dominos for each joint makes for a sturdy construction for this type of lid. Leather glued was on both sides of the MDF panels for a look, which I liked.

14. The lid frame was grooved to receive tongues cut on the panels.
The panels have tongues on all sides that sit in grooves on the inside of the lid (photo 14).

15. Brusso butt hinges were fitted to the carcase and lid.
I made the lid slightly oversized and used hand planes to flush it with the chest after installing the hinges to ensure a perfect fit (photo 15).
Finishing details

16. Cast iron handles were screwed to the sides around 150mm from the top.
The chest was completed with a small oak lid pull rounded over with hand planes. For easier lifting I chose some sturdy cast iron handles with a matte black finish (photo 16). Holes were pre-drilled into the chest and the handles screwed on.

17. Four coats of oil and a final buff with wax completed the chest.
At this stage of the build only the inside surfaces were finished. So I used a combination of hand planes, scrapers and 400 grit sandpaper to prepare the surfaces for final finishing. All remaining surfaces received a thinned coat of shellac, which was sanded back with fine sandpaper. Four coats of oil were applied, waiting 24 hours between coats. I lightly sanded the surfaces after the second and third coats with 1600 grit sandpaper. After the last coat I buffed the surfaces with a clean cotton rag. A final coat of wax for protection was applied about two weeks later (photo 17).

Building this tool chest was thoroughly enjoyable, and making it also improved my hand skills. The chest is great for when I travel and ensures my much-loved tools are stored securely. I recommend a project like this for anyone wanting to improve his or her basic woodworking skills.
First published in Australian Wood Review magazine, issue 89.