Hidden Showcase: cutting blind mitred dovetails
Words and photos: Richard Vaughan
There was a time when joinery was what held wood together for buildings, boats, furniture and much more. And the point was the complete piece was the focus, the goal, rather than the hard won skills and processes entailed in making it. Those who created then and create now generally have no need to showcase techniques passed on over centuries.
The industrial revolution and its huge capacity for machine mass produced items sparked a reaction expressed in the celebration of the handmade, of human skills. Ever since then, visible joinery has remained for many as a mark of ‘real old fashioned woodwork skill’, even though it now routinely includes the use of machines.
There is an admittedly irrational satisfaction in employing woodworking hand skills that will not be seen when shortcuts, such as table sawn mitres with loose tenons are employed. But for many people there is real pride in being able to do something well just for the sake of doing it. Skilful use of powered tools is certainly not ‘cheating’ in my opinion.
I doubt many clients would pay for the time it takes to make fully blind mitred dovetail joints rather than use more efficient machine methods. But it gives pleasure, and for me this was a love job anyway. Hopefully you’ll be inspired to do this joint simply for the pleasure of extending your skills and enjoying the process. It also happens to be an extraordinarily strong joint, and like any other, you just need to mark it right and cut it right.
Mark it right, and get good habits
The pencil is your forever friend. On the outside of the components mark Tails and Pins, and position in the piece (such as right/left, top/base) in large clear letters with a B or 2B pencil – it needs to be dark and not bruise the wood.
Always and only mark on the outside as you’ll be sanding the inside before assembly, and if you have the habit of only identifying components on the outside you’ll always knows which is the outside, or the upward, face. Mark in the orientation of the piece when complete so you know which way is up as you work on each part without the need for arrows.

Set up three cutting gauges (or systematically use what you have) but use cutting gauges with sharp blades rather than the grain tearing pin of a marking gauge. I use blue tape to make the cut lines more distinct (photo 1). First capture the thickness of the boards and mark on the insides across the tape. Peel off the waste tape.

Knife the mitre to this line. Next, set a gauge to an adequate distance from the outside face (6 or 7mm is good) and mark across the ends and the inside faces (photo 2).

Mark this line to the mitre line on the edges (photo 3).
Now set a cutting gauge to be a bare millimetre larger and mark edges so you have lines parallel to those described above. This is so the pins and tails are a little shorter than the depth of the sockets, ensuring clearance for a snug fit. Photo 1 shows these marks, including an inept mitre mark which happily was on the safe side.
First cuts

Set up your tablesaw to cut to the first line – this sets the depth of the sockets. A chisel top sawblade is best here. It is worth having a blade ground this way for other uses. Then make a second cut to set the length of tails and pins (photo 4). You could also perform this step on the router table or using a hand held router.

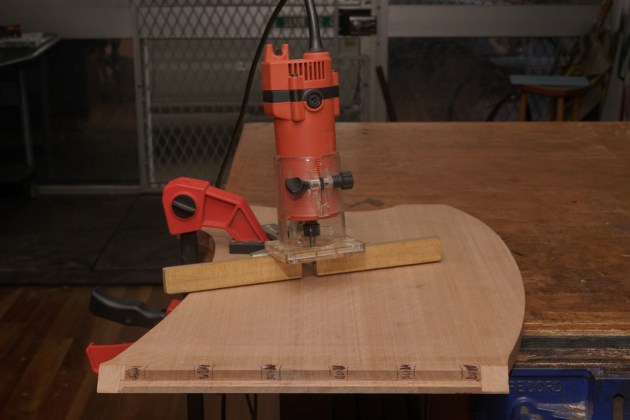
Set up the Very Fast Chisel, aka laminate trimmer with fence to accurately clean the surfaces if necessary (photo 5). Use an offcut of the same material to test the depth and width of cut.
Mark it right, next step

Lay out the pins using the template you’ve made for this very purpose. I have off-cuts of acrylic and polycarbonate from a local plastics manufacturer stashed for such uses but you can use ply, brass or whatever. There is no need for the pins to be show-off skinny as that will make it harder to take out the waste, as will become obvious (photo 6).
Square these lines to the tape and clearly mark the waste – pencil or even ink will make it obvious.
Saw on the lines
Sharp eyes may notice a correction in photo 5 that I had to make in the first gauge mark. Note also that I was cautious with marking the all-important mitre. Use a square and knife to highlight the bottom of the waste between the pins. Then chisel a slight V into that line on the waste side to ensure a clean cut line when chiselling to it.
Cut it right


Now set up the VFC fence to cut exactly to the taped cutting gauge mark and set the depth to the deeper of the two saw cuts as this is what gives the socket depth for clearance for the tails (photos 7, 8).
Hog out the waste with the VFC then chisel out the remainder. Note the full depth of cut compared to the shallower saw cut to avoid cutting past the mitre. Saw the mitres at each end.
Pins to tails

Clamp components into position and then mark the pins onto the tails. It helps if you can extend the lead of the pencil to
reach inside, and the sandpaper is there to maintain a fine point (photo 9).

Saw tails and mitres just on the waste side of the line to ensure a tight fit, with room to pare if essential. Sneaking up on the mitre is the way to go unless practice has made you very confident (photo 10).

If the pins are thick enough the VFC makes quick and accurate work of hogging out waste (photo 11).
Power tools have a place

Hand chiseling or hand planing the mitre is easier if you’ve made a jig for that, however I made a practical compromise and used the router table with a 45o chamfer bit. The sacrificial MDF on the fence gives zero clearance and minimises the chance of an unwelcome dip (photo 12).

Next comes careful fine tuning with sharp chisels, and finally the satisfaction of ready for assembly (photo 13).
Glue-up, the real test
It’s essential to do at least one complete dry clamp up of the piece. You need to be sure it will come together, and be clear on what clamps and spacers you need. This is the time to be very critical of every aspect, as it is the last chance before you have to offer excuses. Maybe even wait till tomorrow for one more look...
Once you have that sorted, now is the time to carefully press tape tightly along both sides of each joint to catch glue squeeze- out. Taping is easier when it is apart. After gluing and clamping, check for square – you can reposition clamps to pull it into exactly square. Scrape off the squeeze-out (and be concerned if there is none) and peel off the tape before the glue sets.

Here I used epoxy tinted to match the wood. Epoxy gives more working time, and it lubricates tight fitting joints. It is also gap filling, just in case. As well as the blind mitred dovetail, this piece required a lovely amount of hand tooling to get the subtle surface curves that I wanted to express the concept of ‘waves of sleep’ that is the heart of this bedside cabinet design (photo 14).
Being engaged by how you spend your time is the best way of being alive. Well, it still is for me after some 40 years of woodworking, and I wish you the same for whenever you can fit it into your life.
Richard Vaughan is a furniture designer maker who also teaches woodwork from his Brisbane ‘shedudio’. Learn more at www.richardvaughan.com.au