Hallway table with inset legs

Words: Jake Sawyer
Photos: Bryce Twyman
Illustrations: Graham Sands
I’m a self-taught woodworker running a one-person workshop in Perth, Western Australia. Under the banner of Marshall Wood, I have spent the last three years focusing primarily on bespoke timber furniture and small batch production, with occasional machining work. I’m also a qualified chartered accountant who strayed from the full-time cubicle life after falling in love with woodworking six years ago.
Design details
I have found that overwhelmingly my clients prefer simple, minimalist pieces and ultimately my job as a bespoke furniture maker is to fulfill the client’s brief. Conveniently, I also love this aesthetic, but the concept of building ‘simple’ looking furniture has left me occasionally feeling as though I’m not showing off the skills I know I possess as a maker.
Over the years I have come to realise that designing and making quality minimalist furniture does take a lot of skill and one has to consider who it is they are trying to impress – their peers or their clients? I’m also conscious that paring back the details helps me to deliver well made pieces at a more reasonable price point which I believe is appealing to my clientele.
The French oak hallway table shown is constructed with traditional joinery using modern machines and has a few nice details to set it apart. The shadow line allows for and conceals any wood movement that will ultimately occur in the top. The legs are tapered and rounded over to slim down the overall profile.

Your set-up
Keen observers will note that I appear to possess some very high end machinery for someone who has only been in business for a few years. I was lucky to have the opportunity to purchase a fully appointed workshop from a retiring furniture maker at a time when I was looking to make a major change in my life.
I’ve had quite a few hobbies that have become obsessions in my life, and there’s this recurring theme of starting at the bottom, buying beginner equipment, then intermediate and then ultimately going pro. It’s an expensive and time consuming process, and in this case I decided to skip this step and go hard, or go home. Of course having a great set-up makes my job as a furniture maker more efficient, but this build isn’t out of reach for someone with a more modest collection of tools.
One of my timber suppliers stocks a wide variety of section sizes in French oak, meaning I could specify thick legs without laminating thinner boards, and a single, wide board for the top. When working with minimalist designs, it is important to select exceptional timber and execute the little details perfectly.

Plan ahead
To begin, I sketch a 3D model in SketchUp. Here I can visualise proportions and correct any design issues before they occur. Fig.1 shows the construction. I run through every step of the build in my head to check for logistical issues. I check all the cuts, angles and processes can be executed by my machines and with the tooling I have on hand.
Main: Full and detail views of the French oak hallway table made by Jake Sawyer.
As an aside, I flip between metric and imperial as necessitated by my machines and tooling. I run a calculation to ensure the top won't expand further than the shadow line. There is a formula to calculate this, which is the dimensional change coefficient of the timber species x change in moisture content between wet and dry season x width of the board.
There’s a lot of guessing here, so in practice, I work on an estimate of 1% expansion for flat sawn white oak and confirm that the width of the board between the legs will likely only expand by ~2mm (239mm x 0.01). As it was winter at the time of building, it’s more likely that it will shrink by this much than expand. This is supported by an offcut of a quartersawn white oak dining table I have in my workshop which has expanded 0.6% from when it was cut.
Performing these checks now means I can start the build with confidence in the design. I take the key dimensions from the model and in this case I knew that I could order stock that would easily yield these components, e.g. 65mm for the legs, 40mm for the aprons and 27mm for the top. It’s a key part of my planning to consider the dimensions of timber available to me so that my designs avoid being wasteful.
Machining the wood

1. Stickering out the boards: ‘I like to rest my timber upon purchase, machine once and then rest again.
Everyone has their own machining processes, and mine change depending on the job and the timber, so I won’t go into too much detail. I like to rest my timber upon purchase, machine once and then rest again. Final machining happens only when I’m ready to proceed with the rest of the job and I utilise sharp Tersa knives to ensure less sanding later on. Components are stickered from purchase until glue up (photo 1).
The frame components are cut to the sizes shown in the cutting list. The dimensions allow for 40mm tenons on each end, but if you use dowels or dominos you’ll need to adjust this. The middle rail is narrower than the aprons, so it can be offset from the edge and the apron can be rounded over later.

2. The board for the top was ripped and machined close to final width and thickness.
The wide board for the top (photo 2) was ripped straight down the middle and the two halves machined close to their final width and thickness. This was done to relieve tension in the board and to help maintain a decent final thickness (fig.2).

After resting, I dressed the boards again, taking only the bare minimum off the edges for gluing (to maintain grain flow). Once satisfied with the joint, I biscuited and glued the two halves back together (photo 3).

3. Gluing up the top. Biscuits were used to help alignment.
Once the components are cut to size, I note their position and orientation. I arranged the legs so the angle of the rift sawn grain created a diamond when viewed from above and then marked to keep track. I also marked the aprons as I had cut the sides and front from one long piece to preserve the grain flow of the apron around the piece.
Joinery processes

4. Showing the double mortises.
I used the PantoRouter to create mortise and tenon joinery for the base (photo 4). You could use dowels, dominos or even cut the joints by hand with chisels and a saw.

5. The PantoRouter preparing to cut tenons.
I have previously made this table with mitred tenons that meet inside the legs, but this time I wanted to try intersecting mortise and tenon joints. Where possible, I perform glue ups in stages, and this method maximises glue surface and means the glue doesn’t flow into the adjacent mortise and interfere with the next glue-up.

6. The corresponding 2-1/8" tenons were first cut 40mm long.
Eight mortises were cut at 2-1/8" wide x 20mm deep, and inside these I cut another eight smaller 1" mortises at 40mm deep (photo 5). I then cut corresponding 2-1/8" tenons at 40mm long (photo 6), and then did the same operation to cut a 20mm long 1" tenon on the end (photo 7).

7. A 20mm long 1" tenon was then cut on the end of the 40mm long tenons.
I used my off-cuts from milling the stock to set up and test these joints (photo 8). I used the panel saw to cut spacer blocks for setting up the depth of the tenons, one at 20mm and one at 40mm to ensure consistency across the different components (photo 9). I also use a laminate sample as a shim to make the mortises a touch deeper than the tenons will be, so nothing prevents the joint coming together.

8. Off-cuts from machining the stock were used to set up and test these joints.
Once the joinery was cut, I dry fit the frame and measure for the length of the middle rail. This is the first reference cut so far as all other cuts have defined the overall size.

9. Spacer blocks were used to set the length of the tenons to ensure consistency.
I then set the PantoRouter up to cut triple mortise and tenons, but offset this so only two were cut. The tenons are stacked in such a way that maximised face-to-face grain glue surface (photo 10).

10. The PantoRouter was also used to cut triple mortise and tenons.
Fixing the top

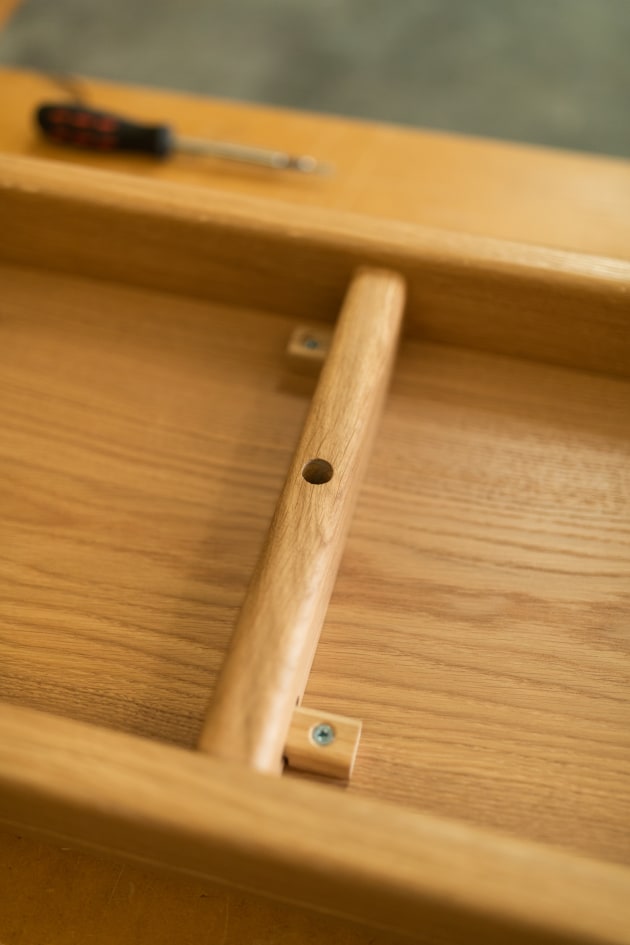
11. Wooden buttons and centre holes through the rails were used to fasten the top.
Now it’s time to get down to details. I use a combination of wooden buttons and centre holes through the rails to fasten the top down (photo 11). I use the Festool domino to cut oversized slots for the buttons (photo 12).

12. The Festool domino was used to cut oversized slots for the buttons.
The centre holes are cut at the drill press, counterbored for a screw and washer (photo 13). This is all easier done before glue-up while everything is more manageable.

13. Fixing the frame to the tabletop. Centre holes were drilled and counterbored for a screw and washer.
On the topic of drilling, I’ll also drill a large, shallow hole to recess soft feet into the underside of the legs. I do this on my horizontal drilling machine/borer for safety and consistency.
Creating a shadow line

14. Cutting 3mm deep shadow lines on the tablesaw.
The next detail is the shadow line. This is quickly cut at the panel saw by raising the blade to the desired depth of the groove and setting the fence to cut the desired height (photo 14). I like a 3mm shadow line, so the fence was set to 60mm (given my stock was 63mm wide). The depth of the groove is arbitrary, but with tenons quite close to the edge, I went with 8mm to avoid encroaching too far into that area.Next time I’ll adjust the tenon size and spacing to allow for a deeper shadow line.
Tapering the legs
While at the saw, the leg tapers can be cut. First, I mark where I want the tapers to start and finish – in this case 10mm in from the end and 93mm down from the top. To avoid a gappy joint, I stop the taper 10mm before the apron meets the leg so that I can sand and smooth this transition without rounding the flat face of the leg where the apron meets.

15. A jig was made from MDF to saw the leg tapers.
I cut a sacrificial board of MDF that acts as a zero clearance. I line up the pencil marks on the leg with the edge of the MDF and then rest a straight offcut against the leg (photo 15).

16. This was glued and screwed down with an end block and hold downs.
This is glued and screwed down with an end block and some hold downs to make safe, repeatable cuts (photo 16).

17. A custom MDF square with one corner notched to fit around the leg was used to check the frame for square.
I also created a custom square from another MDF offcut by squaring it up on the slider and notching out one corner (photo 17). This would fit around the leg to check the inside of the frame for square during glue up.

18. The undersides of the aprons, middle rail, and the long edges of the legs were rounded on the router table.
Next up at the router table, I used a 3/8" router bit and rounded over the undersides of the aprons and middle rail, and the long edges of the legs (photo 18). Care must be taken here to shift the weight of the tapered legs in order to round over all faces evenly.
Sand in stages
With a nice finish off the machines, I start sanding at 180g, move to 240g, water pop and then sand at 240 again. Wider faces are done with a random orbit sander and a hard backing pad. A super soft backing pad is used for the roundovers and curved surfaces. Narrow faces get a pass or two with my smoothing plane, followed by a few swipes with a 240g sanding block. Any sharp edges are broken with sandpaper to a 1mm radius or so. The ends of my tenons are chamfered to make the glue-up more straightforward and keep glue from scraping off the inside of the mortise.
Assemble in stages
19. While a part-assembly dried, the long and middle rails were sanded.
I do my glue-ups in stages so I can continue sanding while the previous subsection dries. In this case, I start by sanding the long aprons and middle divider that are then glued together into a long H-section (photo 19). I check for square and ensure each open end is evenly spaced.
Next I sand the short aprons and legs and perform two more glue-ups to join one short apron to two legs (twice). I check for square by sighting where the shoulder of the apron meets the leg. You can’t really check the inside for square as the legs are tapered to an arbitrary angle, and the diagonals can’t be measured because the corners are rounded. I check the top and bottom of the legs to make sure they are equidistant, but at this point I’m relying on tight, accurate joinery to ensure the piece is square.
The legs are 20mm higher than the rails, so during the glue up I use a feeler block machined to 20mm thick which is the same thickness the top will be. Resting the spacer on the leg, I can then feel if it is flush with the top of the leg, which means the top will be flush further down the road.
Once these subsections are dry I can bring all three pieces together for a final glue-up, using the shop-made square to check for overall squareness of the frame. Clamps and round-overs can interfere with measuring the diagonals, but I do this when I can. Realistically, this glue up can be done all in one go, but the staged glue-up is a habit I have picked up on larger jobs in order to keep my heart rate down.
Top it off
The top is the last piece of the puzzle and its final size is dependent on the rest of the frame. I double check the dimensions for the top and prepare for final cuts. Any panel glue up that fits through my thicknesser gets a light pass on each side with sharp blades to bring it to final thickness. I then crosscut and rip to final size at the panel saw. Doing so in this order means any snipe from the thicknesser is crosscut off, and any tearout from the crosscut is ripped off.

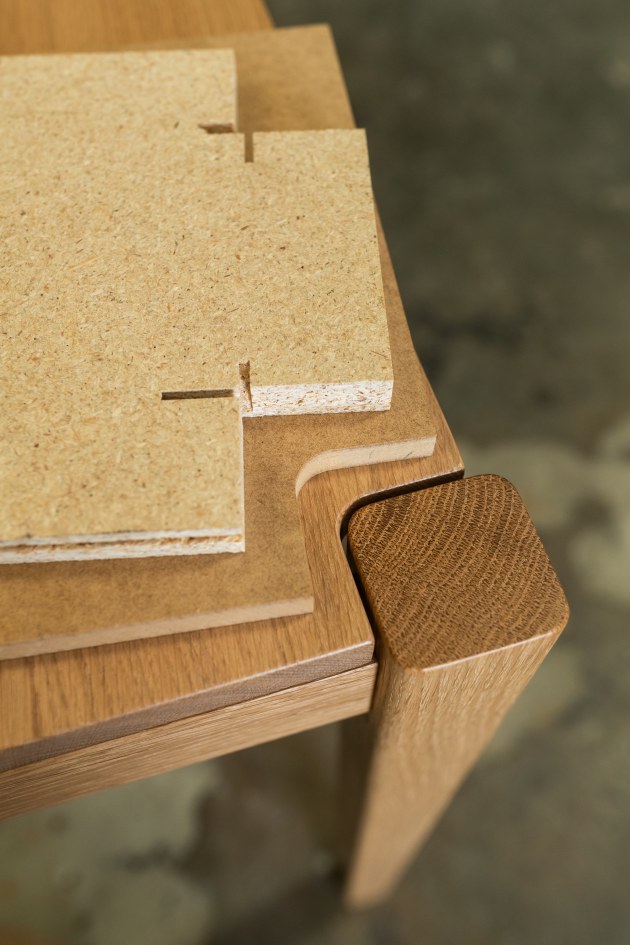
20. A second template in conjunction with 1" flush trim bit gives a 1/2" radius on the inside corner.
At the same time, I use the panel saw to make a routing jig for the leg cutouts. With the fence at the same width as the top, I cut two off-cuts of MDF that are large enough to be able to clamp to my workpiece, say 300–400mm long.
I then set the fence to notch out a square to form the routing template (photo 20). This square needs to be 42.5mm plus the shadow gap, which the sawblade accounts for at roughly 3mm thick.
21. This also works with the 3/8" round-over on the legs and the 3mm shadow gap.
I can then use the first template to rout a second template, which with a 1" flush trim bit will give me a 1/2" radius on the inside corner. This works perfectly with my 3/8" round- over on the legs, plus 3mm for the shadow gap (photo 21).
I test fit this template on my frame and sight the shadow lines to make sure they’re evenly spaced. Once satisfied, I can trace the template on the top, jigsaw out the waste and perform final routing. Tearout on the trailing edge of the cut is controlled with a backer block or some veneer tape. Sharp bits are a necessity here to avoid burn marks.
Finishing off
While the base is drying, the top can be sanded. After removing clamps, final finessing and clean up can be done. If all is looking as it should when the top is placed on the base, I flip everything onto the workbench, mark out fixing holes, and screw it all together. At this point it is often late in the day, so I reassess with fresh eyes the next day in the morning light. I’ll move to various places in the workshop to pick up different lighting and I almost always find something I missed the previous day.
It’s only now that I feel satisfied to commence the finishing process. I like hardwax oils as they are easy to apply, feel nice and natural and are easily repaired. I roll three coats on the top and rub and buff off three coats on the base. The top can now be fixed down, and the piece is complete.
Jake Sawyer is a furniture designer maker in Perth and trades under the name Marshall Wood. See Instagram @marshallwoodau