Frame and Panel By Hand
Words: Damion Fauser
Photos: Raf Nathan
Frame and panel is one of the most commonly used construction methods that allows for the seasonal dimensional change that timber undergoes. It’s common to use machinery for creating these joins however I’ve developed my own process (after initial machining of stock) that involves just a few simple hand tools.
This is not a method for fast-paced full-time joinery shops. But for small jobs, such as a cabinet with one or two doors, or the rear panel assembly of a cabinet, or if you like working without earplugs on, then this could be for you. I use it whenever I’m not under intense time pressure and I feel like easing back on the throttle a little.
Tongue and Groove Planes

The one-piece blade Lie Nielsen is easier to set than the two Stanley blades.
Apart from the usual hand tools you’ll need a tongue and groove, rebate and router plane. Also known as match planes because they joint boards to form wider panels, tongue and groove planes are unique joinery tools. There is a blade either side of a carefully machined or cast guide in the body of the tool and a pivoting, off-centred fence.
In the first setting, one blade is exposed and the fence is positioned to centre it on the width of the stock to cut the groove. Pivot the fence around and both blades are exposed and positioned to cut away a third of the material from either edge, forming the tongue. The resulting tongue slots into the groove and the two boards are seamlessly joined together.

Detail of Lie-Nielsen plane base.
Traditionally the two blades were separate edge tools, independent of each other and requiring individual placement and setting. The downside here is that the depth of each blade must be set precisely the same. The advantage is that these traditional tools come with blades of varying widths, allowing the use of stock other than 1/2" or 3/4".
Lie-Nielsen manufactures a modern version of the Stanley #48 (for 3/4" stock) and the #49 (for 1/2" stock) and their blades are a single forked assembly that sits on a specially cast body to ensure proper alignment. Treat the blade as you would any other chisel or plane blade for sharpening. Give it the full treatment by lapping and polishing the back and polishing a micro-bevel and this tool will perform well even in unruly woods.

Old and new models. Stanley and Lie-Nielsen #48 tongue and groove planes.
Like other joinery planes, I find the front handle to be more of a hindrance than a help. I get far more accurate results by placing my front hand lower down on the tool, with my thumb riding on the top of the casting and my fingers wrapped underneath to apply gentle pressure to keep the fence registered against the workpiece.
Whilst a tool designed for rapid stock removal and with integral fence and depth stop, this is still a handplane and you must commence the cut with pressure at the toe and end the cut with pressure at the heel to ensure consistent results. Finally, as this tool cuts a shaped profile, I treat it as I do a moulding plane and therefore start the cut at the far end of the workpiece, taking a first pass of about 150mm. Move back towards the front end, take a second longer pass of 300mm and so on until you are running the full length of your workpiece.

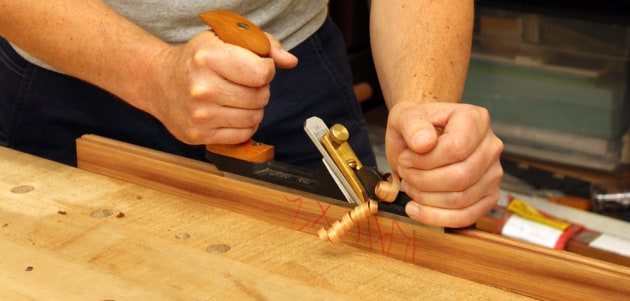
Close-up of running the groove in a stile.
The tongue and groove plane cuts grooves in the frame components. The walls of the grooves in the stiles serve as a reference point for the face of your chisel when cleaning out the mortises.

The tongue is run on the alternate fence setting.
After running the grooves, switch the fence setting on the tongue and groove plane and run the matching tongues on the long grain sides of your panel. Switch to the rebate plane to cut a rebate on each face of the panel ends using the long grain tongues as a visual reference for your cutting depth.
This is the one time I cut the long grain of a profile prior to cutting across the grain, but with sharp tools I don’t get any breakout issues and I like the convenience of the long grain tongue as a visual depth stop. Lay out and cut mortises in the stiles and haunched tenons on the rails and there you have it – frame and panel by hand.

Starting a pass. My elbows are locked and my right arm is directly in line with the tool and the direction of the cut. Here I am applying pressure on the toe of the tool to commence the cut.

Mid-pass. Pressure is being applied to both the toe and the heel now, my arms are still locked and I’m using my legs and body mass for forward momentum.

Completing a pass. Body position remains the same but I am now applying pressure to the heel of the tool and ensuring I fully exit the tool from the cut before lifting the tool away from the work.
First the frame
Prepare components. Machine frame and panel components precisely to desired thickness. Cut to length but allow extra on the rails for the tenons. Stiles are also overlength at this stage as the ‘ears’ make disassembly after a test-fit much easier. This also lets you cut mortise ends closer to the final ends of the stiles without risk of breaking out the weaker short grain at the end of the mortise.
Don’t cut to width just yet. Because the fence on the tongue and groove plane protrudes below the sole of the plane, you will need additional width for securing in the vice. Once the profile is run, rip to width on the tablesaw.

Above: Use of a cabinetmaker’s triangle or some other form of reference is essential.
Because the tongue and groove plane rides on its integral fence, careful use of reference surfaces is essential. Lay frame components out and mark triangles on one face only as shown above on the almost completed construction. Always ensure the plane rides on the marked faces. If you don’t, any jointing errors will be doubled when assembling.
Run the grooves. First take a few light passes to establish the run of the groove. This will also help if you happen to be going against the grain. Although you have a fence to guide you, this tool will follow the grain if you allow it, so you need to get the first few passes just right. Also concentrate on keeping the tool plumb. After the groove is well established, remember the tongue and groove plane is a rapid stock-removal tool and you can take a decent bite with each pass.
Make sure you exit the groove fully before lifting the plane away or you’ll risk damaging the end area. Use your body mass and legs as the primary force behind each pass and lock your arms to maintain control of the tool. Once you get into a routine you can remove material surprisingly quickly. Continue until the shavings stop — the sole of the tool serves as a depth stop.
Establish stile length and rail width. Mark the desired length on the stiles, adding 1–2mm to allow for trimming to fit after assembly. To establish rail width on the stiles lay a rail across a stile right at the scribe line and make a tick mark with your knife on the opposite side of the rail. Square these marks around to the inside face of the stiles and measure in 5–6mm from each mark to show mortise lengths.

The inside walls of the groove act as a reference for the chisel when cleaning out the mortise.
Cut the mortises. The grooves will determine the thickness of your mortises, as well as the tenons on the rails, because the groove is cut at one-third the thickness of your frame stock. Cut the mortises using your preferred method. At present I drill out the waste with a forstner bit and clean up with chisels. The inner groove walls serve as a fantastic vertical and flat surface from which to reference the face of your chisel.
Mark and cut tenons. To lay out the tenons on the rails first establish the length required between the stiles and scribe the shoulders accordingly. Then lay the end of a rail against the scribe lines of a stile and transfer the inside end of the mortise and the frame length to establish the width of the tenon.
Take a gauge and set it to scribe a line that’s a whisker outside the inside walls of the groove. Remove the waste to establish the cheeks of the tenons. Given the symmetrical nature of this joint I use router plane to trim the tenon cheeks. This tool not only perfectly centres the tenon on the rail, it ensures the cheeks are co-planar with the faces of the rail which is essential to keeping your final assembly flat.

Using a router place to trim tenon cheeks
Lay out and cut a haunch on the tenons to fill the gap left by the fact that your grooves extend to the ends of the stiles. The depth of the groove establishes the length of the haunch, and the distance you measured in from the end of your stile to establish your mortise establishes the width.
I reference mine directly off the stile grooves to ensure I’m working to reality. Saw away the waste to establish the haunch and then test-fit and pare to fit if required.
Prepare the panel
Cut your panel remembering to add twice the depth of the grooves (in the case of the Lie-Nielsen #48 plane for example that is 5/16") and then subtracting 1/8–1/4" to leave a small gap (1/16–1/8") at either side for dimensional change.
One limitation of this technique is that only smaller assemblies can be made, as there isn’t enough room in the grooves for a larger panel to move. Using quartersawn stock helps, or you can make panels up from narrower boards. The widest I have made to date are 12" wide.
Switch the plane fence to the tongue setting and run the tongues on both of the long grain edges of the panel. Once again go lightly at the start, use your body mass and exit the tool carefully.
Once the long grain tongues are done, clamp the panel to your bench with the end hanging over. Set your rebate plane to cut a rebate that is as wide as the depth of cut on the tongue and groove plane. If desired, set the cut depth by laying the sole of the tool on the tongue and bringing the depth stop down to the face of the board. I don’t bother with this as I use the long grain tongues as a visual reference to know when to stop cutting.
Set the nicker blades if you choose to and start planing. Establish the rebate on the first side, which forms half of the tongue, flip the panel and repeat for the other half. Repeat on the other end of the board.
To ease assembly and reduce the risk of breaking the walls of the stiles, I gently break the edges of the tongues with a block plane.


Two views of cutting the rebates with a Veritas skew rebate plane. Keep elbows locked and right arm in line with the tool.
Assembly and finishing
Mill some shims to the thickness of your reveal for use during assembly. After test-fitting remove the reference and machining marks with a handplane. It may pay to pre- finish the inside edges of your frame components and your panel. Get ready for glue up and assemble your piece, using the shims for the reveal.

Test assembly. Spacer shims are used to keep a consistent reveal between the panel and the frame.
After the glue has dried remove the clamps, then smooth any steps at the rail/stile intersection with handplanes or abrasives. Now it’s just a matter of fitting the assembly to its intended space and completing any further work needed.
This is one of my favourite working techniques. For smaller jobs where you don’t have time pressure, this technique will introduce you to some wonderful hand tools and improve your skills and confidence as a woodworker.
Republished from Australian Wood Review issue 87.
Damion Fauser is a Brisbane based designer maker who also teaches woodwork classes. He is a regular contributor to AWR.