Carving a dog with flat plane techniques
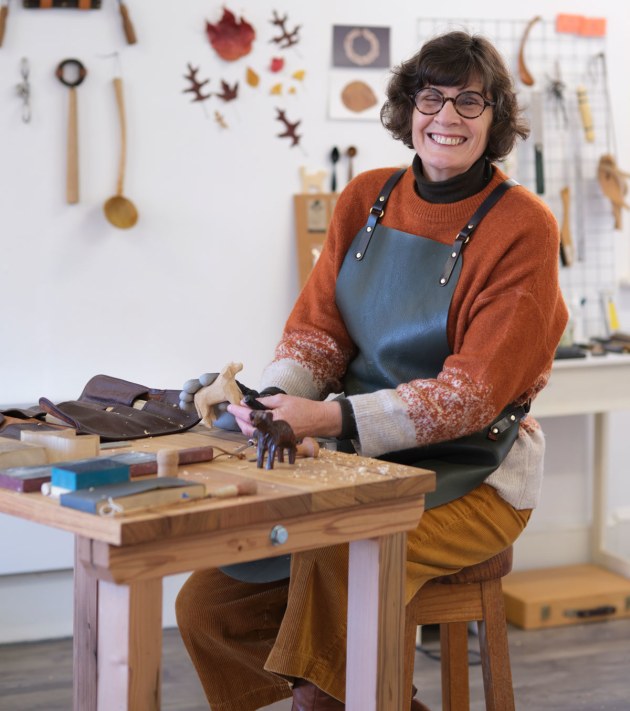
Carol Russell in her Launceston, Tasmania studio. Photo: Philip Kuruvita
Words and photos: Carol Russell
On a trip to Japan a few years ago, we were making our way through some side streets somewhere in the vastness of Tokyo. I passed by a window that had a couple of tiny carved animals, a dog and a bear, sitting on a ledge in front of a curtain. They were carved from a plain light timber with no figure to speak of. There was no detail, such as eyes or a mouth and they were finished off with flat facets that produced shadows in the afternoon light. The shadows filled in the detail. I stood for a while and looked at how they seemed to come to life and be so full of character and movement.
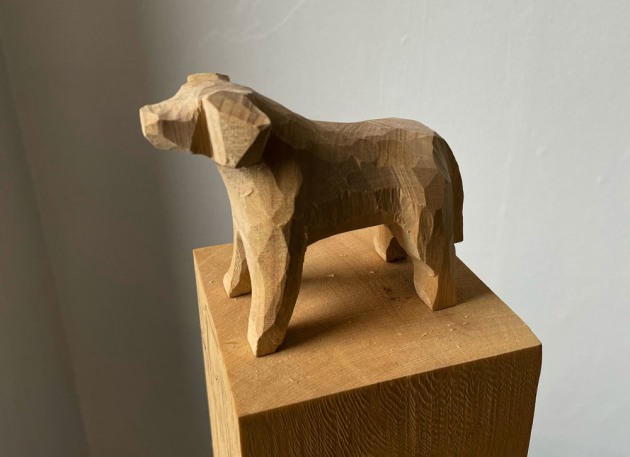
1. Labrador retriever carved with flat-plane techniques by Carol Russell.
It's funny how sometimes in your life as a maker, the big moments are almost incidental, they can be powerfully cathartic or an image or conversation that trickles into your subconscious and starts to inform your work going forward. These little animals were a turning point for me.
I have since discovered that this faceted style of carving is very much a recognised technique called flat-plane carving. There are many Japanese carvers who work in this way. Some of my favourites being Hideo Sawada, Seiji Kawasaki and Fumiya Watanabe. Minimal in style, straight off the tool, usually a knife, no sanding and simple finishes, sometimes milk paint. There are usually bold flat facets with as few cuts as possible designed to catch the light and shadows.

2. Dog portraits brought to life with bold knife strokes.
This style is also associated with Scandinavian carvers, there are many famous carvers who produce little caricatures in this style. Swedish carvers Axel Petersson Doderhultarn and Carl Oloff Trygg are two of the most famous. Harley Refsal from Minnesota has written several books on the subject. Australian Jeff Donne is a beautiful carver in this style and brings humour and pathos to his gorgeous creations. All these carvers are a great inspiration to me.
In order to find my own voice with my carving, I focus a lot on simple, abstract animal forms, and dogs in particular. I sometimes like to heavily texture the surface to create fur, other times I keep the pieces completely minimal and almost unfinished – there is a point when they reach their peak character and it takes some restraint to leave it alone at that point.
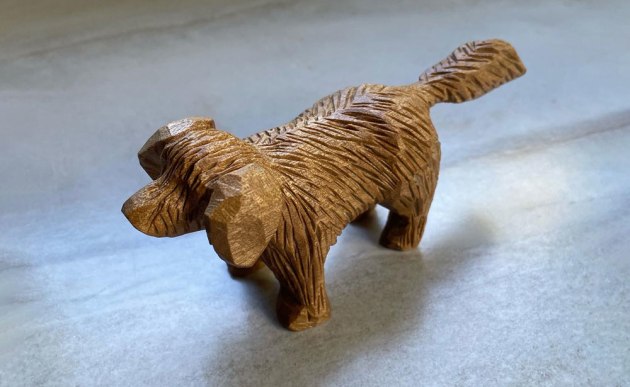
3. A heavily textured dog in white beech. The ‘fur’ was created with a V-tool, followed by layers of umber acrylic paint and shellac.
Getting started
I have outlined here my process for a simple dog sculpture. I’ve chosen a labrador retriever (photo 1). I’m not the best at drawing so I start with a very basic profile, preferring to find the form through carving. I don’t stress too much about anatomical correctness any more, I’m looking for a feeling or a mood. I have noticed however that with practice I am improving with my drawing and now often freehand my design rather than tracing.
I watch animals all the time to try and understand their moods and how they relate to people – I find children’s books a great reference. Dogs, in particular, are always conspiratorial and always happy to join in. They are usually drawn loosely, with lots of movement that really captures the essence of their nature (photos 2, 3).
The wood
I use stock around 45mm thick. I like to have a lot more material width than I need to create plenty of shadow and contours. I love to carve in white beech, that’s what I’ve used here. It’s a bit waxy and holds the facets well, it doesn’t chip out too much and you can burnish it to a shine. It’s plain in figure but not completely characterless.
Other woods I enjoy are silky oak, red cedar, Huon pine, tiger myrtle, blackheart sassafras and Tasmanian blackwood. The harder timbers are more difficult, but I love the weight of them and the way the knife cuts cleanly.
The tools
The most important tool is a knife you feel comfortable with. A double bevel is best and allows for changes in cut direction. No matter what knife you choose, keeping it beautifully sharp will give you nice clean cuts.

4. A tool kit for carving small animal portraits – bottom row, left to right: Mora sloyd knife, Peter Trott detail knife, Woodlands CC chip carving knife, Pfeil palm gouges and Japanese keyhole saw with a carving glove and coping saw above.
I also like a small V-tool and a small flat gouge. The Pfeil palm gouges, pictured in photo 4 are great for handheld projects. I often use a #120 Mora sloyd knife. The picture also shows a Peter Trott detail knife and a Woodlands CC chip carving knife. A carving glove worn on your non- dominant hand and a piece of thumb wrap on your knife hand can save you some serious injury.
Start with an outline

5. To get started, trace a dog, transfer the markings to a piece of wood and bandsaw the shape out.
Trace or draw your profile onto the wood or transfer it using carbon paper if you have any. Cut it out with a bandsaw, or if you don’t have access to one, a Japanese keyhole saw combined with a coping saw is effective (photo 5). Machinery is great and a real time saver. I have found though, that most things are possible without it if you’re prepared to take more time and practise your technique.
I always cut wider than the line, especially on the face. For this dog I’ll carve the mouth closed. Make sure the grain runs the length of the legs, you want to avoid short grain sections that may be fragile. Tail straight down or up will be strong as the grain will run lengthways to it. Having the tail at an angle makes it vulnerable as the grain will be short and it may break off.
Cut out the legs

6. Once you have your profile, draw a centre line on the blank for reference (photo 6).

7. The material between the legs can be cut out with a saw (photo 7).

8. Thin down the tail using your knife; it can get a bit in the way of cutting the legs (photo 8).
Define the ears and face

9. Mark the widest point and sketch in the ears (photo 9). Viewed from the end, these lines define the ears in ‘cross-section’.

10. I start by making stop cuts to mark out the ears, then carve away the material around them (photo 10). Cut in the width of the face and mark where the tip of the nose is.

11. Here I want the ears to be very prominent and triangular from the front, in keeping with a labrador retriever. The extra width in the blank helps with this. Just these few cuts make the blank start to feel like a dog (photo 11). Now move down the body and remove all the sharp edges, being mindful of grain direction. You want to lay the fibres down smoothly and avoid tear-out.
Round off corners

12. A series of contour lines can help you to reduce material evenly over curves.

When rounding corners it can be helpful to draw a series of lines on the adjacent surfaces to guide you (photos 12, 13).

If you don’t remove enough from the corners, it’ll be hard to lose the squareness of the blank (photo 14).
Stay sharp
Hone your knife often, your cuts won’t be clean unless you maintain that lovely edge. A flat strop with honing compound should be all you need. Focus on making contact with the bevel and draw away from the cutting edge. If you use a white board marker to colour the bevel when you strop, you can check that you’re making full contact all the way along the bevel. If there’s any marker left you can see where you’ve missed and make another pass.
Keep refining

Keep carving away the waste material (photo 15).

You’ll need to reduce the thickness, creating a bit of contour around the middle. Round off the legs and define the tail (photo 16).

You’re looking for nice flat cuts with no tear-out. Come in at the nose and create some cuts that catch the light around the eye area (photo 17). I carve by a window and often turn off the overhead light so I can see where the shadows fall from the raking light.
If you have any tricky grain that can’t be settled using the knife, a small gouge can be useful. I like the number #7/10mm wide Pfeil palm gouge. You can cut straight across the grain to take out any difficult sections.
Finishing


I usually finish the little dogs with a wax polish, and it’s a good idea to burnish them as well to get rid of any stray fibres. You can use a wooden peg or even stiff brown paper works well, but you don’t want to round over any facets as they are the main feature. I buff the wax in with a stiff brush and then polish with a soft cloth to pull up a bit of a shine (photos 18, 19).
The heavily textured dog has been finished with a V-tool to create the fur, I’ve used burnt umber acrylic paint and shellac over the top to bring out some shine. Milk paint can also be quite effective.
This style of carving is a very intuitive process, follow your instinct as to where the cuts should be, refer to photos only occasionally and make the little dog from your mind’s eye. You’re more likely to capture the canine essence that way.
Don’t be afraid to mess up and don’t judge your work too harshly during the process, keep going right through to the end. The dog will start to emerge.
I call this the ‘ugly barrier’ and you just work through it. I’ve seen many people lose heart halfway through a project, only to be delighted as the character of the piece emerges as they keep carving.
There isn’t a right or wrong with this work, it’s about self-expression and a coming together of you, the tool and the material. It’s also incredibly fun.
Hopefully you’ll carve many pieces in this style and you’ll get better the more you do. I really believe we don’t know what’s in us until we give things a go. This highly intuitive carving technique can be very revealing and freeing. Happy Carving.
Author’s note: Please be aware that this style of carving isn’t suitable as toys for small children. They can have sharp edges and a possibility that sections may break off and create a choking hazard.
Carol Russell is a woodcarver and often at woodworking events around Australia. She is a regular contributor to Australian Wood Review. Learn more at www.carolrussellwoodwork.com.au