Carving a bowl with Grant Vaughan

Words: Grant Vaughan
Process photos: Grant Vaughan
Photos of finished piece: David Young
Carving organic bowls of this nature is very time consuming. Designed as a project for one of my five day workshops this piece needed to be interesting, as large as possible, and yet simple enough to be completed in the given time. Having all the timber well prepared ahead of time meant the class participants could hit the ground running.
Drawings, models and templates
When designing a new piece I'll start with freehand sketches and then make a small clay or timber model. I find it difficult to resolve a 3D design from sketches alone, so for this I carved a model from jelutong that was 120mm long. This was scaled up to a suitable size, 300mm long x 240mm wide. Although my work is very organic in nature I always use the discipline of technical drawing to produce full scale drawings. A plan and two elevations usually give me enough information to proceed. It’s a process that allows me to read forms.
As shown in the photos below, instead of a drawing board and paper I draw on 4mm MDF using its edge to guide my T-square.


The advantage of the MDF is that the drawings can be cut out and transferred directly onto the timber. This done I carefully dress a timber blank to the exact height, length and width of the bowl and mark centre lines on every face. I make sure all surfaces are flat and at 90° to each other. This allows me to accurately transfer any measurement from the drawings to the timber.
Marking out
The plan view is then cut out and marked on the wood. At this point the side elevation can also be marked allowing the piece to be cut out on the bandsaw from two directions or planes. Indeed this is the logical way to go, however many of the pieces I make can be bandsawn in one plane only. Purely as a demonstration I have used other techniques to shape this bowl.
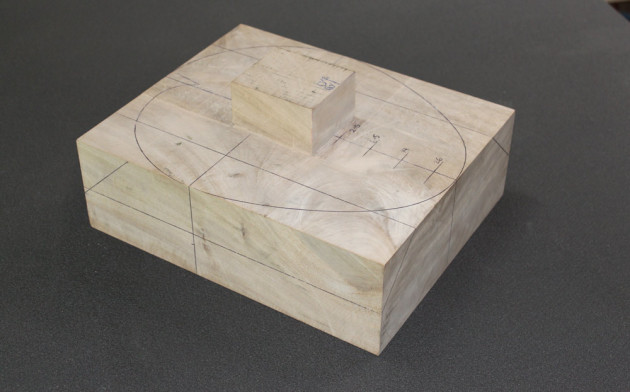
By looking at the end elevation, a 45° line has been drawn on the left-hand side intersecting the side of the bowl. This shows that a 45° bevel (50 x 50mm) can be cut from both edges of the underside of the blank.
Similarly the side elevation has a 45° line marked on the left-hand side showing that another bevel can be cut from the blank. With the right hand side of the elevation I used another method.
The side elevation has four vertical lines that intersect the underside of the bowl. At each intersection the distance from the base of the blank to the underside of the bowl can be measured i.e. 26, 14, 6.5 and 2.5mm. Four holes can then be drilled along the centre line into the blank at the measured intervals and depths. By removing the timber down to the bottom of each hole the approximate curve of the bowl is revealed. Using this technique any point on the drawings can be measured and a hole drilled into the blank to locate the point. Basically it is the same method a computer uses to scan an object.
The beech blank with bevels and hole points marked is shown below.
A block for holding the piece has also been glued to the base. A red cedar blank of the same design, see below, shows the bevels removed, holes drilled and the plan view cut with the bandsaw. Before shaping the underside of the bowl a block is screwed to the top to hold the piece. The lines of the bowl lips are drawn onto the sides so that I don’t round the base beyond them and change the plan shape.

First shaping
I initially shape the base with an Arbortech carver...

...then a spokeshave.

The marks from drilling the holes can still be seen. The lips are undercut and the separation of the bowl walls at the large end is chiselled.
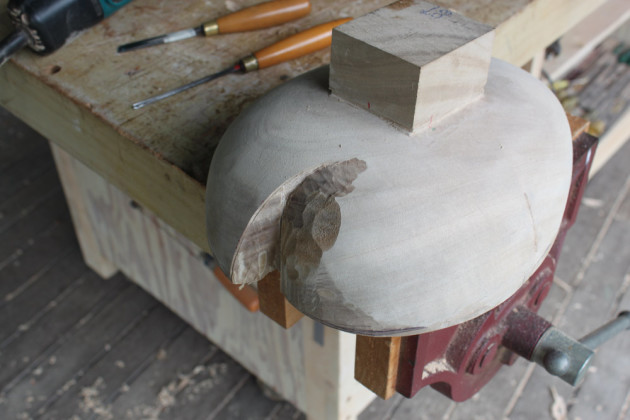
The base is rough sanded. With the base completed the piece is turned over and the sides shaped down to the desired height for the lips.
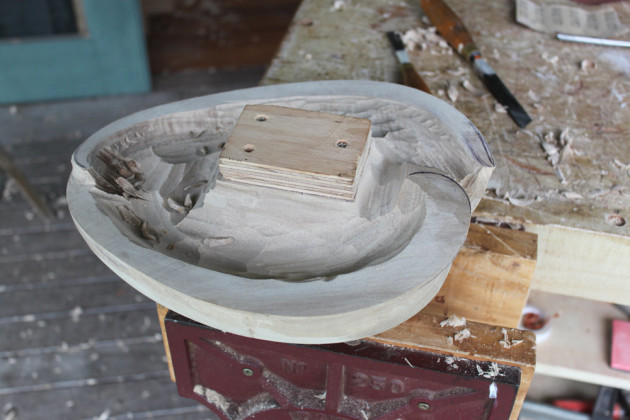
The top block is then removed and the inside roughly hollowed. The thickness of the bowl walls are slowly worked down to approximately 10mm staying away from the bowl lips and end details which are left until last.

Tools for detail work
Carving the lips and end details is the most difficult part especially getting into the grooves created by overlapping surfaces.
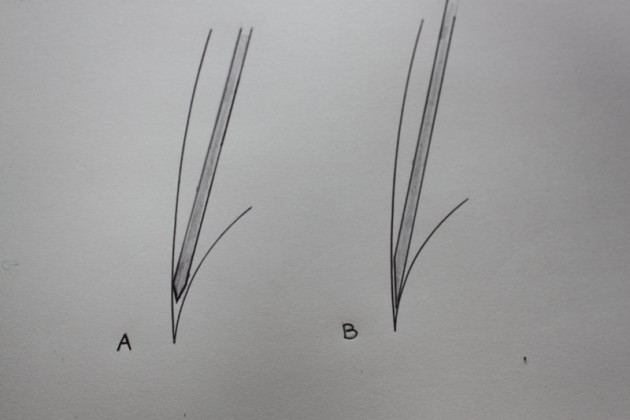
I have tried many tools but the most effective has been the skew chisel sharpened in a particular way. Normal skew chisels and knives are sharpened from both sides. In the photo above, ‘A’ is a sketch of a tool with the thickness of the steel limiting its access to the bottom of the groove. ‘B’ in the same photo is a drawing of a skew chisel with one flat side that allows it to cut to the bottom of the groove. The other advantage is that the flat side can follow the bowl wall giving greater control. I had several skew chisels which were rarely used but have since put them all on the grinding wheel flattening one side and sharpening from the other.

I also did this with the two carving knives shown. I do them in pairs so that when the flat sides are facing down one skew slopes to the left and the other to the right. The same applies for the knives. Armed with pairs I can carve into crevices no matter what the grain direction.
Finishing touches
The aesthetic of this piece depends on smooth fluid surfaces with their intersecting element needing to be very accurately carved. After fine sanding I often rework areas with the chisels if I’m not happy with the shape. It’s a very fine line between a clumsy outcome and a piece that has some life.

White beech (Gmelina leichhardtii) is a favourite timber of mine but it has a tendency to look dirty when finished in a conventional way. I bleach it with industrial strength ammonia and hydrogen peroxide before spraying with a clear lacquer. This improves the appearance of the beech and has a lasting effect.

Grant Vaughan runs carving workshops from his studio near Lismore, NSW. His work is represented in the permanent collections of many galleries and museums including the National Gallery of Australia and the Boston Museum of Fine Art.
Contact him via www.grantvaughan.com.au
