Card scrapers: how to sharpen and use them

Words and photos: Neil Erasmus
Illustrations: Graham Sands
It would be unusual not to find the humble card scraper and burnisher always at hand in most woodworking shops. In mine, a scraper is often to be found in my apron pocket. This simple tool is arguably the most versatile of all, especially when an understanding and skill is developed to make full use of it. However its simplicity belies the complexity and skill required to sharpen and use it properly.
Tool anatomy
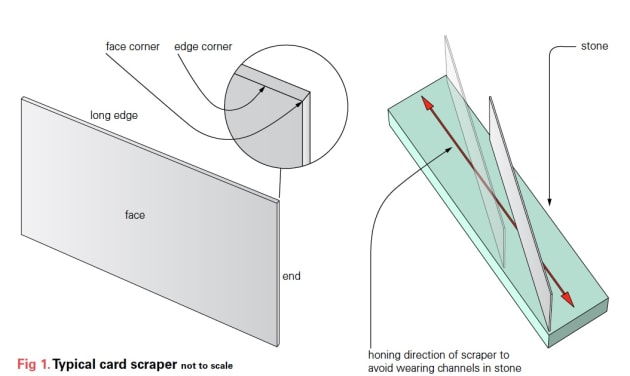
Typically, a card scraper measures 150 x 70mm and varies in thickness between 0.4 and 1.0mm. In fig.1 the ‘face corners’ are the four corners you see when the face of the scraper faces you, while the ‘edge corners’ are adjacent to the edge of the tool.
Like any product, some are better than others, so some things should be considered before you buy. The card scraper should be considered a cutting tool, not too dissimilar to a bench chisel or plane blade. A little knowledge of how the finish on the backs of these tools affects their cutting edges will help in understanding what can be achieved with a properly sharpened scraper. So, always buy one that is finely ground on its two faces. The coarser they are, the more work will be required to hone them into a far better performing tool.
Sharpening

1. Flattened to 4000 grit on waterstones, these scrapers can now be edge sharpened.
When I fettle a scraper for the first time, I first tackle the two opposing faces on waterstones, working through the grits from 800 to 4000. What I try to achieve is a uniform, dull grey sheen (photo 1). Once the faces have been ground smooth to 4000 grit, never take anything coarser to them again. It is not necessary to polish the faces to a mirror finish as on the backs of chisels and plane irons – there is little to be gained.
Once I’m satisfied the faces are how I want them to be, I am ready to prepare the long edges. If the tool is new and has never seen a burnisher I hone both long-edges, again working up to 4000 grit. It is important to keep the tool at 90°, or very close, throughout the process, and to work it around the stone to avoid cutting channels in it (fig.1).
Like their chisel and bench plane brothers, scraper edges wear relatively quickly, even though there are four longish edges to work with. Check the surface of the honed edge regularly, and once you have advanced to the 4000 stone and are satisfied the edges are flat and the corners nicely square, you can de- burr the edge-corners on the same 4000 stone by going between face and edge until no wire burr remains. At this point, we still don’t have an effective scraper edge.
The burnisher
Another tool, the scraper burnisher, now comes into play. Held in one hand, this is a tool with a palm-length turned wooden handle and a shorter length of round hardened steel or, better still, tungsten carbide.

2. Use the burnisher one-handed, or you can mount the scraper in a vice.
The next stage requires that you draw the burnisher, at an angle of around 5°, down the length of each of the four edge-corners (photo 2). The pressure applied at the point of contact between the super-hard burnisher and the softer scraper results in pushing or ‘turning’ the edge corner into what is called a ‘hook’. Done properly, this is the sharp edge that will, literally, whistle across the surface of wood as it cuts a fine shaving like a handplane – the higher the note, the keener the edge.
Be particularly mindful that when you turn a hook the angle of the burnisher is consistent, and that you apply as much pressure as you can muster. Try and get it right with two, perhaps three turns, no more, as multiple attempts tend to curl the hook too far around the edge. Finish off the same process on the other three edge corners and you’re done. If you’re struggling physically with the process, try placing the scraper in a padded vice and use both hands on the burnisher.

3. Store scrapers in a simple shopmade rack.
Once the edge-corners have been pulled or turned, a thumb across the edge should reveal a nice burr, or hook. Many professional woodworkers sharpen several scrapers at the same time, and store them safely in a simple rack (photo 3).
Restoring the hook
A dull card scraper will soon reveal its reluctance to cut efficiently. Increased effort will deliver miserable dust rather than reams of wide shavings. With a little practice you can get to use the full length of each edge-corner with a little stretch of the fingers.

4. Restore the hook by keeping the burnisher parallel with the face of the scraper.
Place the dulled scraper near the edge of a bench and flatten what remains of the hook back over the edge, now keeping the burnisher parallel with the face of the scraper (photo 4). Several swipes on each corner should suffice. Now turn four new hooks. Clearly, this kind of restoration has a limited number of three or four goes, each with slightly diminished edges, before a full sharpening is required again.
Squaring the edge
Let’s now assume the hooks have been restored several times, and no matter how much pulling with the burnisher, the tool refuses to cut cleanly. The corners that produce the hooks have been worn away completely and in fact are rounded. Again, as before, push any remaining burr or hook back over the edge. We now have to remove about 0.5mm of material, and then proceed on waterstones as described at the beginning.

6. Remove unwanted metal by drawing a file at 90° over the edge of a vice-mounted scraper.
There are several ways to remove this unwanted metal – traditionally, a file is drawn over the edge of a vice-mounted scraper, being mindful to keep the angle at 90° (photo 5).

6. A small bevel at end corners stops dig-ins on flat surfaces like tabletops.
If my scraper is to be used on flat surfaces like tabletops, I tend to place a tiny bevel at each end-corner to prevent any possibility of a corner digging in (photo 6). The cycle of preparing a sharp hook is shown below in fig. 2.

The scraper in use
The most common use is to hold the tool in both hands, fingers outstretched around the back, while the thumbs press down at the front at the apex of the curve thus created, and low down.
For the most part, the scraper is pushed, not pulled. The angle that the tool is held to the surface is crucial in getting the desired scraping. As a general rule, it is best to keep it as upright as possible on hard woods, and leaning it more forward, and with less pressure, on softer ones. The tool will generate a lot of heat through friction, so be prepared for thumb blisters. Some people quite wisely place fridge magnets on the scraper body to help sink some of this heat.

7. Push the tool in long, smooth strokes applying pressure gradually until the sweet spot is found.
Try to push the tool in long, smooth strokes (photo 7), starting each by gradually applying pressure to get the sweet spot to engage. Very soon this becomes second nature, and spontaneous. However, there are some important things worth noting.
Firstly, unlike a hand plane, you can’t start a cut be applying downward pressure before moving forward – you have to move the scraper first, then get the sweet spot to engage while in motion. Failing to do this will likely result in nasty cross-grain marks in the wood where the scraper has dug in.

8. If you need to pull the scraper towards you experiment with the angle of the tool relative to the surface and stroke direction.
Secondly, when scraping a tabletop or board, it is only possible to do the ends properly by skewing the scraper slightly and pushing it towards, and then beyond the edge – you can’t start at the very end as you can with a hand plane.
If this is awkward due to the size of the tabletop, it may be necessary to hold the scraper differently, and pull it towards you, across the end (photo 8). Play with the tool to develop an understanding of the results you get when you vary the angle of the tool relative to the surface of the wood, and when you skew it relative to the stroke direction. Held at a more acute angle to the wood and pushing down more gently will give you a better finish. Add to this, skewing the scraper, and the results compare quite favourably to that of a hand planed finish.
Done properly, the shavings are gossamer-thin and should float gently to the floor in long ribbons of wood fluff. Of course, the real beauty of the scraper is that there is practically no fear of tear-out, especially on highly figured woods, that may require only a little light sanding to prepare for a first coat of finish.
When to use a scraper
The scraper is the perfect tool to remove the kind of deep scratches left by belt sanders, to even out glue joins, or even remove thicknesser marks. Another little mentioned use of this humble tool is its ability to de-nib finishes before their next coat. First coats tend to raise the grain a little, and the roughness can be quickly and efficiently cut back with a sharp scraper by lightly drawing it across the surface before lightly sanding.

9. Curved scrapers can deal with concave surfaces.
A scraper is capable of removing shavings from hard to get places, such as dished areas in scalloped chair seats, using a curved scraper for instance (photo 9), or to clean out stopped rebates (photo 10). And then there is the myriad of shapes that may be scraped with specially profiled scrapers to suit – the sky’s the limit!

10. Custom profile scrapers for specific jobs such as cleaning out rebates.
Neil Erasmus is a furniture designer/maker based in Perth, WA and a contributing editor to Australian Wood Review. Links to some of Neil's stories are shown top right of this page as ‘related articles’.