Building a Custom Handplane

Words and photos: John Kennedy
For a long time I had assumed that handplanes had reached their peak of development in the form of metal-bodied planes like Lie-Nielsens and other top end handplanes. Because these planes could never quite give me a tear-out free finish I believed that Australian hardwoods and some imported timbers like New Guinea rosewood were just too cranky and grain rich to be tamed by any handplanes or jointers without the inevitable patches of tear-out and splinters. Cabinet scrapers and sandpaper were the only way to deal with this problem. How wrong was I?
During a furniture woodworking workshop one of my students asked me if she could build a wooden handplane, mostly to learn the skills required and also end up with a really cool looking, useable tool at the end of the exercise. Thinking this was a great idea I decided to make one myself so I could work through any pitfalls and problems before any student started asking embarrassing questions. How hard could it be?
From the start
A little research revealed a plethora of designs and ideas from all over the world and I began to realise that making a plane out of timber wasn’t as simple as it looks. Sure, it is possible to copy someone else’s design but there are no guarantees it would actually work and, more importantly, that it would perform as well as a bought metal- bodied plane.
The only way to really find out was to make one and, by trial and error, see what worked and what did not. To this end, a test bed plane body that could be modified and re- modified (and thereby avoid having to build a new body from scratch every time something had to be changed) was made.

Mark 1. The test bed plane had kwila as the main body and rosewood sides. The body was made extra wide so extra wedges could be inserted to vary the dimensions.
The obvious design was one based on the famous James Krenov style. The ‘fast back’ model was appealing because it was so simple, without totes or any bells and whistles so this became the model test bed using kwila as the main body and rosewood as the sides. The body was made extra wide so extra wedges could be inserted between the blade bed and the blade itself. This would allow me to increase or decrease the blade angle as testing proceeded and, with repeat testing, determine the best angle to use on the timbers I commonly use.
Starting at the recommended 45°, planing tropical timbers resulted in tear-out that was horrendous even with a razor sharp blade. As wedges were added and the angle increased, tear- out began to decrease significantly.
However, just as the angle reached 60° and tear-out had all but vanished, the tear-out problem was replaced by severe blade chatter as the thin blade seconded from an old metal handplane reached the limit of its endurance.
Some of this was undoubtedly due to the less than perfect bed arrangement due to the extra wedge in place between the blade and the fixed bed. Shifting the position of the wedge bar and increasing wedge pressure helped but could not eliminate this problem.
A thicker blade
The search for a better plane blade started. I had seen some of Terry Gordon’s beautiful handplanes in display cases but hadn’t noticed until now just how incredibly thick the blades were compared with the blades in most of my metal planes. A phone call to Terry and, on his advice, I bought a 50mm wide HSS 6mm thick blade from him. This turned out to be the best advice anyone had offered during the whole process.
The new blade soon arrived in Cairns and it was immediately obvious it was far too thick to fit through the existing mouth on the test body so yet more modifications were made to allow the new blade to sit in the now battered test bed body. Not only did the mouth need opening up, but also the wedge bar had to be shifted yet again.
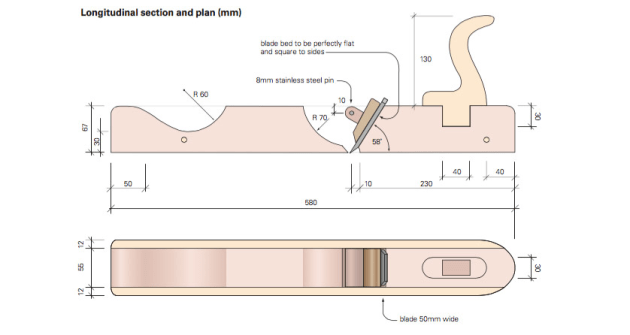
Diagram: Graham Sands
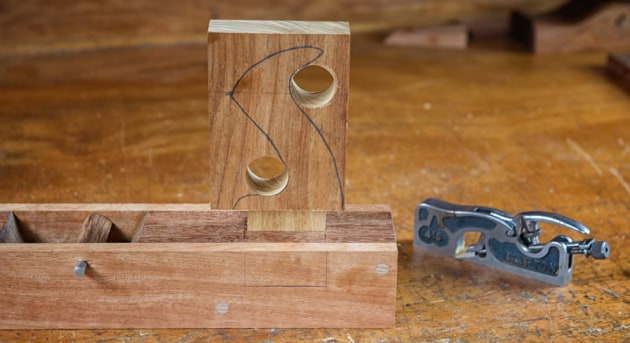
In most of the wooden bodied planes I have seen the wedge bar is made out of square timber with the ends rounded over so that it can swivel around in the planes sides and so self-adjust to the plane blade. This type of wedge bar becomes fixed in place once the sides are glued on and makes it all but impossible to change or modify it once in place.
Making a composite bar out of a piece of stainless steel rod that went through the timber wedge bar allowed me to drift the pin out of the body, plug the resulting hole in the side of the plane body with a dowel and redrill the hole in a new spot. It also meant I could replace the wooden bar if I had to. As it turned out, the wooden bar was also modified and replaced a number of times before I was happy with how it performed, but both the steel pin and the test body were recycled every time.
After yet another rebuild, the first few strokes with the new blade were a wonderful revelation. At a 58° angle on the blade bed and the wedge sitting a lot higher than before, the plane sliced through the toughest piece of hardwood in the workshop effortlessly.
The finest shavings began to curl out of the plane and the timber was tear-out free. During the ensuing glow of success, many different pieces of timber were reduced to shavings before I had convinced myself I wasn’t dreaming. Time to start building the long bodied plane I had in mind all along.
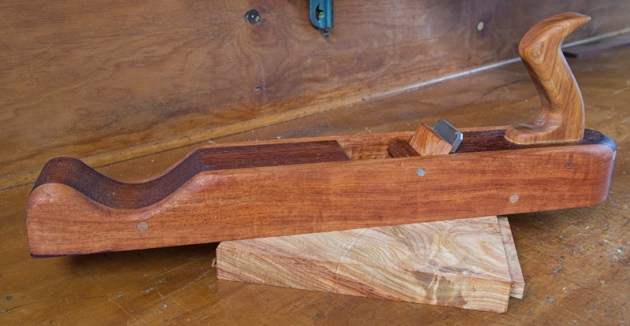
With a long body
I had wanted to make a long bodied plane with a tote at the back which encouraged a strong downward force on the back of the plane rather than the usual tote angle which tends to lift the back as you push forward. Secondly, I wanted to be able to grip the front with my whole hand rather than hang on to a relatively small knob which is what you usually find on the toe of planes and which, in my opinion, offers surprisingly little directional control.
I wanted it to be the go-to plane for flattening wide glued up boards for tabletops and so on. I have never had the courage to use a plane for this job since a tear-out disaster ruined a beautiful top I had laminated for a very special project. Theoretically though, a long, well-tuned plane taking out the finest of cuts should be the tool to use.
Design features
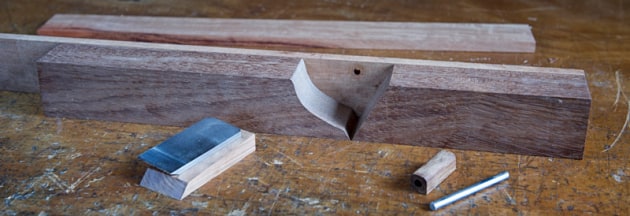
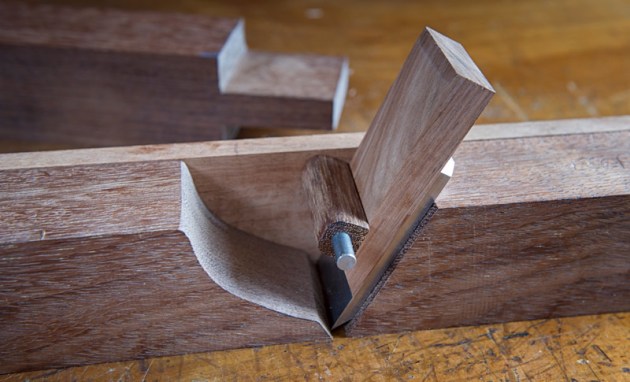
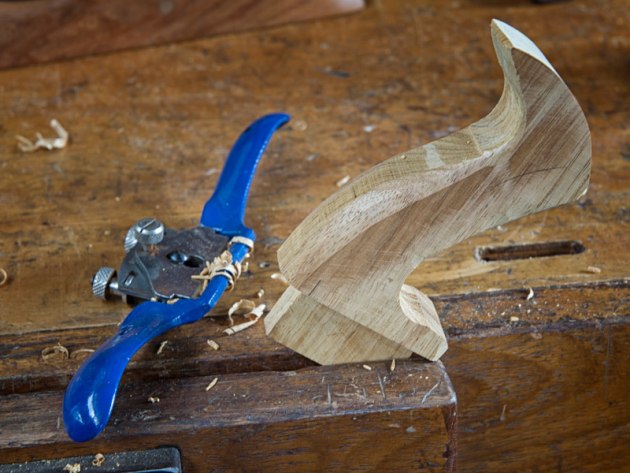
From the photos you will notice that instead of the usual flat face in front of the blade I have bandsawn out a curved area. This was to allow my fingers to reach inside the cavity to clear any jammed shavings and had the unexpected and beneficial side effect of acting as a shavings bucket where shavings can collect rather than spill out all over the job and generally get in the way.

Another lesson I learned during the trial and error phase was that in order to set the blade accurately, it is essential that the back of the body against which the blade itself rests, be absolutely flat with no bumps or high spots. If there are high spots, the wedge puts more pressure in that one spot and when the blade is tapped down or up, instead of rising or falling parallel to the base, the blade tends to swing around the tight spot. The end result is a blade that is a pain to reset. Better to take the time during construction to ensure the back is perfectly flat.
The rear tote was mortised into the body and has a dowel going through its tenon for security. The front of the body has been shaped so my palm rests easily in the hollow and my fingers wrap around the fore grip. This allows me to rest my weight down on to the body, gives good directional control and all with ergonomics which suit my hands perfectly. No blisters or cramps even after prolonged use.
Test results
Did it work? We have a piece of rosewood in the workshop which is aptly named the timber from hell. It has grain running in all directions and no matter where or which direction you plane it, you always end up going against the grain somewhere. There is not a plane in the workshop that can plane it without at least some tear-out. Until now. This old fashioned wooden block plane with a modern super blade not only planed it without even the tiniest tear-out, it also left it dead flat with a burnished, polished appearance.
In the process of preparing a lesson for students I have discovered so much more about the how and why of planes and, armed with that knowledge, I find I can better tune my metal- bodied planes although none of these can be made to perform as well on tropical timbers as this latest addition to the workshop. A shorter, lighter version is definitely on the ‘to do’ list.
John Kennedy lives in Cairns, Qld. His philosophy is that if someone goes out into a forest and kills a tree on his behalf,
it’s then his responsibility to turn that timber into something that will last at least 50 years to give nature a chance to replace what was taken.
First published in Australian Wood Review, issue 93.