


Words and photos: Leo Sadlek
The challenge to design a piece from a single board of timber is, at first glance, quite different from the usual design brief. It is rare for a client to give me a piece of timber with a request involving nothing more than can I please make something from it. Usually a designer is given a brief by a client and that brief will involve things like budget, materials preference, functional constraints, stylistic preferences and even environmental concerns. Now that I look back on the process I can see that all those elements were there when Australian Wood Review presented me with the challenge to make a piece from a board of wenge.
For a start I do have a client in the form of Australian Wood Review and ultimately its readers. But there is the other client lurking in the background; the perceived customer who will one day buy this product. There is a budget and it is not only the materials budget in the form of the carefully wrapped board that arrived via post. Included in the budget is the time I spend on design and fabrication which has to be considered in regards to the perceived customer. The materials preference, well that is a firm given in this case. When it comes to the functional constraints I did have more freedom that usual, but the dimensions of the board ruled out a few options such as chair, table or sideboard and the like. Stylistic preferences are usually taken care of by the fact that the customer usually approaches me because they like my work. If a client approaches me then I can be fairly sure they want something contemporary. The environmental concerns are becoming more and more part of the designer’s responsibility. If a client isn’t aware of environmental issues associated with timber products then it is probably up to the designer to do a little subtle education.
Research
When the parcel of wenge arrived it occurred to me that I should check out the ethical issues surrounding this African timber. A quick Google search provided a few interesting facts. Wikipedia says that ‘The tree is native to Congo, Cameroon, Gabon, Tanzania and Mozambique’. Under health hazards the same article says, ‘The dust given off when cutting or sanding wenge can cause dermatitis similar to the effects of poison ivy and is an irritant to the eyes. The dust can cause respiratory problems and drowsiness. Splinters are septic...’.
This from the Woodworkers Source website: ‘Environmental Profile: This species is reported to be rather secure with very little threat to its existence within most of its growth range, including Congo, but it is officially classified as either Extinct, Endangered, Vulnerable, or Rare in Cameroon…(Source—World Conservation Monitoring Center, 1992)’. That gave me the confidence to go into this project feeling a little better about the sustainability of this timber…as long as the board didn’t come from Cameroon!
Conservationist Jane Goodall’s website has references to wenge being harvested in the Tumba Lake region of the Congo with no forest management plan. The Forest Stewardship Council of the UK does list suppliers who source FSS approved wenge. More recently things in the Congo seem to be changing as evidenced by this from the FSS website: ‘June 2006 A forest concession...covering 296,000 hectares of natural forest has achieved FSC Forest Management certification, the first in the country and only the second in tropical Africa’.
So it seems that there isn’t an overall threat to wenge, but it matters who is doing the harvesting. Some sources will harvest with a management plan, others don’t. As a designer/maker then it is important to refer to some sort of Forest Stewardship accreditation.
One of my sources for general information on timbers is the excellent World Woods in Colour by William A. Lincoln. In there you can read about some delightful names for wenge. In Zaire alone it is known variously as dikela, mibotu, bokange and tshikalakala. In Gabon it is known as nson-so. Wenge is described as a dense timber with a weight of 880 kg/m3. Because of its resistance to abrasion the timber has been used for flooring. For me the most useful information was that resin cells in the wood might interfere with gluing and polishing. This made me aware that I had better be careful in my choice of adhesive for this project.
Design phase
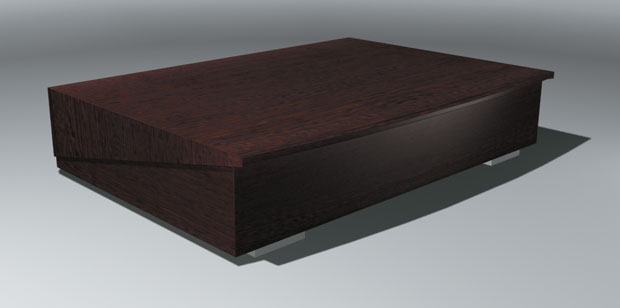
During the design phase I started with sketching and generated about 40 pencil drawings of various ideas and details. Early on I made the decision to make a box or rather two boxes. With a timber of exotic nature such as wenge it seemed best to make as much use as possible of the resource. One box from the 950 x 160 x 45mm rough sawn wenge seemed excessive. Designing to fit two boxes then became my priority. And a box with a ‘twist’ seemed to be the best way to add even more value to the resource. The chocolaty colouring of wenge gave me the idea to choose a design that recalled fancy chocolate boxes. Once I was happy with the sketches it was time to test the design prior to fabrication. I have the luxury of having a 16 year old son who is quite proficient with a computer graphics program called 3D Studio Max. With this program it’s easy for Jackson to create a life-like 3D image to help me decide if my design ideas have the impact in three dimensions that I imagine they have. We scanned in my 2D pencil drawings and an image of the dressed wenge board and used that to render the image Jackson created (photo 1).
Fabrication
In the workshop the first task was to deep cut the 45mm thick board into three 13mm boards (photo 2).
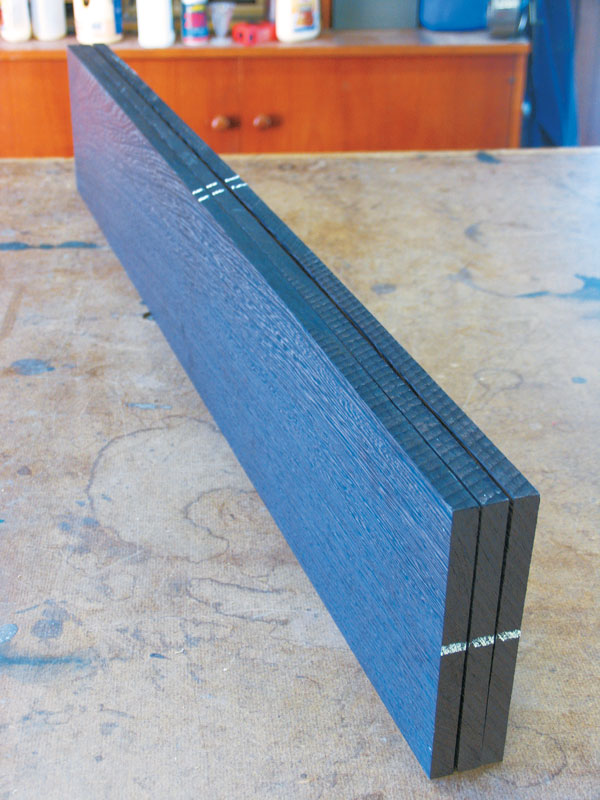
A sharp 25mm blade on a large bandsaw that I have access to made this operation easy and quick. When I did this I made sure to have at least one buzzed face on each board as it came off the bandsaw. This and the good luck that the stable wenge came off the saw without distorting meant that I only had to plane 1mm off the boards to achieve their finished 13mm dimension.
To get a 220mm width on the boxes I had to join the 13mm boards. This led me to the next step which takes me back to what I consider to be part of careful design. The top of the box is the first thing to be seen and so this should be as pleasing to the eye as possible. I laid the three boards out in various arrangements to ascertain what would look best.In the end I decided on two different patterns: one box has a book matched join while the other has a reverse slip matched arrangement (photos 3, 4).


I thought that a bookmatch of the more figured grain would be too overpowering and not at all balanced. After this decision the rest of the components were chalked out on the three boards (photo 5) and then it was time to start construction.

After reading about the resin in the timber I decided to use the West System Epoxy for the glue to hold joints together (photo 6).

I also reinforced the main boards for the top and sides with biscuits. The next day, with the resin set, I could begin to cut the pieces from the wide glued boards. Care at the cutting stage made sure that the centre join of the top board was exactly in the middle to maintain visual balance. The three joins between the top, sides and back are all mitred. There is a lot of surface area on these joins and with the small dimension of the boxes I decided this was enough for solid construction. It also means the edges are the only visible lines on the box, which was important to my original design idea.
Next I quickly sharpened my 45° router bit with a 360 grit diamond stone. The wenge is indeed hard and a sharp edge on the tool was needed to make routing of the mitres easy, clean and accurate. Two finger boards on my router table fence kept the material flat and secure and prevented my fingers from doing too much stressful work close to a fast moving cutter (photo 7).

Before gluing the top assembly with epoxy I cut the housing for the brass butt hinges in the top and back rails of the box. With the positioning of the hinge being low at the back it seemed best to cut these housings while I still had easy access to the edge of the back rail. I have a system for routing hinge housings when I have more than a couple to do that is neat, accurate and quick. With this system I first mark the position of the hinges with a sharp knife and then cut the sides carefully with a Japanese dozuki saw. With a small trim router set to the depth of the hinge leaf and a fence set to the width of the leaf I then quickly remove material to an accurate depth. A few quick cuts with a sharp chisel to clean up the corners is all that is required after the router removes most of the waste.
Before I glued the box lid there was one last item: cut the angled sides on the box top that give this box design its unique look. My first idea was to make a jig to hold the sides for cutting on the tablesaw. Then I remembered my straight line pattern fence which would be perfect for this job. The jig is an attachment for the tablesaw fence with a smooth edge for a pattern to run off and a recess for the waste and offcuts to run under. A pattern or in this case, simply a straight edge is tacked on to the piece to be cut. With the fence and blade set to the right height the saw will cut a line deep enough to remove the waste but not cut into your pattern or the jig. I use this jig for many things from truing up a waney edged board to trimming the waste off of solid timber edging to cutting odd angled shapes without setting up mitre gauges or angled cross-cut fences (photo 8).

Tape as clamps
With a good fitting mitre joint, tape is all you need to get enough clamping pressure for gluing. Epoxy glue was used again on the top along with just a bit of masking tape (photo 9).

Care has to be taken at this stage that all angles are glued at 90° and gaps are closed. But if your mitres are clean and 45° this is not difficult.
The hard part of the box was now completed. The elements for the base of the box were cut to size and mitred on my docking saw. Before gluing the base together the trenches for the 6mm back wall and partitions within the box were routed with a 2.5mm bit and the inside faces sanded to 600 grit (photo 10).

Then epoxy was applied to the mitre joints on the base and they were taped together. The only joint that I thought it best to reinforce was the mitre at the back of the box where the most pressure from the hinged lid would be transferred to. After the glue is set on the mitre joints, I used my feather spline jig to cut some saw kerfs into those back corners and epoxied in small wenge splines (photo 11).

The design called for some material to be removed from the base sides to form the ledge for the box top to rest on. After removing excess glue with a scraper I carefully marked out the angle and then removed half the thickness of the sides. To do this I clamped a straight edge to the sides and used a pattern bearing router bit on my trim router (photo 12).

A 6mm back wall and 3mm partitions were resawn from offcuts from the top panel, thicknessed and carefully cut to fit the trenches routed into the insides of the box.
Prior to finishing and assembly I carefully sanded all the surfaces beginning at 240 grit and working up to 600. The base was cut from brushbox veneered ply because brushbox ebonises nicely and would blend well with the wenge. The top of the base insert is felted using thinned down PVA to bond the felt to the plywood.
Once the box was assembled and everything was working right it could be disassembled and then oiled. The feet and pull were cut and polished from stainless steel bar and attached with small screws. To give a final touch to a small detail, I cleaned up the brass butt hinges with 240 then 400 grit wet and dry before polishing with brasso.
Steel pull
After assembling the finished box I decided that the front aspect was in need of something extra. The front edge of the box lid protrudes from the base and could serve as a ledge to facilitate opening of the box. To give the front of the box more visual effect I cut and shaped a small stainless steel pull that protrudes from the middle of the front edge of the lid. The lower front edge of the lid is then routed to form a housing for the pull detail. This detail forms the third point of a triangle of silver highlights which is a good counterpoint to the dark wenge.
The finished boxes have the look and feel that I was hoping for during the design stage. Its small size, dark rich colouring and silver highlights all intimate that the box contains precious objects. The heavy weight of the wenge and stainless steel give the piece a feeling of intrinsic value. The chocolate box attitude presented some interesting challenges that made fabricating a rewarding experience.
Leo Sadlek is a furniture designer/maker who teaches furniture design at School of Design (TAFE) RMIT, Melbourne. In AWR#13 he wrote about his Clock Tower series of cabinets.