A Simple Jewellery Box

Story and photos: Adrian Potter
Boxes are great woodworking projects, they are quick and fun to make as well as being useful. This project is a simple jewellery box with a drop-in lid that you can easily make in a weekend even if you haven’t had much woodworking experience. It is designed so you can practise marking out, sawing, planing and using a router.
Making the box

1. Machine components to size
Begin by selecting your wood for the walls and plane to thickness and width. Highly figured wood is great to use in a box and it can be a dominant feature, but if you are new to woodworking I recommend using a stable, easy to work timber like mahogany or black walnut. The box shown above is made from recycled wood — a Tasmanian oak floorboard, a jarrah floor joist, an old Queensland maple drawer front and some odd wood growth for the handle. The base is an offcut of 4mm ply veneered in black walnut.
You need to use plywood (or veneered MDF) for the bottom rather than solid wood in this design because it must be glued into the rebate in the walls of the box. Plywood and MDF are relatively stable sheet materials and they don’t expand or shrink along or across the grain. Solid wood will expand and contract across the grain only, not along it, as the moisture in the air changes with the seasons. If solid wood is glued into the bottom of the box it may crack when it shrinks in drier weather, or push the box apart as it expands in wetter times of the year. You can’t really stop a piece of wood expanding or shrinking across the grain, so it is better to remain aware of the phenomenon.
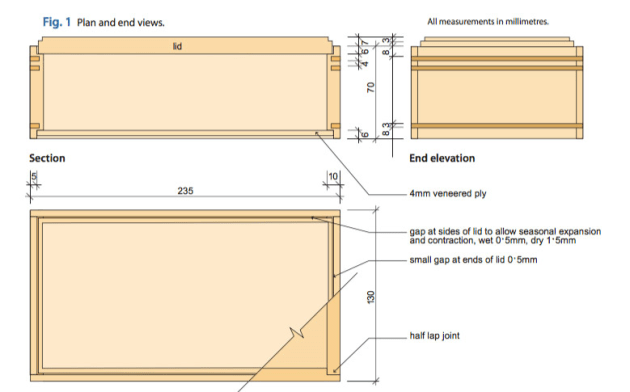
The construction of and measurements for the box are shown below in fig.1.
2. Marking out

I used a knife and a good square to mark all around the box walls and then cut exactly on the knife line with a sharp crosscut saw.
3. Cut walls to length
Sawing the components to length by hand or use a tablesaw or a drop saw for this task if you prefer. If you make a mistake when sawing you can trim the ends with a plane and a shooting board.

Often when sawing we err into the waste side of the cut requiring extra trimming. Practise cutting right on the knife line — it will save you time and reduce the opportunity for error when trimming the extra waste. The saw you use does matter.

Select a crosscut tenon saw with almost no set (better for hardwoods) around 14 to 20 teeth per inch (tpi). A thin blade is good too. My preference is for a traditional European tenon saw over a Japanese pull saw because I find they are more accurate. It is important to get the components the same length and square to the top and bottom; otherwise your box won’t be square.
4. Cut half laps in long sides
A half lap joint is a very simple joint. It lacks strength because there is only endgrain to long grain gluing surfaces and unfortunately endgrain wood does not glue well. Consequently this type of joint usually needs extra fasteners like nails, screws, dowels or timber inserts as in this design.
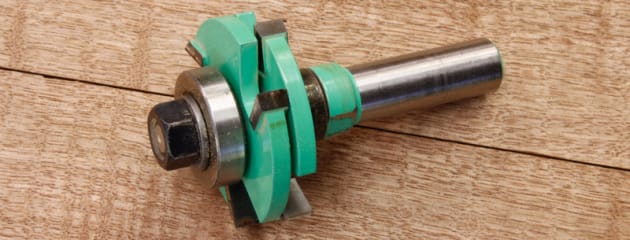
There are numerous ways to cut a half lap joint — tablesaw, chisel, handsaw — but here I have used the slot cutter shown above in a router table. The slot cutter is a wonderfully useful cutting bit and I use them all the time because of their cutting quality, easy set-up, accuracy and speed. The height of cut for the half lap joint will be the same for the rebate used for the ply bottom and drop-in top. The inside face is our reference face and is down on the tabletop.

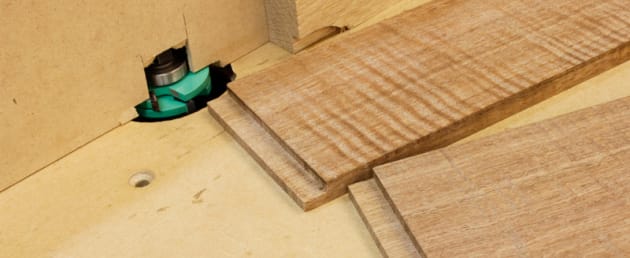
When crosscutting with a router like this it is wise to push it with a piece of scrap. This is safer, helps keep the part square to the fence and it prevents the wood chipping at the end of the cut. A variable speed router is handy — I regularly use it on a low speed because it doesn’t burn the wood as much.
5. Cut rebates for the top and bottom

When the half laps are done adjust the fence position and cut the rebates for the top and bottom.
6. Dry assemble

Time to dry assemble the box before gluing to check the fit. Don’t forget to sand the inside faces — apply polish to the insides too if you want — shellac is ideal because it is easy to apply, dries fast and smells pleasant.
7. Glue the box together

The sides are glued together without the top or bottom in place. Check the sides are at right angles to each other and adjust if necessary. I use Titebond original but any good PVA will work. Use a wet toothbrush to wash PVA off, or clean up the glue with a sharp chisel when it’s semi-dry. PVA glue should be sufficiently set after about half an hour and the clamps can be removed.
8. Glue the bottom in
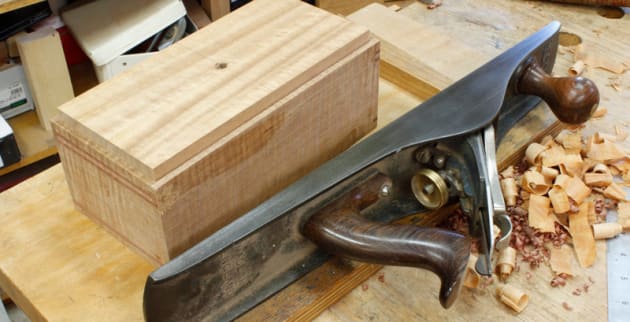
The glued-in ply bottom helps keep the box together so it is good to make it fit without gaps. I used the plane and shooting board to trim it for a snug fit. A heavy weight placed on the bottom will hold it in place while the glue dries.
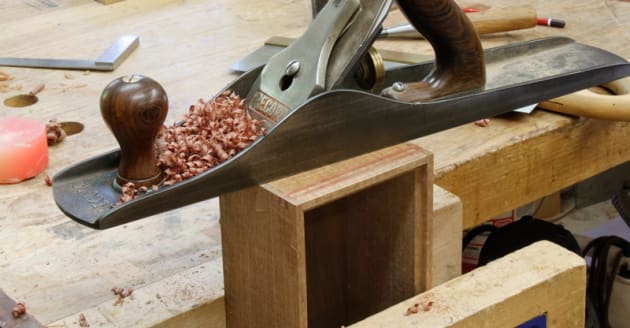
9: Plane the ends planing the ends of the box flat

This is done before making grooves with the router for the timber inserts. This is easiest done when securely held in a vice.
10. Machine grooves for the joints and decorative details

The grooves in the ends are for the decorative timber inserts that also give the half lap joints strength. I used a 1/8th (3.2mm) slot cutter in the router table for the grooves along the short ends. A tablesaw with a flat top blade will work too. the two inserts at the top and one at the bottom add visual interest — it is a sort of visual rhythm — and the extra insert at the top provides additional strength where the box opens. the bottom is glued in so that area is quite strong already.
11. Make the inserts, then fit and glue them in

Plane the inserts to fit snugly with finger pressure and glue them in. You may need a clamp to get the inserts all the way to the bottom of their grooves and squeeze the glue out.
Once the glue is dry trim the excess length and plane the inserts flush. Be careful when planing endgrain. Endgrain will plane fine with a sharp plane blade but always plane into the centre of the box to avoid chipping the unsupported timber on the outside. If you do accidently chip the wood, glue the splinter back in straight away using masking tape to hold it until the glue dries.
12. Make the lid
The lid can be a focal point of any box. I’ve used rebates for a shadow line and a piece of wild wood growth for a handle. The handle is placed asymmetrically but there is no real reason to do that. I thought it looked good there — it also covered the existing hole from when this wood was a drawer front.
I made sure the wood for the lid was quartersawn (growth rings perpendicular to the top face) so it’s less likely to move as the seasons change. The gaps for the lid to drop into the rebate at the ends need only to be the thickness of a hair, but along the long sides leave room for the lid to expand across the grain. If you are making in a wet time of year the gap can be small but in a dry season allow more (say 0.5–0.75mm each side). I adjusted the size of the lid after cutting slightly oversize with a plane on the shooting board.
13. Sand and polish
Your box is almost complete now — only the important steps of sanding and polishing remain. I start sanding with 120 grit sandpaper to remove any grain tear-out and other imperfections, then 240 grit to remove scratches made by the 120 (if there is no tear-out start with 240 grit). Finish sand with 400 grit. Quality abrasive paper is worth the added cost.
Now dampen the wood with a wet rag to raise the grain. When the wood has dried after dampening it will feel slightly furry to touch. Using blunt 400 grit abrasive paper smooth the surface and dampen again. continue dampening and sanding with the same blunt 400 grit paper until the timber doesn’t feel furry following being damp. Some timbers only need one wet application, others need four or more. You will notice the difference in the finish quality regardless of what polish you apply.
I use two finishes regularly, Danish oil (various brands) and shellac. Danish oil is an easy finish to apply and gives a great lustre to wood if the wood is prepared as mentioned above. Apply the oil with a rag and wipe off the excess straight away — four or more applications may be necessary allowing each to dry overnight or longer if you can. After the first coat of oil is dry rub with the grain with 0000 steel wool — no need to rub back after subsequent coats.
Shellac is not so toxic but equally easy to apply or repair. It can build to a high gloss with repeated applications. It dries much faster than oil and is applied with a brush and/or a rubber (as used by French polishers). I use an oval-shaped detail brush to apply the shellac and smooth it off with 400 grit abrasive paper and 0000 steel wool after each coat. reapply shellac three or more times.
Both finishes are great but require practice so consider testing your finishes on a scrap piece of properly prepared wood prior to coating your box. This box project was designed to practise some key hand and router skills and make a functional object at the same time. You can experiment with different box forms or move onto different designs.
Adrian Potter is a furniture maker/designer in Adelaide. See www.adrianpotter.net.au
Reprinted from Australian Wood Review, issue 82.