


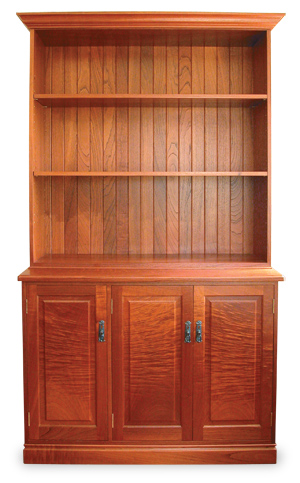
Project by Frank Wiesner. Main photo and details by David Seeto
When building a piece of furniture you normally go to your timber rack or timber agent, select what you need, and get into it. With this job the customer supplied the timber, but I got a surprise when I saw its quality. I have rarely seen red cedar with this kind of figure.
The customer harvested the cedar on his property and had it milled some time later. Rather than wasting time (another budget job!) travelling to his shed some way out of town, I gave him a materials list and asked him to bring the wood in. He left it outside my workshop with a ‘mudmap’ and some measurements of what he wanted.
Getting started
Delay between felling and milling meant some boards had long cracks in the ends. I cut these out and rejoined the boards without losing evenness of grain. The boards were all 40mm thick so I had to sharpen my old bandsaw and rip 25mm boards to get my 20–21mm thick stock for the sides, blades, shelving and doors (photo 1).
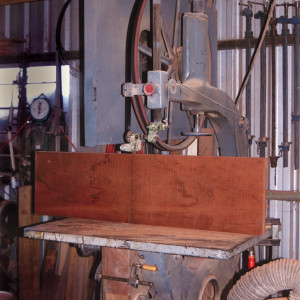
Photo 1: Frank’s faithful old bandsaw was used to rip 25mm stock out of 40mm boards.
Splitting was not a problem but dressing was. The very tight and curly figure kept lifting out the grain. Changing the angle of the planer cutter might have helped but experimenting costs time, so I surfaced one side and thicknessed the boards through my drum sander. It worked fine and I ended up with a full 20mm thickness.
The mudmap called for the sides of the top to be 400mm deep and the sides of the base to be 600mm deep. I considered that to be a little overkill but wouldn’t have questioned it except that the rejoined boards were 530mm wide and adding 70mm would have spoiled the figure on the base. If there is anything about a job that you feel uneasy about talk it over with the customer. Blindly following instructions does not always equal customer satisfaction! We decided on a 500mm deep base and a 330mm deep top.
Building the base
I sorted the timber for the base and cut all pieces to size. Where incorrect seasoning had caused surface checking I filled the cracks and faced them inwards. Pine was used for the bottom and the inside vertical divider, with 70mm cedar facings on the front edges, as I did not want to waste that beautiful cedar on unseen areas. I also used pine for the back blade.
The back edges of the sides were rebated 20mm deep to accept the back panel. The 6–7mm lip left on the side is given a full round. (When I was an apprentice I was taught that the back should be as good as the front – I was obedient in those days.) I then sanded the insides of the sides on the stroke sander with a 240 grit belt for a fine finish. Doing this before cutting the dovetails gets the shoulder up nice and tight and avoids destroying the fit with a careless stroke later.
With my Leigh dovetail jig the base was dovetailed ready for assembly. I have an old aluminium body Black and Decker 1hp router permanently set up for dovetailing. This router is one of four that I picked up some years ago—having them set up ready to go for different tasks saves a lot of time.
The divider was dowelled to the bottom and the two top blades. Before assembling I fitted brass sleeves in the sides and the divider for the adjustable shelves. I usually put in five settings about 30–40mm apart.
I moulded the top edge of the skirting (fig. 1) and glued it together. Fitting a shaped bracket at the inside back corners prevents the bookcase getting damaged if someone slides it sideways.

For the back I fitted 14mm thick pine boards into a mortise and tenoned frame made from ex 70 x 25mm pine (ex meaning the most I can get out of a piece of 70 x 25mm wood). The boards were sanded and fitted into an 8mm groove in the frame before it was glued up. Allowance was made for movement and the outside edges of the boards sealed. This frame and panelled back section was screwed in place.
Top section
The top was made in much the same way. After fine sanding the insides of the components and fitting shelf bushes, I dovetailed (photo 2) and assembled this section.

Photo 2: Dovetailing the top section.
The moulding was made from ex 100 x 25mm cedar on the spindle moulder (fig. 2). I cut the mitres on my docking saw using a home-made mitre board held in place with F-clamps (photo 3). This is heaps quicker than setting up a sliding compound saw.

Photo 3: Mitring the top moulding using a home-made mitre board.
For the back I cut 70mm wide boards out of the cedar left over from ripping the 25mm stock out of the 40mm boards. After tongue-and-grooving and dressing I finished up with a 63 x 11mm thick VJ back. This was screwed in place.
Doors
The three cedar doors have 55mm wide x 22mm thick stiles and top rails and 75mm x 22mm bottom rails. Their joinery is made with typical rail and stile cutters on the spindle moulder (fig. 3).
At the very start of this job I put aside the best timber for the panels. By splitting these from one piece I got three really nice bookmatched pieces that stand out strongly against the fairly plain bookshelf section.
The doors hang on 65mm (2 1/2”) brass hinges and are held closed with magnetic catches fitted at the top of the doors. The handles were supplied by my client.
Finishing
After removing the backs, shelves, doors and hardware I went over the piece with a fine-tooth comb checking for anything that could offend. I applied two coats of sanding sealer, sanding back heavily to fill the grain. This was followed by three coats of pre-catalysed lacquer. I don’t put this on too thick as people today seem to want to see and feel and the wood.
Frank Wiesner is a Toowoomba based master craftsman who has written several stories for Australian Wood Review magazine. This one is reprinted from issue 47.
