Utility Coffee Table

Words and photos: Frank Wiesner
One of the many problems facing the furniture maker is designing. It is just as important to be able to design well as it is to make well. You can always go and learn about it, and that can be a lot of fun, but unless you are entering a competition most people just want something that is functional and fits in with their décor.
A little taste and imagination can go a long way. You don’t have to be a professional to design an item of beauty, although for some projects it is cheaper in the long run to employ one—haggling with a client is time you seldom get paid for. With other clients you agree on the design from the start. The table featured here came about just like that.

A lady called one day and said someone recommended me to custom make some tables. I went out to her little farm just out of town and it was friendship at first sight. I’m sure this has happened to you at one time or another. We went down to what was once an old dairy and there was this jarrah timber—ugly, cracked and dirty. She had dragged it all the way from WA to Qld.
The idea was to make three occassional tables, each with a drawer. It had belonged to her late husband and she wanted something made from it to give to her three children. The timber was a worry but she was such a nice person I did not want to turn her down. She was also on a tight budget but I saw this as a challenge.
On my way home in my old 2A Landrover ute with the 125 x 75mm (5” x 3”) timber on the back, I started designing. I knew the jarrah was nowhere near enough to make three tables, but I had some pencil cedar left over from another job and the two timbers would blend well.
The design sort of gave itself. The size was determined by the material available and the joinery and fittings by the tight budget. I used the jarrah for the legs, the frameworks and the tops, and the pencil cedar for the panels.


Cutting list
TOP: 910 x 550 x 21mm
LEGS: 4/439 x 65 x 65mm
FRAMES:
Stiles 8/329 x 55 x 21mm
Top rails 2/370 x 55 x 21mm, 2/720 x 55 x 21mm
Bottom rails 2/370 x 65 x 21mm, 2/720 x 65 x 21mm
PANELS: 2/294 x 243, 2/644 x 243
DRAWERS: Blades 2/720 x 45 x 21, Packers 4/370 x 65 x 21
Production plan
If you plan your job like this, you won't have to wait for glue to dry as you'll be able to work straight through.
1. Sort out your material.
2. Machine timber for top and glue up. Let glue set.
3. Glue up timber for legs.
4. Make up panels and drawer front. Let glue set.
5. Turn legs.
6. cut panels to size and sand.
7. set out for dowels and drill all holes. Glue up carcase.
8. Cut top to size, sande and attach to base.
9. Assemble drawer, fit and affix front.
10. Remove top and drawer runners and polish all.
Preparing components
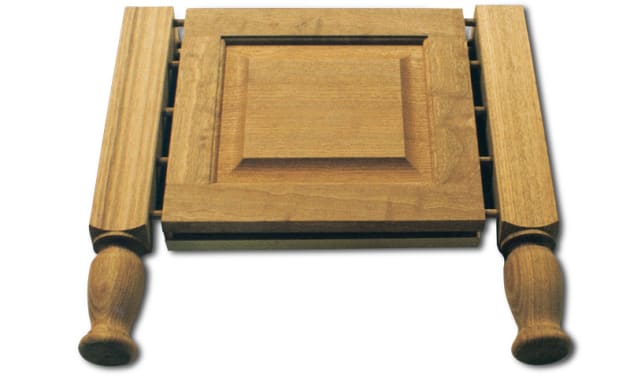
The table shown above is a copy of the ones I made for the lady but made instead from shining gum or Eucaluptus nitens (one of the lesser known eucalypts sold as Tas oak).
After gluing up the top I left it aside to settle for a while. I laminated 38mm pieces to make the legs because I wasn’t able to get any 75 x 75mm sections. I then glued up the panels for the sides, back and drawer. While these were drying I started work on the panel frames.
I always make the bottom rail about 10mm wider than the top rail and the stiles. On this table the bottom rails are 65 x 21mm and the top rails and stiles are 55 x 21mm. The joints are made with a rail and stile cutter but dowels or mortises could be used instead.
The panels are fielded, fine sanded and given a coat of polish before they are fitted in the frames. This way if the panel moves, raw timber won’t show, and glue squeeze-out won’t hold the panel and cause it to split. You can also hold the panels by forming a rebated frame and beading the panel from the outside with an ornamental mould.
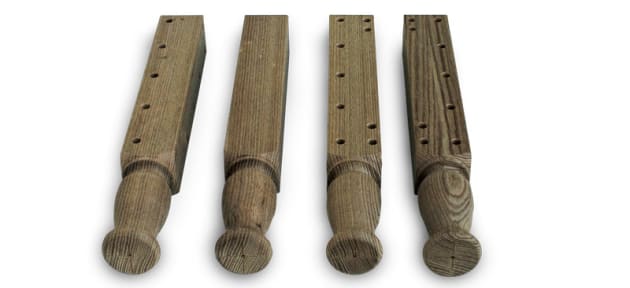
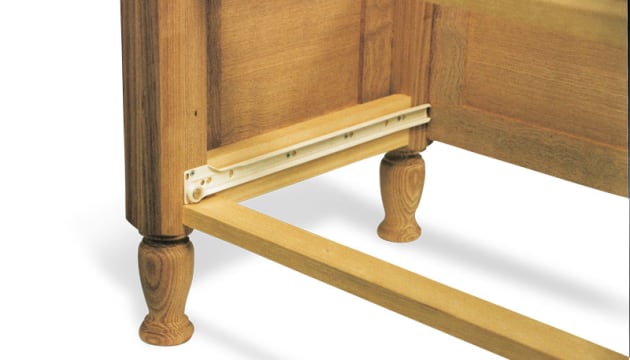
The laminated legs were squared to size and turned. Along with the panel frames they were then dowelled ready for assembly. It is very important to be accurate here, to avoid a twisted carcase. If you use metal runners as I have you also need to prepare packers for them so they are level with the legs on the inside. These are also dowelled in place.
Assembly
After fine sanding I glued the end frames to the legs. When this was dry I glued the back panel and the two front blades in place. The blades are set back from the fronts of the legs and act as drawer stops. As the side and back panels are set in 8mm from the leg fronts the top and bottom drawer blades are also set in 8mm plus the thickness of the drawer front.

My drawer is made from 16mm camphor laurel, dovetailed front and back. As I used bottom-fix metal runners I just glued and nailed the bottom in place. This also added an extra 20mm to the depth of the drawer. When using metal runners it is usual to make the drawer width 26mm less than the opening and allow room at the top for the drawer to slide in over the roller.
After sanding and sizing the top I attached it to the carcase with timber table buttons. The drawer front was screwed on from the inside of the drawer. Instead of handles or knobs I machined a finger slot in the inside bottom of the drawer front.
Finishing
This table is finished with two coats of sanding sealer followed by three thin coats of pre-catalysed lacquer, sanding with 320grit between coats. Sanding the sealer back fairly heavily tends to fill the coarse grain of the Tas oak.
By using metal runners and simple joinery I was able to machine most of this job and keep handwork to a minimum. This kept it within the tight budget, pleasing the customer who was over the moon with the job.
First published in Australian Wood Review issue 44.
Frank Wiesner designs and makes furniture in Toowoomba, Qld.