On Soap Finish

Words and photos: Christopher Schwarz
Christopher Schwarz is founder of Lost Art Press and author of an online blog and several books. This excerpt from The Anarchist’s Design Book was reprinted with his permission in Australian Wood Review magazine, issue 91.
Finishing a piece of furniture with soap is no stranger than covering wood with a bug excretion (shellac), tree sap (varnish), bee stuff (wax) or rendered flax seed (lacquer).
All finishes seem odd when you consider their sources. So when I first learned that soap was a traditional finish for floors and furniture on light-coloured woods in northern Europe, I was intrigued because of what soap is and is not.
Of all the things that will harm you in woodworking, finishes are at the top of the list. Take a look at the material data safety sheet (MSDS) for lacquer thinner. Now do you have the courage to spill the stuff on your skin or inhale it? I don’t.
I’m not a safety nut. Woodworking is dangerous, and I embrace that. Cut yourself or don’t – that is a concept we all get. But when it comes to chemicals that silently build up in my body without me noticing, I’m cautious. I know people who were professional finishers who walked out of a spray booth one day and dropped dead after years of inhaling volatile organic compounds. So soap – a treatment of a natural oil with an alkali solution (such as ashes) – is comforting.
Does it work as a furniture finish? Yes, absolutely. Is it as durable as a lacquer or urethane? Absolutely not. But that is the trade-off with safer finishes such as natural oils, waxes and soaps. They require maintenance, and I’m okay with that.
What is a soap finish?
You can’t just rub a bar of Irish Spring on a chair and call it finished. (Wait, maybe you can. Try it for yourself.) A Danish soap finish uses natural soap flakes that are mixed with hot water. Soap flakes are a pure form of soap that doesn’t include additional detergents, fragrances or other modern chemicals. It is simply an oil that has been mixed with an alkali solution to create a salt of a fatty acid. Our ancestors made soap by pouring tallow (animal fat) onto the ashes from a fire.
You can still buy this important and elemental soap from a variety of sources all over the world. Look for companies that specialise in ‘natural soap flakes’. You’ll find a bunch.
The flakes are white and soft to the touch. They don’t have much of a smell until you mix them with water. Then they will smell just a wee bit. Your nose will register the smell as ‘clean’.

If you mix these flakes with hot water you will produce a solution that is somewhere between whipping cream and a soft wax. Then you can rub this solution on your work to give it some protection and a little sheen. The trick is deciding how much water to add to how much soap.
Two solutions
When I first started to dig into the recipes for a soap finish, I found two types. One used a lot of water and a little soap – a couple spoonfuls of soap and a litre of water was a typical recipe. Then there were recipes that used equal parts soap and water.
I tried both.

When you mix equal parts soap and boiling water you end up with a waxy solution that gives furniture a semi-gloss sheen and mild protection. When you mix a little soap and a lot of water you make a mayonnaise-like solution that is easy to apply and gives furniture a matte finish with mild protection. Neither soap finish is bullet-, baby- or waterproof. But both are easily applied, repaired and renewed.

To mix up a watery solution – what I call ‘soap soup’ – boil four cups of water and pour that into one cup of soap flakes. Stir vigorously. The result looks like bathwater after a long soak. Don’t throw it out in frustration (like I did the first time I made it).
Put the solution in a bottle to let it cool and set up. After a few hours, the liquid turns an opaque white and becomes a bit stiff like shaving cream or mayonnaise. After 24 hours, the stuff is ready to use on furniture.
To mix a hard solution, begin with a cup of boiling water and a cup of soap flakes. Pour about half of the boiling water on the flakes and mix. Add water bit by bit until you get a stiff whipped-cream-like solution. Let that cool and set up. After about an hour it will be waxy and ready to use.

Applying the soap soup is easy. Rag it on so that the wood is wetted and a bit foamy. Let it stand for a couple minutes. Then take a clean rag and wipe off the excess. Let it dry for an hour then sand the surface – I use a #320-grit sanding sponge – and repeat.
After four coats you will start to see some sheen build up. Stop whenever you like the way it looks. Two coats is not unreasonable – nor is 10. To renew the finish in the coming months, apply more soap solution to clean it and create the original soft sheen.
The waxy solution is applied more like a wax. Get a clean cotton cloth and scoop a single dip-sized dollop into the middle. Wrap up the soap and twist the cloth around it to create a ball of rag and soap.
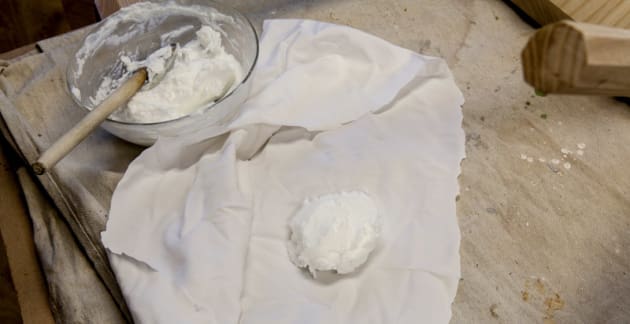
Squeeze the rag and the soap will begin to leach out of the rag. Rub the rag on your work and a small amount of the waxy soap will flow onto the wood. After you finish a leg or seat or door of your project, come back with a clean rag and buff out the soap solution. It will polish up to a semi-gloss sheen like any wax polish.
Repeat the process a couple times until you get the look you want. This soap polish can be renewed at any time. You can use either solution at any point – use the watery solution over the waxy solution if you want to experiment with a flat look. Or vice versa.
It’s a great finish, but it requires upkeep. If you are happy with the ease of melamine or the durability of bartop, you probably won’t like a soap finish.