Make your own veneer press
Words and photos: Darren Oates
Recently I had a commission for a round table with a diameter of 1600mm that required a veneered substrate with a solid timber edging. My vacuum press can only press panels up to 2000 x 1000mm so I had to come up with a new way of pressing large veneers.
I probably could have outsourced the pressing of the substrate, but to not be in control of a piece of furniture that I am being commissioned to make is not something I could ever consider, and I rightly thought that this veneer press would be used again in the future. There have been many times since when my large manufactured veneer press has been lowered down from the spot I now store it.
Materials and construction
The press cost me less than $200 to make and takes panels up to 1600mm in width. If you decide to make one, you will need basic welding skills and access to an MIG welder. The actual welding takes about two hours so you could hire a welder for half a day and still have time to weld up anything else that needed doing around your workshop.
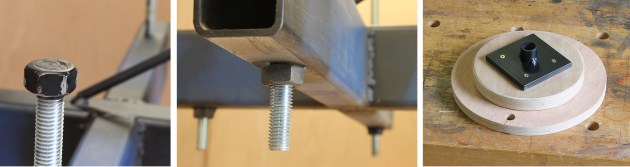
Above left to right: Seven 300mm lengths of 5/8” BSW threaded rod are used. The frame is made from 100 x 50 x 4mm thick RHS. You need 4 x 400mm lengths, and one length that is the distance between your mounting poles – 14 x 5/8” BSW nuts are used for rod ends. Pressure plates made from marine ply with flat steel / tube for locating rods.
I had all the rectangular hollow sections (RHS) metal cut to size by a local metal supplier. You could do this yourself but for around 60 cents a cut it is not worth saving the money as the cuts from the metal supplier will be nice and square and clean.
You will also need threaded rod. I used 5/8" BSW zinc plated mild steel rod, which can be bought from many places including Bunnings. To go with the rod you will need 14 nuts to suit.

1. Your workbench needs to be centred under the press.
To use the press you have to be able to mount the main beam across your workbench. I have two poles in my workshop that I drag my workbench between when using this jig that I can mount the main beam to. I have my setup attached to a chain block and tackle, so when not in use it is raised to its highest level and bolted in place so it doesn’t interfere with any of my normal workshop activities. When lowered for use it is bolted in place to the two vertical beams.
You also need a strong and flat workbench. Like most woodworkers I made my own bench and have confidence that it can handle this sort of work.

2. Use stable timber for the bracing that goes under the substrate.
Welding the frame
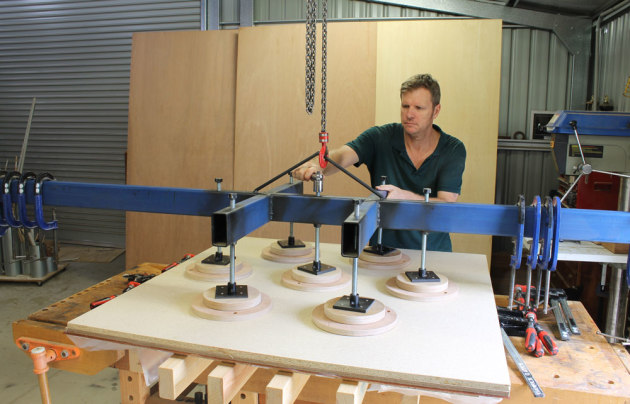
As you can see in the photo at the top of this page, there are seven individual presses that are equally spaced apart. Before welding anything, drill the seven holes, three in the main beam and one at each end of the cross beams with holes large enough to clear the threaded rod.
The cross beams can now be welded in place with a simple butt join. After the side beams have been welded the nuts can be spot welded onto the underside of the jig. You can also weld the remaining nuts onto the ends of your seven lengths of rod. After welding all parts, spray paint them to prevent rusting. If you’re going to store them as I do with a hoist you will have to make an eye for the hook to latch onto that will not interfere with the winding down of the centre press.
Pressure points
Together, the seven individual presses give an even spread of pressure. I made mine out of marine ply mainly because of its stability, but you could use whatever substrate you have lying around the workshop. The diameter of the base is 250mm. The 100 x 100mm flat steel was drilled and screwed to the top section of the press. To keep the threaded rod in the centre of the press I welded a small piece of steel tube onto the top, but this is not really necessary. I drilled a hole in each of the presses so they can be hung on the wall when not in use.

3. Cover the backing board in plastic so the veneer won’t stick to it.
Using the press
Move your workbench so the centre press is in the middle of your four workbench legs and secure to the outside vertical poles or walls. You will need bracing under the substrate – I used eight pieces of 90 x 45mm kiln dried Baltic pine. You want really stable timber here, so don’t scrimp and buy the cheapest radiata pine you can find.
On top of this rests a backing board covered in plastic, as this is the side the glued veneer will be placed on. The last thing you want is for adhesive to seep through the veneer and then glue itself to the backing board as this will cause tearout.

4. Use two-part epoxy or UF adhesive for longer open time.
For a glue-up of this size you will either have to use a two part epoxy or urea-formaldehyde, as you need a glue with a long open time. I use Techniglue which gives me about half an hour to get the substrate into the press. I use a 5" wide piece of perspex to apply the glue. Take care not to apply too much glue. You only want a wet look to both the veneer and the substrate. Too much glue and you’ll have too much seepage through the veneer. Disposable gloves are a must as this stuff gets everywhere and is very hard to wash off afterwards.
Place the glued veneer with the glue side up and then place the substrate on top of this. Start winding down the seven presses so there is even pressure on all (see main photo, p.42). You don’t need a huge amount of pressure for a successful glue-up. The main beam will lift slightly so you will have to go around several times adjusting each press until an even pressure is felt.

5. Once even pressure has been applied, use packers and clamp up.
Now, using packers, use F and G clamps to press the outside of the substrate. I leave these glue-ups in the press overnight. Once out of the press you can tap the ends of your fingers onto the veneer and any spots that are properly glued will make a dull thud and any spots that have not taken will make a much higher pitched lighter sound. This is the second time I have used this press and I have not had any improperly glued spots yet.
The time taken to build this setup has already repaid me in what I’ve been able to press in-house with it. I know I’ll use it many more times, and until then it’s stored in such a way that’s it not taking up valuable workshop space.
Darren Oates is a studio furniture maker in NSW who also teaches at Sturt School of Wood. Learn more at www.darrenoatesfinefurniture.net