First Project: A Simple Stool

Words and photos: John Madden
My daughter has taken up the guitar, so to encourage her I thought I would make her a stool to practise on. I decided on a three-leg design built from solid jarrah that would be simple and stable.
Step 1: Design
When making any object for the first time it’s a good idea to draw the piece and create a cutting list. Upfront planning allows you resolve the design, select suitable construction techniques, make templates if necessary and determine the material requirements.

I start by setting out a plan view of the seat on a sheet of 3mm medium density fibreboard (MDF). First I draw a square on the MDF whose breadth represents the overall width of the seat and whose height is the depth of the seat. I add a centre line from top to bottom which divides the square into two halves, see fig.1. This square is the general parameters of your seat design; draw whatever shape you want within it keeping in mind where the legs will be positioned.
I want this stool to have a triangular shape with rounded corners at each apex. Using a tin can 115mm in diameter, I draw a circle at the top of the square where the centre line dissects and another at the left hand bottom corner 50mm from the bottom edge (fig.1). With these general shapes in place I can sketch out the edge of the seat along one half of the square. When designing a symmetrical object I generally work on one side at a time, as once one side is resolved I can copy it and transfer to complete the overall design.

Taking a pencil I sketch the edge with broad strokes using the setout as I guide. I use the sander like a rubber to remove marks that don’t work (photo 1). After much drawing and sanding the edge line I am seeking begins to emerge; once I am satisfied I take a fine pencil and firm up the final shape. With one half completed I use tracing paper to copy and transfer to a second piece of MDF to make a half template.

This half template allows me to complete my overall design and ensures the shape is perfectly symmetrical. With my drawing complete I cut out the shape and trim. This may seem a longwinded way to make a simple stool seat however learning to make good templates is fundamental to woodwork (photo 2).
Step 2: Making the seat

With my template complete I machine up the seat material to the dimensions shown in the cutting list. Laying the pieces out I place each in position so the growth rings of the wood run in alternate directions in order to minimise wood movement. Choose what will be the upper seen side of the seat and try to position defects to the underside. When I’m happy with the layout I mark across all three sections to record where each piece goes.
Each of the corresponding edges of the wood for the seat must be prepared so they may be successfully glued together. This process is called ‘jointing’ and is completed using either a handplane or a jointing machine. A jointed edge is cut at a perfect 90° angle to the face and is completely straight along its length. When joining longer boards it is advisable to leave a small gap along the mid section of the edge to compensate for movement, however in this project that is not necessary. As a professional I prepare the edges using a jointer as it is fast and accurate.

With the edges prepared I lay the pieces back out and align according to my marks. Placing the seat template in position I mark out the shape of the seat, by doing this I ensure I do not place joining biscuits in positions where they could be cut through and exposed—trust me it does happen. I mark out the biscuit positions about 100mm apart, set the biscuit machine at half the thickness of the boards and cut. Ensuring your edges are free of dust, glue the seat with a high quality PVA and clamp (photo 3).

Once dry you can clean up the seat blank in a variety of ways such as using a a smoothing plane, a belt sander or in this case I drop into Wood N You and for a few dollars run the piece through their wide belt sander to give me a beautifully flat finished blank. I redraw the seat shape onto the blank and cut out the seat using a jigsaw. The general shape may be cleaned up with a spokeshave or a belt sander. I am very proud of my inverted belt sander jig (photo 4).
Step 3: Making the legs
With my remaining jarrah I machine the leg blanks to size as specified in the cutting list. The seat of the finished stool needs to be about 450mm from the ground and each leg will be 35mm in diameter. I oversize the length of each leg so I have plenty of material to work as the legs will be docked to size later.
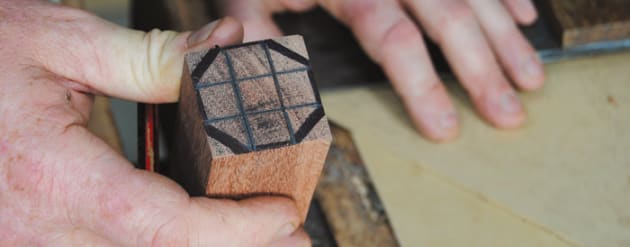
Using a marking gauge I divide each face of the leg section into thirds and I continue these marks across the endgrain as well (photo 5). I can now draw an octagon on each end—within that will be the circular shape of the finished leg. I ensure the marking out results in a circle slightly larger than the final diameter of 35mm. I need extra material to trim away when fitting the leg into the seat. The marking lines are my guides as I cut away timber to reveal the final shape. I remove the bulk of material using the tablesaw set at 45°—running each piece through removes the four corners of the section and reveals the octagon.
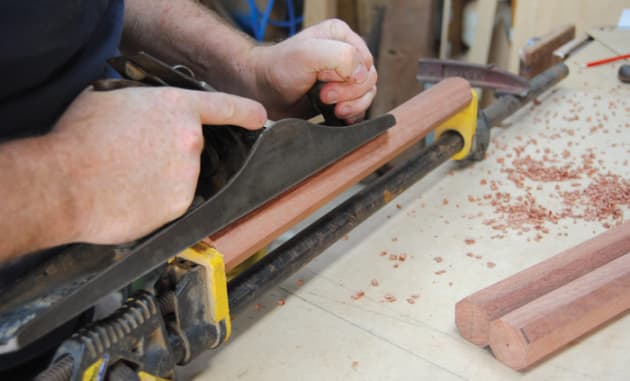
Securing a pipe clamp to my bench, I can hold the leg lengthways so I can work the piece with a handplane. Rotating the leg as I work and keeping an eye on my marks at the ends, the final circular shape of the leg emerges (photo 6). I tune up the final shape with a spokeshave.
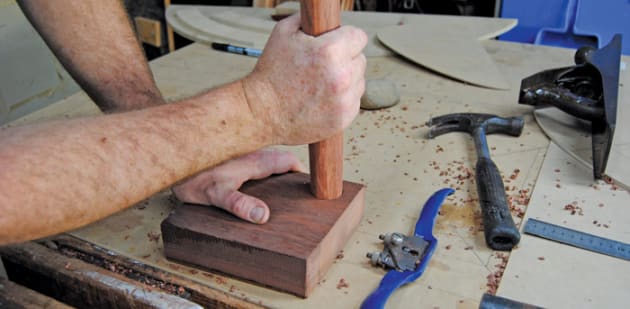
Using a forstner bit I bored a 35mm diameter hole in some scrap to act as a fitting template. Holding each leg in the bench vice, I use the spokeshave to trim one end of the leg down so it almost fits the hole (photo 7). Leave a bit of extra material for the final fit and glue. I finish all three legs to this point and set aside. The next step is to drill holes in the seat.
Step 4: Fitting the legs
Deciding on the leg positions and angles is probably the trickiest part of this job. It is critical that the legs are spread wide enough so the stool will be stable and also aesthetically pleasing.
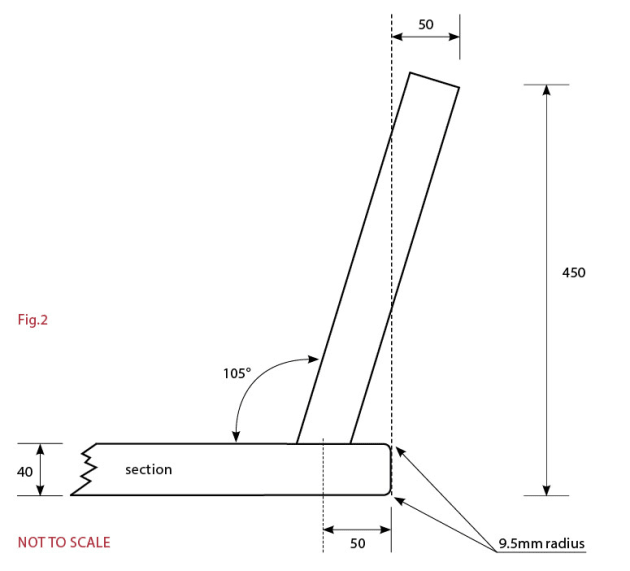
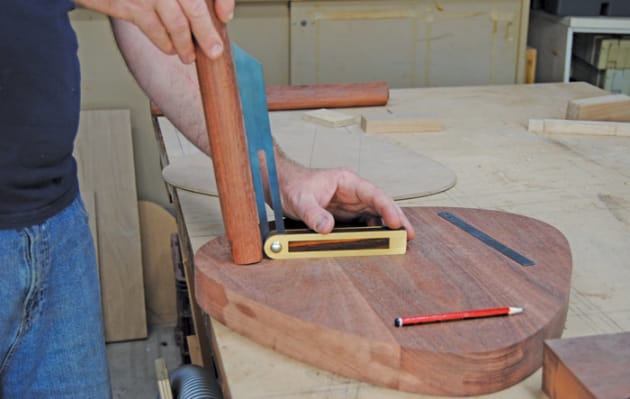
By drawing an elevation of the stool I can explore various arrangements before committing to one design (fig.2), however in this case I decide to simply eyeball the angle and trust my instincts. Centering a leg 50mm in from the underside edge at the corner apex, I lean the leg out so it finishes about 50mm out from the seat edge. I am happy with this angle so I take a measurement using a bevel gauge (photo 8).

Drilling of the holes will be completed on my drill press so I need to make a jig that will hold the seat at the same angle in relation to the forstner bit as the bevel gauge setting, in this case 105° (photo 9). If you do not have a drill press you could drill the holes freehand using the bevel gauge as guide, or even a build a jig to guide your hand drill. Whichever technique you adopt, be sure to mark the entry point with a scribe and don’t drill right through the seat.

Placing the completed seat section on my bench I take a piece of 80 grit sandpaper and tune each leg down to fit the holes firmly. I angle the end of each section slightly with my pull saw so the leg lands snugly into the full depth of the hole. Before gluing the legs in I soften the seat edges by routing with a 9.5mm radius rounding over bit. The best glue to use for this joint is an epoxy resin as it is extremely strong and has the capacity to fill any voids within the joint. I set clamps to hold each leg exactly in position. The epoxy requires eight hours to cure (photo 10).
Step 5: Finishing

The next morning I can pull the job out of the clamps and set it on the bench to assess in preparation for trimming those oversized legs. Measuring down each leg I mark with a pencil and dock each end with the pull saw. Using various rasps and sandpaper I round off each of the legs ends to a dome that will slide easily across carpet and also be very stable on hard surfaces (photo 11).
I begin to sand the piece all over by hand starting with 80 grit sandpaper to remove any excess glue and to smooth over any ripples on the shaped legs. Then moving up through the grades from 120 grit to 180 grit, using both my electric sander and by hand to complete.
I clean the sanded stool with my air tool ready to oil. I used Feast Watson’s Floorseal for the finish. This tung oil based product produces a very hardy and beautiful finish, the trick is multiple thin coats with sanding between each application. I apply a liberal first coat just on the underside and legs using a clean cloth, wait about three minutes for the oil to start tacking off and rub down thoroughly to remove all excess oil from the surfaces.
Pay attention as this product can tack off quickly and become difficult to rub down; thin with mineral turps if this happens. Turning the piece over, I repeat the process to the seat and edges—remember it is critical to remove all the excess oil. Leave the job for 12 hours to dry then sand all over with 240 grit paper, re-oil and rub down. Repeat this process up to five times moving up through the grades of sandpaper until you are satisfied with the finish, applying oil with superfine steel wool speeds up the process.
Well there it is, all done. My daughter now has a piece she can keep for life whether she continues to play the guitar or not. There is a lot to be said for simple things, they are fun to make and a pleasure to keep around.
First published in Australian Wood Review issue 73.